
This article is intended to give you an overview of the steps required to migrate a legacy Liferay MVC Portlet to Liferay 7, and give you some helpful pointers so your first Liferay 7 MVC portlet goes smoothly. This tutorial shows how I migrated the Xtivia ExcelChart portlet, which parses an Excel file stored in Liferay’s Document Library using Apache Poi then it displays the chart using the Google Charts API. More information on this portlet can be found here. To get the most from this article, I recommend that you have an existing portlet that you want to migrate to Liferay 7.
You may have heard that Liferay 7 is much different than Liferay 6x. Yes, it is. Both the UI and the underlying architecture have changed dramatically. These are big design changes, and the goal of this article is to help you have a good first experience migrating Liferay Portlets. Some of the highlights are:
- The directory structure of a Liferay MVCPortlet has been simplified greatly.
- Because of the move to OSGi, the way dependencies are included and deployed in custom plugins has completely changed.
- Packages for many classes have changed, for example: com.liferay.portal.util.PortalUtil has been moved to com.liferay.portal.kernel util.PortalUtil.
My Approach
I started down the path of using Liferay’s Code Upgrade Tool, described here, but ran into several unexplained errors related to setting up the new environment. I scrapped that approach and decided to generate a brand new portlet, add in custom code and test along the way. I documented everything here so you will gain a better understanding of the specific implementation steps for creating a new portlet from the ground up.
Liferay 7 uses a new core platform; OSGi, which has several benefits and side effects
If you’re new to OSGi, it’s important to understand a few basics about it.
- OSGi is a modularity system for Java, and is described as the ‘Dynamic Module System for Java’, by it’s website, here.
- It adds boundaries, loose coupling, and facilitates a complex system made up of many simple systems. See a good intro to OSGi here.
- Some of the core Liferay jar files and class names have been broken up and/or renamed. For example, Liferay has broken apart portal-service and renamed it portal-kernel. It has also broken up other dependencies into separate jar files, so when you declare a dependency, you need to locate the new jar file name and package structure associated with it. See more detail here
- In Liferay 7, you can uninstall an unwanted module, blogs for example, without affecting the overall Portal functionality.
New Development Tools and Methodologies
Liferay has introduced some new and powerful tools to help developers create portlets. The main ones, and the ones I discuss here, are Blade CLI and Felix Gogo shell. In this section, I am also going to show you how to delete the OSGi cache.
Blade CLI
In a nutshell, Blade CLI is Liferay’s new command line interface tool for managing custom OSGi modules, which could be a theme, a service builder portlet, an MVC portlet, a hook, etc. Although you can still create and deploy old-school style portlet .war files on Liferay 7, Blade is the prescribed way to create OSGi modules. With Blade, you can do things like create and deploy new portlet stubs, migrate an SDK theme to a new workspace theme, open or import a project into Liferay IDE, start Liferay, update Blade, generate a sample project, etc.
Felix Gogo Shell
The Gogo shell is a command line tool from Apache which manages the modules that have been deployed to Liferay. It uses a telnet interface to connect to the server and allow you to manage your installed modules.
To use Gogo, make sure Liferay is running, then from a command prompt, execute:
telnet localhost 11311Once you see the welcome message, execute the ‘list modules’ command, which is simply
lbYour screen will look like this:
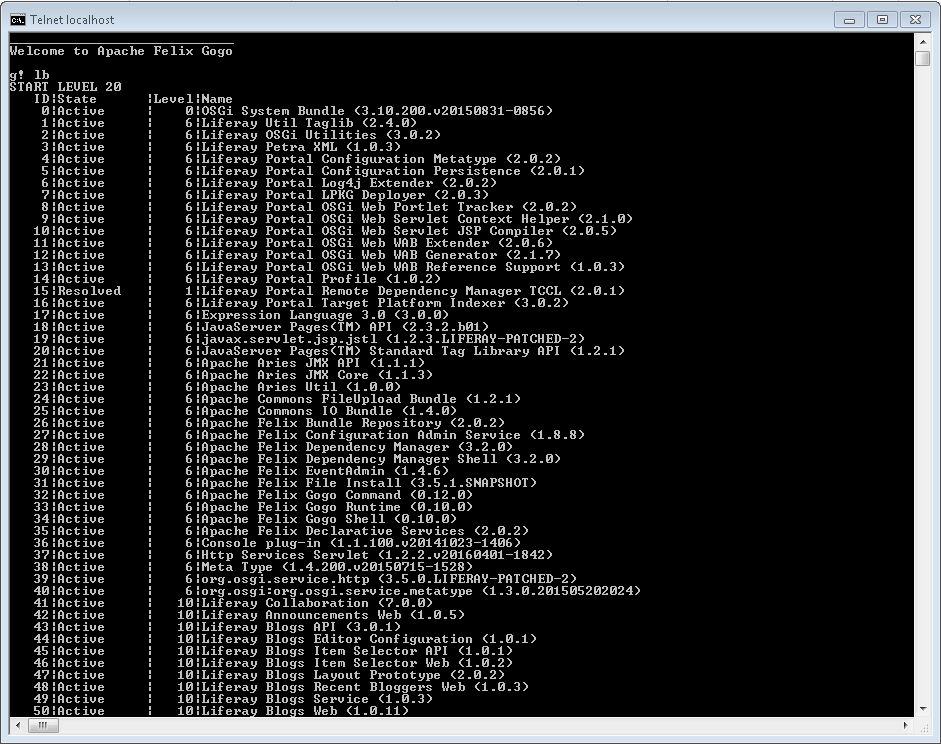
On my install, Liferay has 496 bundles (a.k.a. modules) installed. Gogo provides a grep command to only see the modules you want. I was happy to discover this command, since the list of bundles is very large. This command is case-sensitive, as shown below:
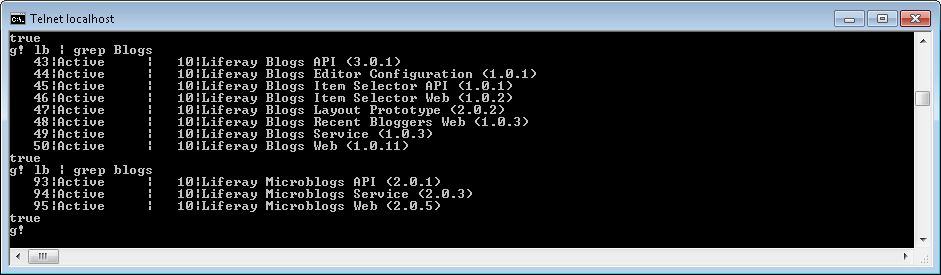
The portlet I’ll be working on is the excelchart at the end of the list with an id of 515.
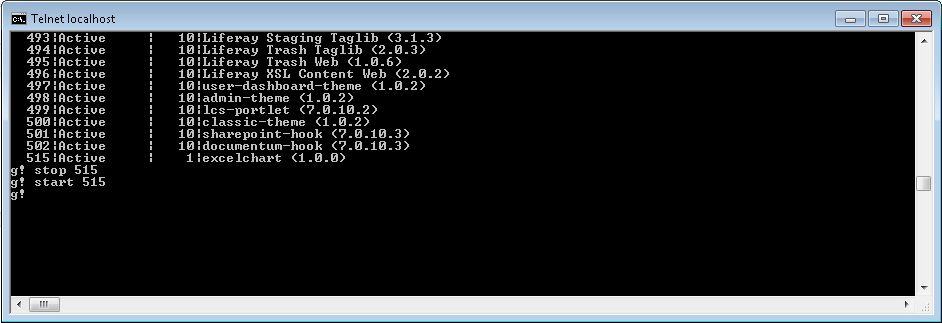
There are several useful commands I can run against this portlet (id=515), which are:
-
uninstall 515This uninstalls the bundle/portlet. After running this command, refresh your
Liferay screen and you’ll see that the portlet has been uninstalled. -
stop 515This command stops the portlet, but does not uninstall it. However, the Liferay UI treats this exactly the same as an uninstall, in that after running this command, the portlet will no longer exist in the ‘Add Applications Panel’ and if you’ve already added the portlet to a page, you’ll see the ‘this portlet has been undeployed’ message. After running this
command, you will see it’s level (status) has changed to ‘Resolved’. -
start 515This starts it back up so it can be added to pages, etc. After starting this, you will see its level (status) has changed to ‘Active’.
Clearing the OSGi Cache
If you’re having trouble seeing changes you’ve deployed, like I was, you can delete the module from the OSGi cache. Here are the steps:
- In the Gogo shell, identify the id of the module you want to delete.
- Stop Tomcat
- Delete the dir at:
%TOMCAT_HOME%\osgi\state\org.eclipse.osgi\<id from step 1> - Start Tomcat
Now that we’ve discussed the tools, let’s get on with the actual migration steps.
Step 1: Install Required Software
- Install Liferay 7. You don’t need a Liferay workspace. The Liferay documentation does not make this clear, but you only need a Liferay workspace if you intend to start Liferay via the Blade command line tool, which is totally optional.
- Install Blade CLI locally, by following the instructions here.
Step 2: Generate a New Portlet Stub
- Next, create an MVC portlet via the command line. Blade provides archetypes similar to maven that allows you to create your project stubs with 1 command. The command to create my MVC Portlet module is this:
      blade create -t mvcportlet -p com.xtivia.demo -c
ExcelChartPortlet ExcelChart
Where -t = type, -p = package, -c=class. ‘ExcelChart’ is the moduleName.
- Next,
cdinto yourExcelChartdir and executeblade deployNote: Liferay must be started for a successful deployment.
Here’s what your command prompt should look like at this point:
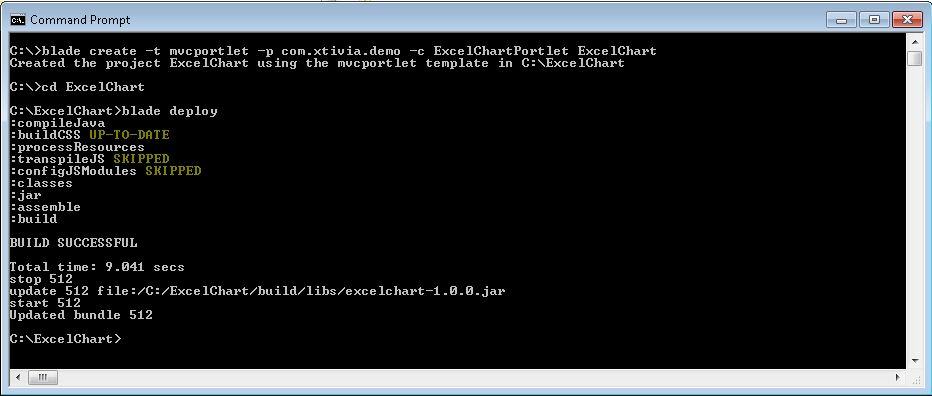
- If Liferay is started and the deployment is a success, you’ll see this message in the Liferay console:
17:56:24,176 INFO [Thread-383][BundleStartStopLogger:35] STARTED excelchart_1.0.0 [511] - Now, go to Liferay and add the portlet to a page, just like you’ve done in the past with one difference. The panel to select portlets is now on the right side, instead of the left.
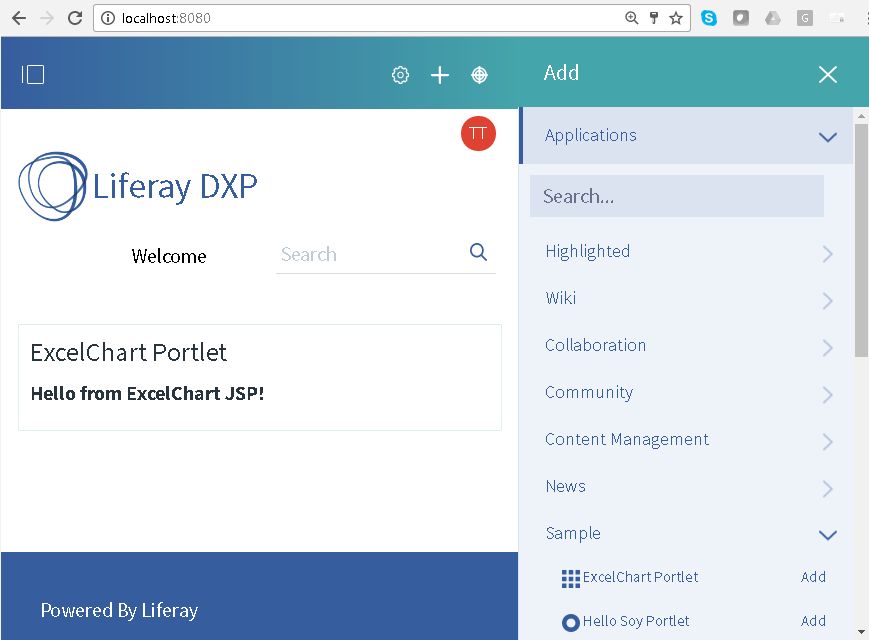
- Let’s go look at the code and see the differences between the traditional MVC Portlet and the new Liferay7 MVCPortlet.
- Open Eclipse (or Liferay Developer Studio) and import your project, by selecting
File->Import->Gradle->Gradle Project, then browsing toC:\ExcelChart.Here’s my workspace:
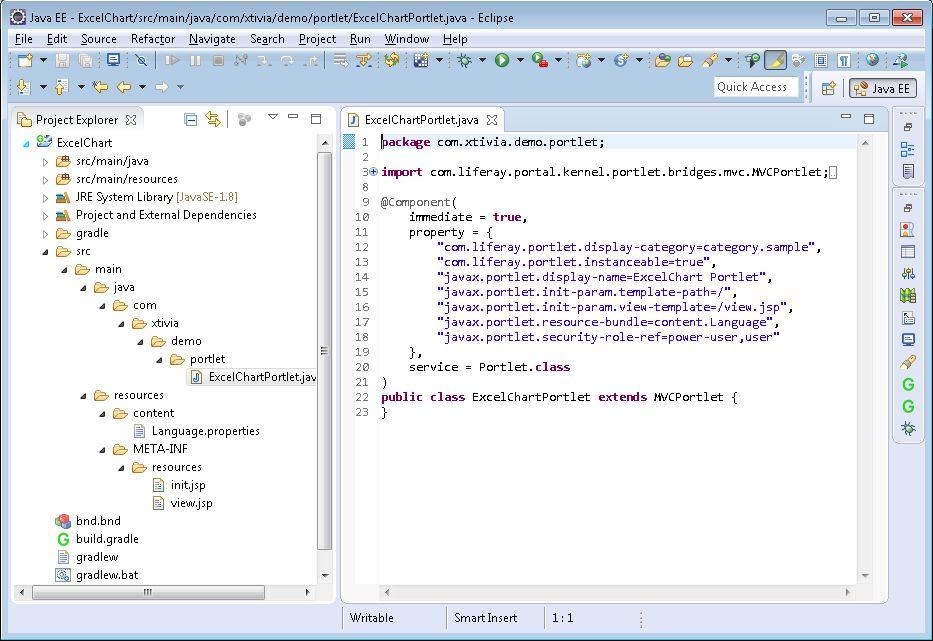
- Notice a few interesting things about your new project structure
- Overall, it is much simpler and has fewer files.
- The
WEB-INFdirectory is gone - The various settings that used to exist in the
WEB-INFdirectory (web.xml, portlet.xml, liferay-portlet.xml, liferay-display.xml, etc) have been moved to the top of your new portlet class as annotations. I really like this change. It’s much simpler and requires less files to manage. - By default, your portlet has a pre-configured
Language.propertiesfile so you can get started with properly localizing the portlet easily. - There is no maven pom.xml or ant build.xml file, since Liferay 7 portlets use Blade CLI, which is based on gradle.
Step 3: Add a Configuration Screen with a Configurable Field
Liferay 7 introduced a slightly different way of handling portlet configuration screens. Let’s add a config screen to set a ChartTitle, to start with. Here are the steps.
- Add a new interface with the following contents:
package com.xtivia.demo.config; import aQute.bnd.annotation.metatype.Meta; @Meta.OCD(id = "com.xtivia.demo.config.ChartConfig") public interface ChartConfig { public static final String FIELD_CHART_TITLE = "chartTitle"; @Meta.AD(required = false) public String getChartTitle(); } - Notice the new import for the Meta class. This will be resolved by adding a dependency to your
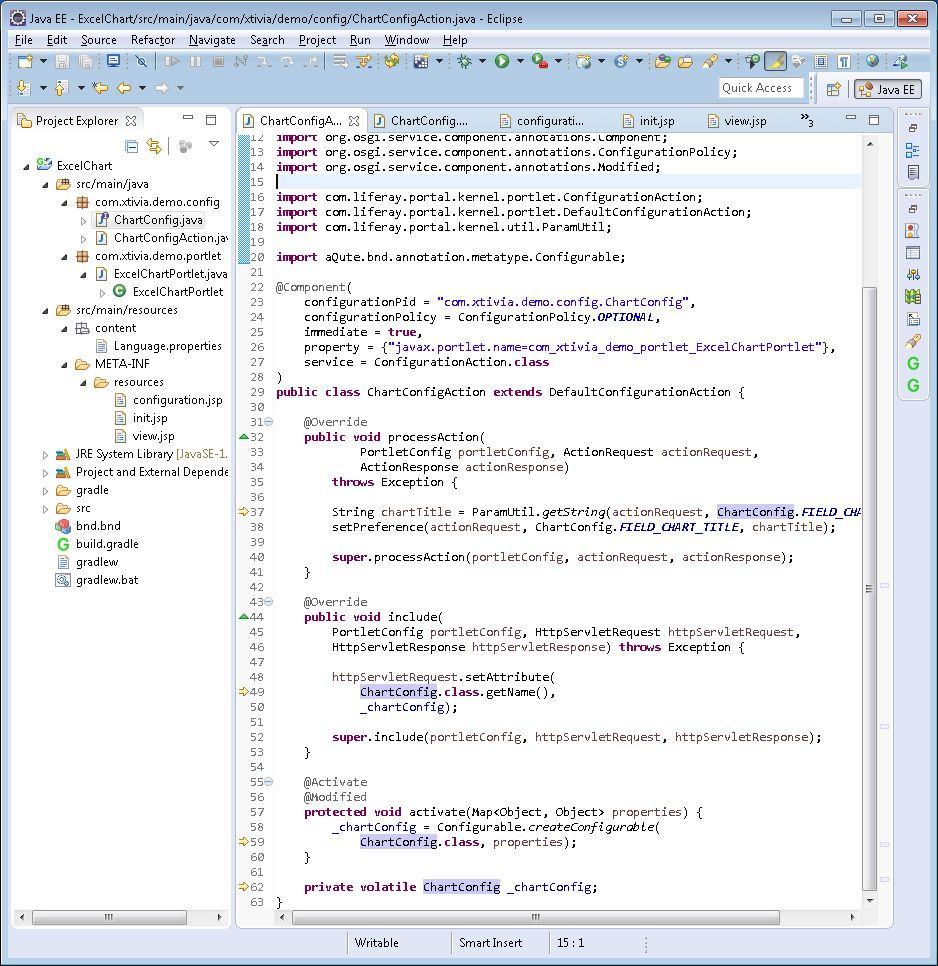
build.gradlefile. Add this line to your dependencies section:compile 'biz.aQute.bnd:biz.aQute.bndlib:3.1.0' - Add a new Configuration Action class with the following contents:
package com.xtivia.demo.config; import java.util.Map; import javax.portlet.ActionRequest; import javax.portlet.ActionResponse; import javax.portlet.PortletConfig; import javax.servlet.http.HttpServletRequest; import javax.servlet.http.HttpServletResponse; import org.osgi.service.component.annotations.Activate; import org.osgi.service.component.annotations.Component; import org.osgi.service.component.annotations.ConfigurationPolicy; import org.osgi.service.component.annotations.Modified; import com.liferay.portal.kernel.portlet.ConfigurationAction; import com.liferay.portal.kernel.portlet.DefaultConfigurationAction; import com.liferay.portal.kernel.util.ParamUtil; import aQute.bnd.annotation.metatype.Configurable; @Component( configurationPid = "com.xtivia.demo.config.ChartConfig", configurationPolicy = ConfigurationPolicy.OPTIONAL, immediate = true, property = {"javax.portlet.name=com_xtivia_demo_portlet_ExcelChartPortlet"}, service = ConfigurationAction.class ) public class ChartConfigAction extends DefaultConfigurationAction { @Override public void processAction( PortletConfig portletConfig, ActionRequest actionRequest, ActionResponse actionResponse) throws Exception { String chartTitle = ParamUtil.getString(actionRequest, ChartConfig.FIELD_CHART_TITLE); setPreference(actionRequest, ChartConfig.FIELD_CHART_TITLE, chartTitle); super.processAction(portletConfig, actionRequest, actionResponse); } @Override public void include( PortletConfig portletConfig, HttpServletRequest httpServletRequest, HttpServletResponse httpServletResponse) throws Exception { httpServletRequest.setAttribute( ChartConfig.class.getName(), _chartConfig); super.include(portletConfig, httpServletRequest, httpServletResponse); } @Activate @Modified protected void activate(Map<Object, Object> properties) { _chartConfig = Configurable.createConfigurable( ChartConfig.class, properties); } private volatile ChartConfig _chartConfig; } - Modify the
init.jsp:<%@ taglib uri="http://java.sun.com/jsp/jstl/core" prefix="c" %> <%@ taglib uri="http://java.sun.com/portlet_2_0" prefix="portlet" %> <%@ taglib uri="http://liferay.com/tld/aui" prefix="aui" %> <%@ taglib uri="http://liferay.com/tld/portlet" prefix="liferay-portlet" %> <%@ taglib uri="http://liferay.com/tld/theme" prefix="liferay-theme" %> <%@ taglib uri="http://liferay.com/tld/ui" prefix="liferay-ui" %> <%@ page import="com.liferay.portal.kernel.util.StringPool" %> <%@ page import="com.liferay.portal.kernel.util.Validator" %> <%@ page import="com.xtivia.demo.config.ChartConfig" %> <portlet:defineObjects /> <liferay-theme:defineObjects /> <% ChartConfig ChartConfig = (ChartConfig)renderRequest.getAttribute(ChartConfig.class.getName()); String chartTitle = StringPool.BLANK; String chartWidth = StringPool.BLANK; if (Validator.isNotNull(ChartConfig)) { chartTitle = portletPreferences.getValue(ChartConfig.FIELD_CHART_TITLE, ChartConfig.getChartTitle()); } %> - Add a
configuration.jspfile in theMETA-INF\resourcesfolder. Note: it must be named ‘configuration.jsp’, exactly or it won’t work.<%@ include file="/init.jsp" %> <%@ page import="com.liferay.portal.kernel.util.Constants" %> <liferay-portlet:actionURL portletConfiguration="<%=true %>" var="configActionURL" /> <aui:form action="<%= configActionURL %>" method="post" name="fm"> <aui:input name="<%= Constants.CMD %>" type="hidden" value="<%= Constants.UPDATE %>" /> <aui:input label="Chart Title" name="chartTitle" value="<%=chartTitle%>" /> <aui:button-row> <aui:button type="submit"></aui:button> </aui:button-row> </aui:form> - Modify the
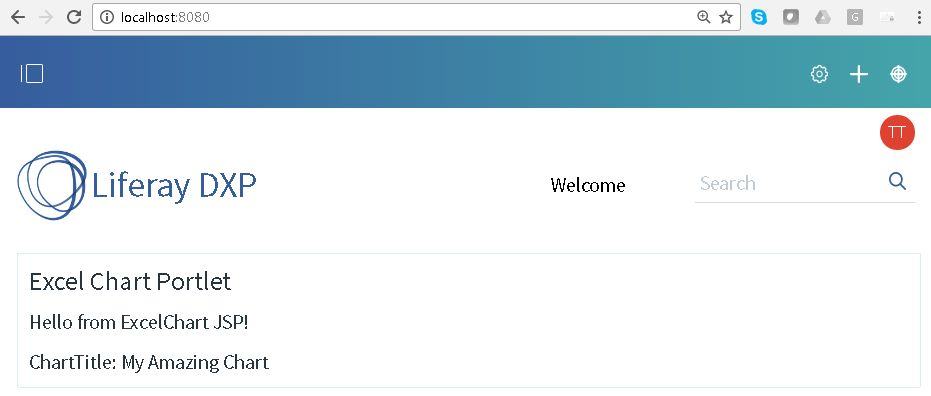
view.jspto display either an error message or your new ChartTitle value:<%@ include file="/init.jsp" %> <p> <liferay-ui:message key="excelchart_ExcelChart.caption"/> </p> <% boolean noConfig = Validator.isNull(chartTitle); %> <c:choose> <c:when test="<%= noConfig %>"> <p> Please configure this portlet. </p> </c:when> <c:otherwise> ChartTitle: <%=chartTitle %><br> </c:otherwise> </c:choose> - At this point, your project structure should look like this:
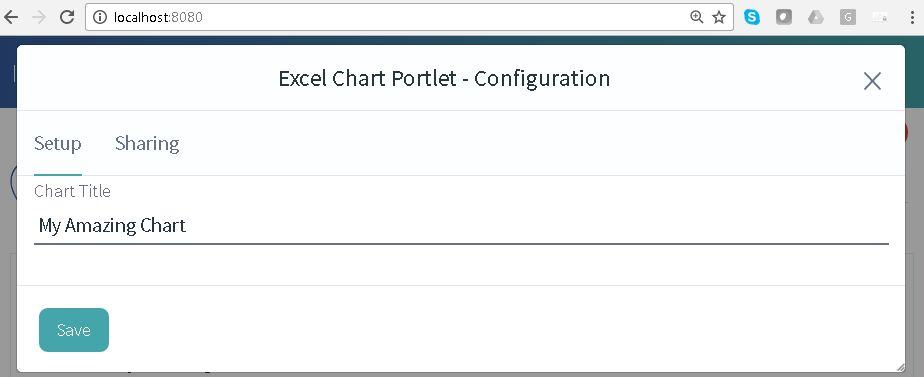
- After deploying your portlet again, hover over the portlet’s title bar and click the vertical ellipses, then Configuration. You’ll see the new screen in a tab labeled Setup.
- Enter a new value and click save, then close the dialog.
- You’ll now see your new value.
Step 4: Add Field Validation
To add basic field validation and show proper messages, you need to modify 3 files.
ChartConfigAction.java(processAction method)@Override public void processAction( PortletConfig portletConfig, ActionRequest actionRequest, ActionResponse actionResponse) throws Exception { String chartTitle = ParamUtil.getString(actionRequest, ChartConfig.FIELD_CHART_TITLE); if (Validator.isBlank(chartTitle)) { SessionErrors.add(actionRequest, "errorChartTitle"); // hides the default error message 'Your request failed to complete.', so we can add the more specific error message. SessionMessages.add(actionRequest, PortalUtil.getPortletId(actionRequest) + SessionMessages.KEY_SUFFIX_HIDE_DEFAULT_ERROR_MESSAGE); } if (SessionErrors.isEmpty(actionRequest)) { setPreference(actionRequest, ChartConfig.FIELD_CHART_TITLE, chartTitle); } super.processAction(portletConfig, actionRequest, actionResponse); }configuration.jsp(add 1 line):<liferay-ui:error key="errorChartTitle" message="message.error.title.missing" />Language.properties(add 1 line)message.error.title.missing=Please specify a Chart Title.
Step 5: Add the Remaining Custom Code
Now that all the boilerplate code has been written, deployed and tested, you’ve got a good template that can serve as a baseline for future portlets. Rather than go through each individual step here, you can download the working version of the Liferay 7 XTIVIA Excel Chart Portlet* from our website.
* Note: As of this writing, I found a bug related to Apache Poi and OSGi, which prevents .xlsx files from being properly parsed in an OSGi environment. There is no problem parsing the older Excel file version (.xls files).
Summary
Due to the new OSGi architecture and the new standardized tools Liferay provides, Liferay is much simpler to customize and deploy. Blade CLI and Felix Gogo shell, facilitates a more highly integrated development environment for custom portlets, hooks, themes, etc, which encourages simplicity and speed of deployment. Overall, code is more enjoyable to write and you don’t need to worry about all the implementation details. The OSGi architecture allows you to componentize your Liferay install and remove any extra modules, making Liferay truly customizable for each client’s needs.
If you have questions on how you can best leverage Liferay’s new architecture or creating / upgrading MVC Portlets, or if you need assistance with Liferay DXP migration planning and execution, please reach out to us.
Additional Reading
You can also continue to explore Liferay DXP by checking out The Top 10 New Features in Liferay DXP 7 from a functional perspective, or Top 5 New Features in Liferay DXP UI Development and Creating JAX-RS REST Services in Liferay DXP from a development perspective, or Top 5 DevOps Features in Liferay DXP from a devops perspective or Liferay DXP Audience Targeting.
I have a portlet in 6.2 and i have to make same requirement on liferay dxp and i don’t have any idea can you suggest me please.