This is part 2 of a series written for UI-dev/FED new to Liferay. This assumes you’re solid with css/html/javascript, and have at least a passing understanding of dynamic languages like PHP or ASP. If you have a Java background, you may want to skip the parts that explain stuff you already know. This post builds on the last post, so if you haven’t read that one, you might want to go back and do that first.
This time we’ll build a non-architectural footer. The mega-footer’s been around for several years now and users have gotten used to it. But in a majorly complex site, you might find that the footer doesn’t actually mimic the entire architecture; it’s not a site map that’s just couched in the footer. Instead, it’s a menu that calls out specific pages based on some organization other than the site map. Frex, the architecture’s headers are Solutions, Services, Products, and Support — but the footer’s headers will be Learn More, Latest News, More Information, etc. These don’t really “map” to the architecture, which is why I call it a non-architectural menu.
You can see more examples over at the Footers Design Gallery. My version looks like this:

The first step is to figure out our structure, starting with the headers. You can see the five columns I chose in the screenshot. Then we do a bit of css to get the columns.
    footer {
 margin: -23px 0 0 0;
 background: #EEE;
 display: block;
 overflow: visible;
 height: 208px;
 clear: both;
 border-top: 1px solid #AAA;
 }
 .footer_inner {
 margin: 0 auto;
 width: 100%;
 text-align: center;
 }
footer a { color: #555; text-decoration: none; } footer a:hover { color: #222; text-decoration: none; }
footer ul li {
list-style: square;
color: #555;
margin: 0 0 .25em 0;
}
footer ul li:hover { color: #222; }
footer ul li span:hover { color: #222; }
footer h4 {
margin: 6px 0 3px -12px;
color: #444;
font-weight: 600;
}
Next up is the custom field, which I’m calling “pagetag”. On the Custom Fields page, add a page-level field called “pagetag”. Here’s what my page looked like when I was done (ignore the other custom field for now, that’s next post).
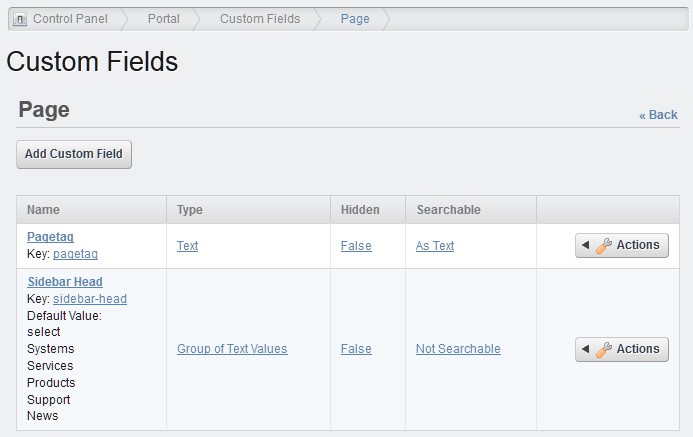
You’ll notice “pagetag” has no values. It’s an input field, not a drop-down. You can do either, really. An input field has the drawback that if the admin can’t spell, links won’t show up since the tag-text must match exactly what you’re looking for. If you do it as a drop-down, you can bypass the need for proper spelling (can capitalization) and offer the admins a limited selection. We’ll be covering the drop-down version in the next post.
The other thing an input field can do (along with checkboxes) is to easily allow multiple tags. If you look back up at the example screenshot, you’ll see “Solutions Group B” is listed in two places. If you’ve got pages that are important enough to get repeated, or that users might look in several places for, you can add those pages wherever, as many times as you like. Just add the tag in a comma-delineated list and off you go.
Now that you’ve got your input field, head to your individual pages. Go to the Custom Fields option in the inset (right-hand) menu. There’s now an input field called “pagetag” — enter the keyword you want to use for your various headers. In my case, I’m using learn-more, latest-news, more-info, solutions, and other. Give each tag to a handful of pages, just so there’s enough to show up in the footer.
Next we start building the loop to pull out these tagged pages. Like I mentioned in the last post, velocity doesn’t have a way to just hand you all the pages on a plate. That means we’ve got to set up an array, because the trick behind this menu is that we’re completely setting aside any child/parent heirarchy. We need everything in one big bundle. We get that by looping through all the levels and adding each menu-item into one array.
  #set( $navBiglist = [] )
 #foreach ( $nav_item in $nav_items )
 #set ( $navItem = $nav_item )
 #set ( $addthis = $navBiglist.add($navItem) )
 #if ( $nav_item.hasChildren() )
 #foreach ( $nav_child in $nav_item.getChildren() )
 #set ( $navItem = $nav_child )
 #set ( $addthis = $navBiglist.add($navItem) )
 #if ( $nav_child.hasChildren() )
 #foreach ( $nav_child in $nav_child.getChildren() )
 #set ( $navItem = $nav_child )
 #set ( $addthis = $navBiglist.add($navItem) )
 #if ( $nav_child.hasChildren() )
 #foreach ( $nav_child in $nav_child.getChildren() )
 #set ( $navItem = $nav_child )
 #set ( $addthis = $navBiglist.add($navItem) )
 #end
 #end
 #end
 #end
 #end
 #end
 #end
This array ($navBiglist) contains every page in the site. Each item in the array is an object, and that means we can fetch any property we like — including the ExpandoBridge properties. After all that prep, the actual substance of the footer menu is pretty simple:
    <div class="column5">
 <h4>Learn More</h4>
 <ul>
 #foreach ( $nav in $navBiglist )
 #set ( $pagetag = $nav.getLayout().getExpandoBridge().getAttribute("pagetag"))
 #if ( $pagetag.contains("learn-more") )
 <li>
 <span>
 <a href="$nav.getURL()" $nav.getTarget()>$nav.getName()</a>
 </span>
 </li>
 #end
 #end
 </ul>
 </div>
When you cut & paste to create the second column, just replace the Learn More in the h4 and the learn-more in the first #if. Repeat for all five columns, and there you go. Your footer menu is done, and you can add/remove pages on the fly, just by changing the value of the custom field for a page.
(No, really, it is that simple!)
Obviously it’s a little more work if you ever want to change the title-headers to be something completely different. Since this is input-field based, it’s not quite as easy to change compared to when it’s based on a preset drop-down list. We’ll get to that in the final post on advanced navigation.