
NextJS and Gatsby are two of the most dominant frameworks in the ReactJS space. Both have great pluses and both are great choices to work with, making both great technologies to learn. A great way to learn both is recreating components in each. In this article we will go over some differences to look out for when converting components between the two.
Converting Components Between NextJS and Gatsby: Grabbing Component Data
It’s very common to have components that fetch data from a third-party source.
NextJS
With NextJS we would use either the getStaticProps or the getServerSideProps functions to fetch data. Our fetching methods are not limited, we could use any available data fetching methods be it Rest or GraphQL and use any library of our choice.
export const getStaticProps = () => {
   // logic to fetch the data
   return {
       props: {
           // data you fetched
       }
   }
}
NextJS: getStaticProps
NextJS getStaticProps is used when doing Static Site Generation (SSG).
export async function getServerSideProps(context) {
  return {
    props: {}, // will be passed to the page component as props
  }
}
NextJS: getServerSideProps
NextJS getServerSideProps is used when doing Server Side Rendering(SSR) of pages.
Gatsby
Main difference between GatsbyJS and NextJS in terms of fetching third party data is Gatsby’s Data Layer. With Gatsby all third party data is pulled into its data layer and then we can query data from the data layer using Graphql queries. The below diagram explains the logical flow of data in Gatsby application.
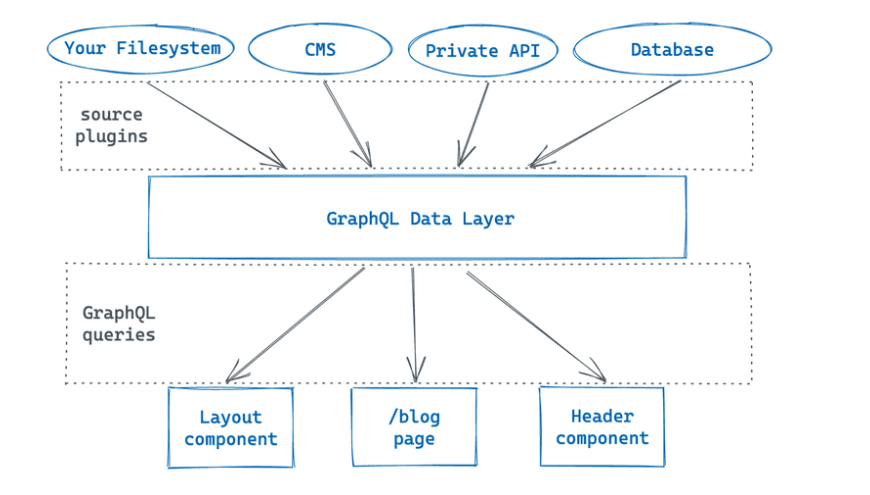
Image courtesy: GatsbyJs Tutorial
With Gatsby Data Layer, we have to use GraphQL to fetch all our data. GraphQL allows the client to define the structure of the data and the server responds accordingly. To fetch data in Gatsby, we use the useStaticQuery hook and pass a graphql query. Another option that was added in Gatsby v2 is using the StaticQuery component. This component lets us pass in a graphql query that will get our data and render it as required. As it says in the gatsby docs:
“By using StaticQuery, you can collocate a component with its data. It is no longer required to, say, pass data down from Layout to Header”
// useStaticQuery hook
export default function Component() {
   const data = useStaticQuery(graphql`
       your_query
   `)

   return (
       <div>
           <h1>{data.data_property}</h1>
       </div>
   )
}
GatsbyJS: useStateQuery
// StaticQuery Component
export default function Component() {
   return (
       <StaticQuery
           query={graphql`
               your_query
           `}
           render={data => (
               <div>
                   <h1>{data.data_property}</h1>
               </div>
           )}
       />
   )
}
GatsbyJS: StaticQuery
To learn more about both data fetching components you can check out their documentation pages:
Converting Components Between NextJS and Gatsby: Links
When linking to internal pages or locations within our website, both NextJS and Gatsby have a built in Link component that we use, however, they slightly differ.
NextJS
With NextJS, their Link component takes in a “href” property and “passHref” property, as well as an anchor tag between the Link tags. The href is the destination of the link and passHref is a boolean that lets the Link component know if it should pass the href to the anchor tag inside of it with our link label.
return (
   <Link href="/about-us" passHref={true}>
       <a>About Us</a>
   </Link>
)
NextJS: Link
Gatsby
With Gatsby, our Link component only takes in a “to” property. This property is the destination of our link. Other than that we can just pass our label in between the Link tags.
return <Link to="/about-us">About Us</Link>GatsbyJS: Link
To learn more about both link components you can check out their documentation pages:
Converting Components Between NextJS and Gatsby: Images
Images are a very important part of components, especially since there is a lot of optimization that needs to go into them to make sure they work responsively with our websites.
NextJS
NextJS includes a built-in Image component that we can use. This component takes in a few properties to define our image.
- A “src” property that defines the image source we are using
- A “alt” property which acts as the alt-text for our image
- A “width” property which lets us define a fixed width for our image
- A “height” property which lets us define a fixed height for our image
- An optional “layout” property which lets us define the layout behavior for the image
Using these properties allows the images to scale within our website based on viewport.
return (
<Image src="/image-location.jpg" alt="Avatar" width={500} height={500}>
)
NextJS: Image
Gatsby
For Gatsby, we will need to use a plugin called “gatsby-plugin-image”. This plugin comes with two components. A “StaticImage” and “GatsbyImage” component.
The StaticImage component is used for images that aren’t expected to change dimensions. This component takes in a src and alt property which act the same as the properties from the NextJS image component.
return <StaticImage src="/image-location.jpg" alt="avatar" />GatsbyJS: StaticImage
Note: The src can also take in a remote location for an image
return <StaticImage src="https://image.com/image/source" alt="avatar">GatsbyJS: StaticImage with Remote Location
If we were using dynamic images we would load them in a graphql query then display them using the GatsbyImage component. We also need another two components called “gatsby-transformer-sharp” and “gatsby-plugin-sharp”.
First we would be adding the image to our page query. If a graphql response object contains an image, it will contain a childImageSharp field which is what we will use to query the images data. The structure will vary based on your project.
query{
   blog {
       title
       body
       avatar {
           childImageSharp {
               gatsbyImageData()
           }
       }
   }
}
GatsbyJS: Image graphql query
To configure our image, we pass arguments to the gatsbyImageData resolver. We can configure a lot about the image such as size and layout as well as placeholders to use when lazy-loading.
In order to display the image, we first need to import a getImage function from our “gatsby-plugin-image” plugin.We will call getImage function with image parameter and assign the result to a variable. Once we have this, we can pass this variable to the image property of the GatsbyImage component.
import { GatsbyImage, getImage } from "gatsby-plugin-image"

function Post({ data }) {
   const image = getImage(data.blog.avatar)

   return (
       <GatsbyImage image={image} alt="alt-text" />
   )
}
GatsbyJS: GatsbyImage
To learn more about both Image components you can check out their documentation pages:
Converting Components Between NextJS and Gatsby: Conclusion
These are some of the key features of components that are different between NextJS and Gatsby. Each of these features go much deeper in how they differ, however, I’m hoping I was able to provide you with a nice overview of how to get the same result with both technologies. A great way to practice is to obviously go and build some components with both!
Please contact us if you need any more information!