
This article is a tutorial for building a custom Contentful app that invokes an external API to retrieve data and add the retrieved data to the content article via the Contentful App Framework SDK. For this example a simple zip code to city/state app was built using the Zippopotamus API. For the sake of simplicity and proof of concept, this app will only work with common five-digit zip codes in the USA.
For a detailed high-level overview on the what and why of custom Contentful App Framework please see the following XTIVIA article: A Step-by-Step Tutorial For Building a Custom Contentful App
Initial Build and Installation of the Custom Contentful App
Initial Build
Begin by creating a custom app with the create-contentful-app CLI.

Once the build is complete, there will now be a fully bootstrapped single-page app built on React & Typescript ready for a custom build.
Installation for Development
It may seem counterintuitive to install an app before it has been developed but due to the nature of how Contentful Apps work it will need to be installed into the Contentful Organization to be able to develop it. Even though it’s a React app, it will not be able to be rendered to the screen the way most React apps are for development via a startup script and localhost:3000.
Deployment and installation of the app can be done one of two ways. Either CLI or through Contentful’s Web App. Since the CLI steps were documented in this XTIVIA article, this article will focus on the Web App steps.
App Definition
Start by creating the app in the Organization via the Apps tab in Organization settings.

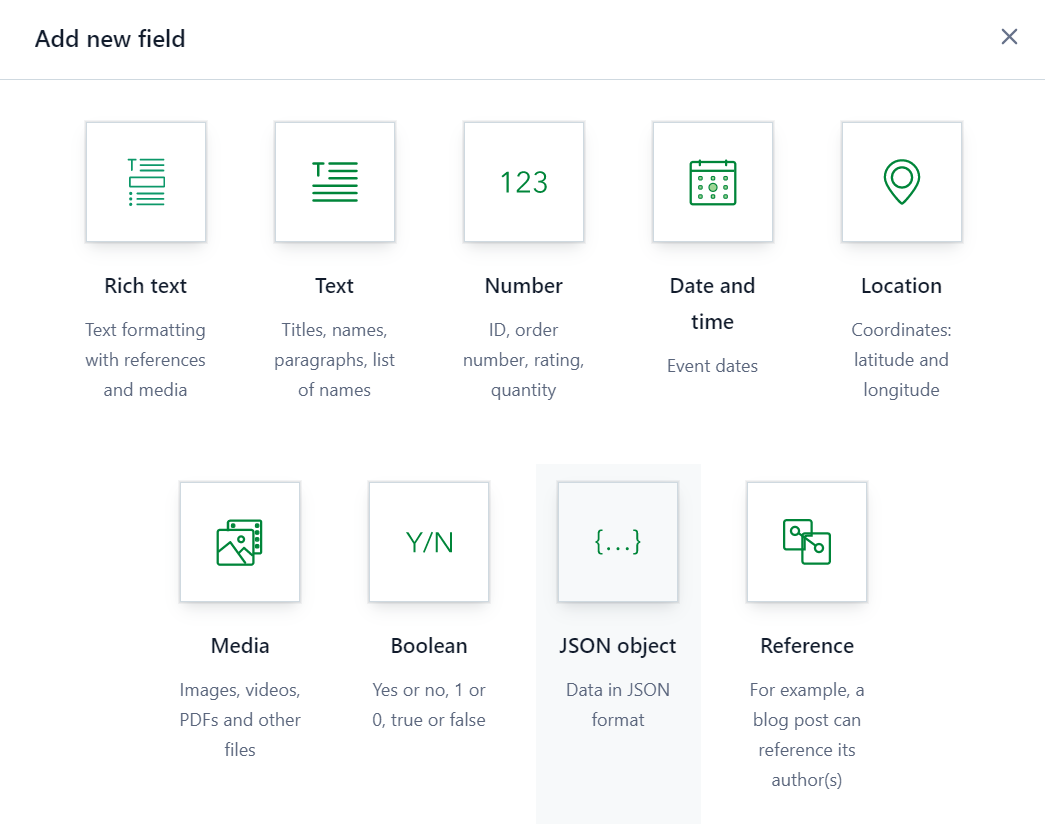
Give the app a name and the App Details (aka App Definition) screen will come up next. In order to develop locally add the localhost name and port that will be used in the Frontend section. As stated, this app is going to be an Entry Field—so that is the location that will need to be selected. There are many field types that can be selected but for this app we are going to choose JSON Object since the data to go into the content will be an object containing zip, city, & state.

Save the App Definition. For more information on App Definitions see here.
App Installation
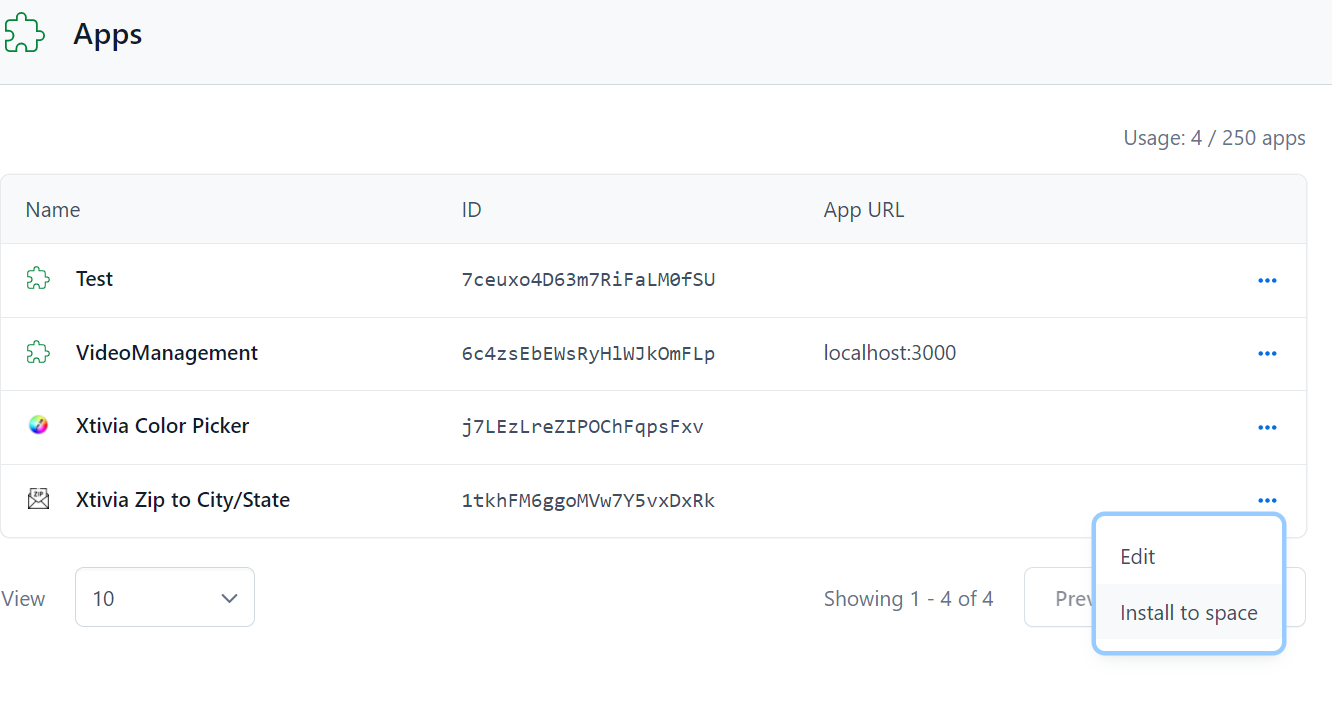
Install the app to a space by clicking the ellipsis and selecting ‘Install to space’.
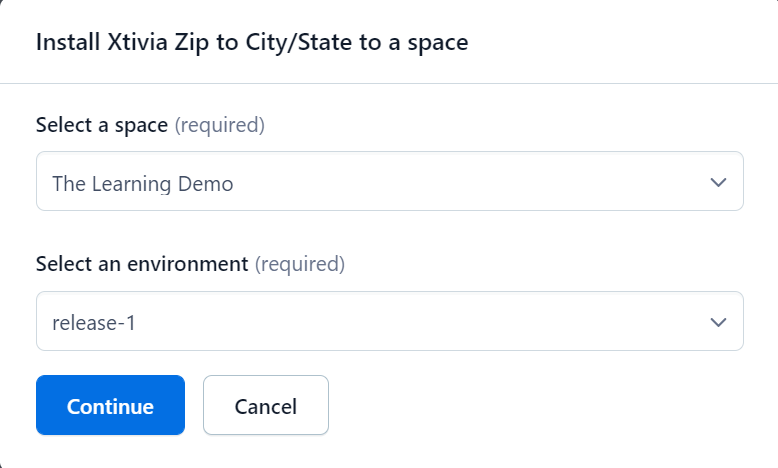
Select which space and the environment the app is to be in. It would be beneficial to create an environment specifically for development but is not necessary. For more information on multiple Contentful Environments see here.
The app will now be available to that space & specific environment.
Navigate to the environment that the app was installed into and select ‘Manage Apps’ under the Apps tab.
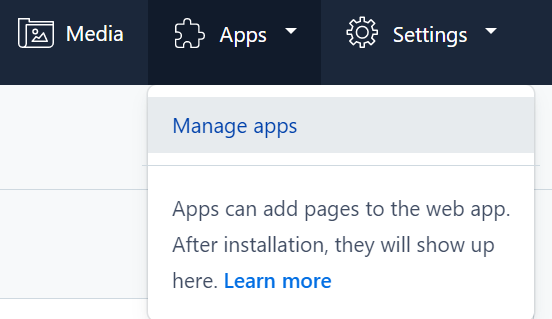
In the available table click on the Apps ellipsis and choose ‘Install in Space’.
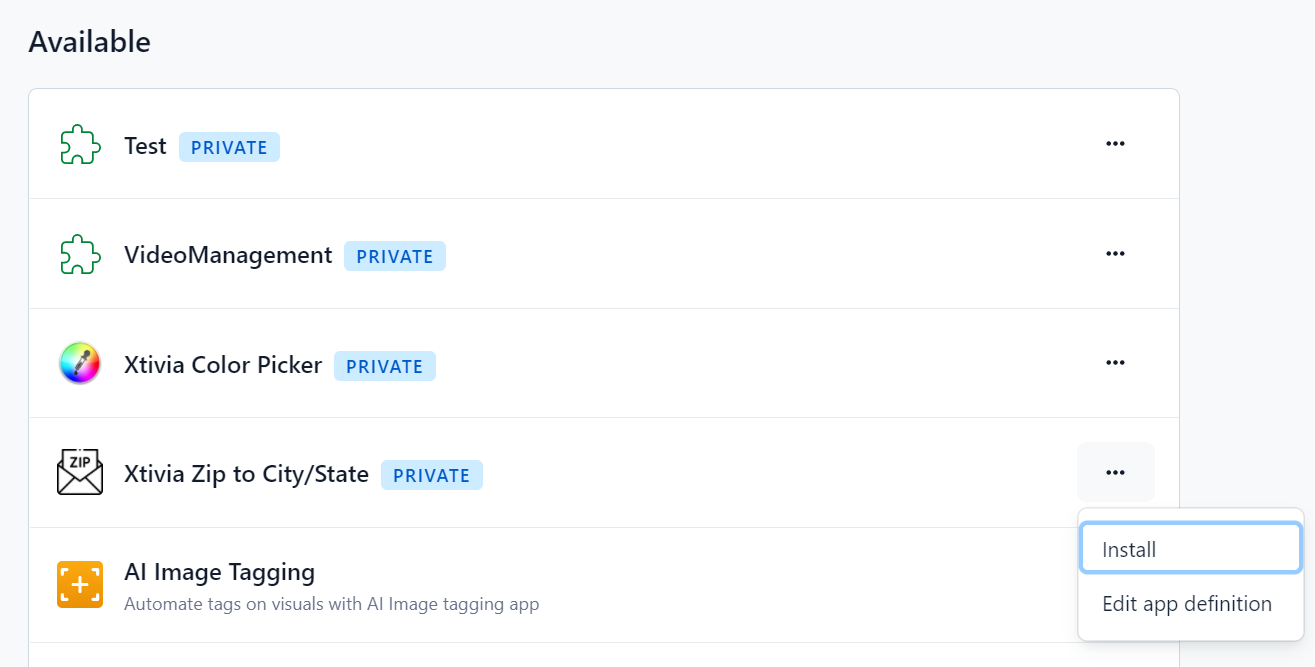
Authorize the App to be installed in the environment so it will be installed.
Adding the Custom Contentful App to Content
Create a new content type and then add a new field. For this app in particular JSON Object must be chosen as that is what we defined in the App Definition.
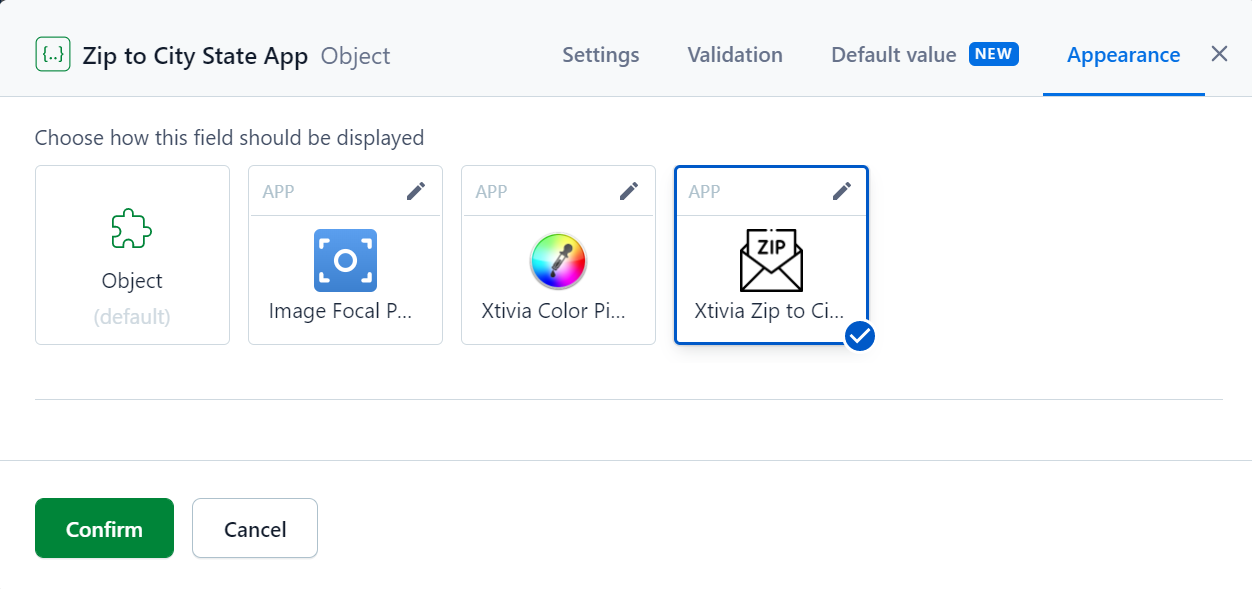
Name and configure the field. From the field’s Appearance tab the app will be available. Select it and confirm.
Lastly, create a piece of content of that content type.
To start development with hot reloading, run npm run start on the local environment. The app will now load into the piece of content that was created.
Development of the Custom Contentful App With External API Access
External API Module
Authors note: I created a separate API module as I prefer this method as it leads to better scaling & reusability, as well as better separation of concerns. Though in the example, it is quite simple and could have easily been added to the Field component. I also chose to use the Axios library to make the API call as the built in Javascript Fetch API is dependent on the browser’s window object & is not available in my API module. The Fetch API could be used inside of a useEffect hook in the Field component if preferred.
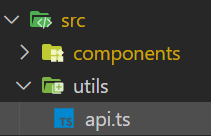
Create the following folder & file in the src folder: utils/api.ts
An async function was built to make the call to the Zippopotamus API and return its response to whichever component or module calls it.
import axios, { AxiosError, AxiosResponse } from 'axios';
const url = 'https://api.zippopotam.us/us';

export const getCityState = async (zip: string) => {
    try {
        const response: AxiosResponse<string, any> = await axios.get(`${url}/${zip}`);
        return response;
    } catch (error: unknown) {
        const err = error as AxiosError;
        return err.response;
    }
};
Building the Contentful Entry Field Component
The chosen design of the app was to have it as a Contentful Entry Field (to see what other locations are available click here). The idea was the content creator will add a zip code and once the zip code meets its validation (five digits, no letters, & is a valid zip code) the city and state will auto populate in their respective fields and will be set in the content via the custom app’s built-in SDK.
Contentful Entry Field Component UX/UI
The Contentful Web App is built on Forma36 and in order to maintain an aesthetic cohesiveness the app structure was built using the included Forma36 components. In order to get built-in Forma36 input labels and validation messages the Form Control component set was utilized as follows:
 <Grid >
      <Grid.Item>
        <FormControl
          isInvalid={containsNonNum || invalidZip ? true : false}
        >
          <FormControl.Label>
            Zip Code
          </FormControl.Label>
          <TextInput
            name='zipCode'
            value={item.zipCode}
            onChange={(e) => {setItem({...item, zipCode: e.target.value})}}
            type='text'
            pattern='[0-9]*'
            maxLength={5}
            placeholder='Enter a 5 digit zip code'
          />
          {(containsNonNum || invalidZip) &&
            <FormControl.ValidationMessage>
              {containsNonNum && 'Numbers Only'}
              {(invalidZip && !containsNonNum) && 'Invalid Zip'}
            </FormControl.ValidationMessage>
          }
        </FormControl>
      </Grid.Item>

      <Grid.Item rowStart='2'>
        <FormControl>
          <FormControl.Label>
            City
          </FormControl.Label>
          <TextInput
            value={item.city}
            onChange={(e) => {setItem({...item, city: e.target.value})}}
            isDisabled
          />
        </FormControl>
      </Grid.Item>

      <Grid.Item rowStart='2'>
        <FormControl>
          <FormControl.Label>
            State
          </FormControl.Label>
          <TextInput
            value={item.state}
            onChange={(e) => {setItem({...item, state: e.target.value})}}
            isDisabled
          />
        </FormControl>
      </Grid.Item>
 </Grid>
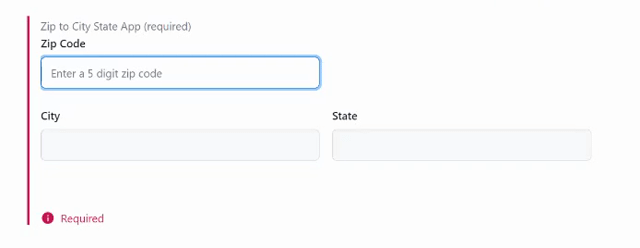
The rendered results of the code above in the Contentful Web App:
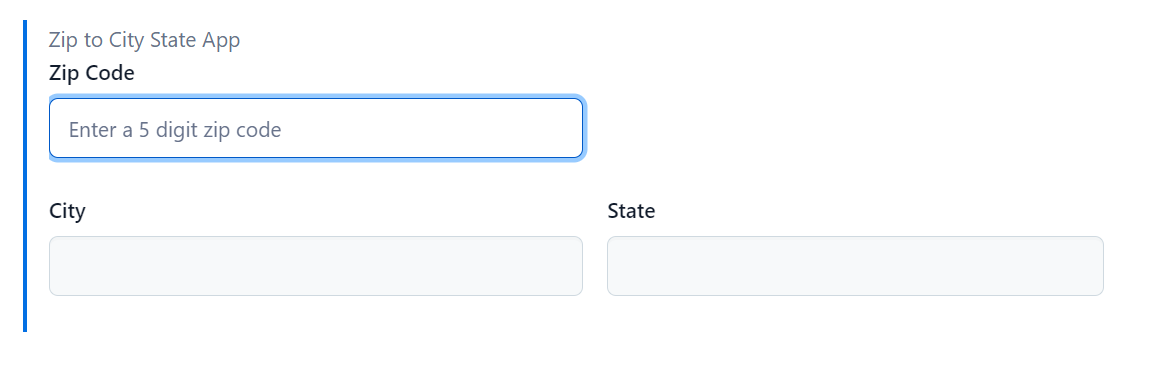
The decision was made to keep the city and state fields disabled so the user cannot edit the results. Again, this is purely for simplicity and could easily be left enabled for the user to have the ability to edit results.
Contentful Entry Field Component
Within the component, the useState hook is used three times. Once for the state of the data, and two more for validations. For item, the built in SDK is put into use.For more information on the Contentful App Framework SDK see here.
 const [item, setItem] = useState<Item>({
    zipCode: props.sdk.field.getValue()?.zipCode || '',
    city: props.sdk.field.getValue()?.city || '',
    state: props.sdk.field.getValue()?.state || '',
  });
  const [containsNonNum, setContainsNonNum ] = useState<boolean>(false);
  const [invalidZip, setInvalidZip] = useState<boolean>(false);
Two functions were created to be used in useEffect hooks (more on the useEffect hooks later).
The first function, getResults(), is for calling our API module with the zip code provided from the user. If any other HTTP response status than a 200 is received, the invalidZip state is set to true. This then triggers the FormControl.Validation message to show to the user and let them know they have an invalid zip code since Zippopotamus is returning an error. If we have a successful response, the returned data is then set to state via setItem.
The second function, setItemInContentful(), is used to set item into the content via the built in Contentful SDK. The setValue() method is a promise so an async call must be made.
  const getResults = async () => {
    const results: Record<string, any> = await getCityState(item.zipCode);
    results.status === 200 ? setInvalidZip(false) : setInvalidZip(true);
    if (Object.keys(results.data).length > 0) {
      setItem({
        ...item,
        city: results.data.places[0]['place name'],
        state: results.data.places[0].state
      })
    }
  }
  const setItemInContentful = async (item: Item | undefined) => {
    try {
      await props.sdk.field.setValue(item);
    } catch (err:unknown) {console.error('Contentful SDK setValue Error:', err)}
  }
Lastly, three useEffects hooks are used to handle the calling of the above functions.
The first useEffect hook is a simple one that calls a built-in utility method in the SDK on the window object called startAutoResizer(). This is not a requirement but it automatically resizes the app’s height in the UI. The useEffect dependency array is left empty so this method is run at initial render only.
The second useEffect is used for validating the users input and making the external API calls. First, the zip code is validated via regex to see if there are any letters in the zip. If so, setContainsNonNum sets our state to true. This triggers the FormControl.Validation message to show to the user and let them know there are non-numbers in the zip. Next, if there are less than five digits in the zip code we clear invalidZi state, and set the city and state values to be blank. Lastly, if the zip code is five numbers long and passed validations the API is called and item is updated. The useEffect dependency array contains item.zipcode so that any changes to the zip will trigger the call but only if the zip passes validation. This eliminates the need for a submit button on the UX side. When the user’s input hits five numbers the API is automatically called and the city and state are updated if it is a valid zip code.
The third, and last, useEffect hook is for calling the function to set the item in Contentful via the setItemInContentful() function. An if statement was added to double check the zip code’s validity. If not valid, the Contentful item is set to undefined. This allows Contentful’s required validation to work. An undefined field will trigger Contentful’s required validation to alert the user and not allow the content to be published. The dependency array has the entire item so any change to the item will trigger this useEffect.
/** built in Contentful field resizer */
  useEffect(() => {
    props.sdk.window.startAutoResizer();
  }, []);
  /** handle api call per zip code validations */
  useEffect(() => {
    // validate for numbers only
    regEx.test(item.zipCode) ? setContainsNonNum(true) : setContainsNonNum(false);

    if(item.zipCode.length < 5) {
      setInvalidZip(false);
      setItem({...item, city: '', state: ''})
    }
    if((item.zipCode.length === 5 && !containsNonNum) && (!item.city || !item.state)) {
      getResults();
    }
  }, [item.zipCode]);

  /** handle setting content in Contentful */
  useEffect(() => {
    if(item.zipCode.length === 5 && !containsNonNum && !invalidZip){
      setItemInContentful(item);
    }
    if(item.zipCode.length < 5 || containsNonNum || invalidZip || !item.city || !item.state){
      setItemInContentful(undefined)
    }
  }, [item]);
Initially, the intent was to keep the API call and SDK content setting functions in the same useEffect hook with item as the object in the dependency array but this created an infinite loop. Everytime the API was called it would update item with the city and state which in turn would call the API again which would update item and so on and so forth. Breaking them out into their own useEffects solved the infinite loop issue.
In the end the final code for the Field component is as follow:
import { useEffect, useState } from 'react';
import { PlainClientAPI } from 'contentful-management';
import { Grid } from '@contentful/f36-core';
import { FormControl, TextInput } from '@contentful/f36-forms';
import { FieldExtensionSDK } from '@contentful/app-sdk';
import { getCityState } from '../utils/api';

interface FieldProps {
  sdk: FieldExtensionSDK;
  cma: PlainClientAPI;
}
interface Item {
  zipCode: string;
  city: string;
  state: string;
}

const Field = (props: FieldProps) => {
  const [item, setItem] = useState<Item>({
    zipCode: props.sdk.field.getValue()?.zipCode || '',
    city: props.sdk.field.getValue()?.city || '',
    state: props.sdk.field.getValue()?.state || '',
  });
  const [containsNonNum, setContainsNonNum ] = useState<boolean>(false);
  const [invalidZip, setInvalidZip] = useState<boolean>(false);

  const regEx= new RegExp('[a-z!@#$%^&*()_+~=`{}:";<>?,.\\[\\]\\|\\-\\/\'\\s]', 'ig');

  const getResults = async () => {
    const results: Record<string, any> = await getCityState(item.zipCode);
    results.status === 200 ? setInvalidZip(false) : setInvalidZip(true);
    if (Object.keys(results.data).length > 0) {
      setItem({
        ...item,
        city: results.data.places[0]['place name'],
        state: results.data.places[0].state
      })
    }
  }
  const setItemInContentful = async (item: Item | undefined) => {
    try {
      await props.sdk.field.setValue(item);
    } catch (err:unknown) {console.error('Contentful SDK setValue Error:', err)}
  }

  /** built in Contentful field resizer */
  useEffect(() => {
    props.sdk.window.startAutoResizer();
  }, []);
  /** handle api call per zip code validations */
  useEffect(() => {
    // validate for numbers only
    regEx.test(item.zipCode) ? setContainsNonNum(true) : setContainsNonNum(false);

    if(item.zipCode.length < 5) {
      setInvalidZip(false);
      setItem({...item, city: '', state: ''})
    }
    if((item.zipCode.length === 5 && !containsNonNum) && (!item.city || !item.state)) {
      getResults();
    }
  }, [item.zipCode]);

  /** handle setting content in Contentful */
  useEffect(() => {
    if(item.zipCode.length === 5 && !containsNonNum && !invalidZip){
      setItemInContentful(item);
    }
    if(item.zipCode.length < 5 || containsNonNum || invalidZip || !item.city || !item.state){
      setItemInContentful(undefined)
    }
  }, [item]);

  return (
    <Grid >

      <Grid.Item>
        <FormControl
          isInvalid={containsNonNum || invalidZip ? true : false}
        >
          <FormControl.Label>
            Zip Code
          </FormControl.Label>
          <TextInput
            name='zipCode'
            value={item.zipCode}
            onChange={(e) => {setItem({...item, zipCode: e.target.value})}}
            type='text'
            pattern='[0-9]*'
            maxLength={5}
            placeholder='Enter a 5 digit zip code'
          />
          {(containsNonNum || invalidZip) &&
            <FormControl.ValidationMessage>
              {containsNonNum && 'Numbers Only'}
              {(invalidZip && !containsNonNum) && 'Invalid Zip'}
            </FormControl.ValidationMessage>
          }
        </FormControl>
      </Grid.Item>

      <Grid.Item rowStart='2'>
        <FormControl>
          <FormControl.Label>
            City
          </FormControl.Label>
          <TextInput
            value={item.city}
            onChange={(e) => {setItem({...item, city: e.target.value})}}
            isDisabled
          />
        </FormControl>
      </Grid.Item>

      <Grid.Item rowStart='2'>
        <FormControl>
          <FormControl.Label>
            State
          </FormControl.Label>
          <TextInput
            value={item.state}
            onChange={(e) => {setItem({...item, state: e.target.value})}}
            isDisabled
          />
        </FormControl>
      </Grid.Item>

    </Grid>
  );
};

export default Field;
Final Installation of the Custom Contentful App With External API Access
With the development of the app complete it will now have to be built and hosted somewhere for production. The easiest is choosing to have Contentful host the app. Return to the App Definition in the Organization settings and toggle to 'Hosted by Contentful' in the Frontend section. If the app was to be hosted on a different server the localhost address would need to be replaced with the new hosting address.
Begin by running npm run build to build the app locally. There are two options here. Either drag & drop the build folder onto the page or use the npm run upload script for CLI deployment. More detail on app hosting can be found here.
Demo: Custom Contentful App With External API Access
Tutorial Summary: Custom Contentful App With External API Access
For any questions on how to best leverage Contentful or to know how to use the App Framework, or any general help with Contentful implementation, please engage with us via comments on this blog post, or reach out to us here.