
SUMMARY:
This deep dive explains how to optimize Boomi integration resilience by strategically configuring Try/Catch shapes to handle specific error types, automate retries for transient failures, and implement custom alerting mechanisms.
- Configuring the Failure Trigger allows developers to distinguish between fatal Process Errors and non-fatal Document Errors, preventing entire process halts for minor data issues.
- Strategically placing Try/Catch blocks before specific connectors, rather than at the process start, ensures that error reports contain useful, current document data rather than empty or obsolete payloads.
- Using the Retry option handles temporary network outages automatically, whereas the Catch branch must explicitly trigger notifications via Mail or Exception shapes, since Boomi treats caught errors as successful.
- Effective error messages should leverage the “Try/Catch Message” property for caught exceptions and use the Notify shape to provide accessible, clickable details in the Process Log.
By adopting these best practices, developers can prevent silent failures and ensure that error notifications provide the immediate, actionable context required for rapid troubleshooting.
Table of contents
Introduction
Boomi offers a suite of tools for building a custom error-handling solution. However, there are finer details that, after tripping up a developer, can lead to exasperated forum questions. A solid understanding of these factors, and a few associated best practices, will help you get the most out of the tools Boomi provides.
Try/Catch Considerations
The central fixture in Boomi error handling is the Try/Catch shape. We’ll review how the different configuration options behave, and then cover some design considerations.
Config Option: Failure Trigger
You can customize the level of error the Try/Catch will look for. Let’s first define what the two error types mean:
Process Errors: A failure that is sufficient to halt the entire process execution. Examples include an error in a connector, script compilation errors, NullPointerExceptions, or Exception shapes that do not have “Stop Single Document” selected.
Document Errors: A problem that only halts the document to which the error is relevant. This includes mapping issues, duplicate cache keys, Exception shapes with “Stop Single Document” selected, failed field validation (such as field length constraints and data formatting), and similar problems.
You can set the Failure Trigger to All Errors, in which case it will react to either type – Process or Document. You can alternatively set it to only look out for Document Errors, in which case Process-level errors will not be handled by the Try/Catch.
A couple of finer points about how the Failure Trigger works:
- Unhandled Errors: If you set a Try/Catch to only look for Document Errors, and a Process-level error occurs, what happens? The answer is that it will throw an exception just as if no Try/Catch were set. It will mark the execution as an error and invoke Boomi’s standard error-handling response. Document processing will be halted, and any logic placed on the Catch branch will not be triggered.
- Nested Try/Catches: If you set two Try/Catch shapes in a row, the earlier one will always detect both Process and Document Errors. It will ignore the Failure Trigger setting in favor of this behavior. The latter Try/Catch will follow its Failure Trigger configuration as normal.
Config Option: Retries
You can instruct the Try path to retry a document up to five times. This feature is either tremendously useful or completely useless, depending on the error! A Retry re-runs the original copy of the document, starting at the beginning of the Try path. If multiple Retries are allowed, the integration will wait longer and longer between each attempt:
1st Retry: Instantaneous
2nd Retry: 10s
3rd Retry: 30s
4th Retry: 60s
5th Retry: 120s
This is especially useful for intermittent or passing problems, such as network hiccups, maintenance outages, and similar temporary issues that will pass with time. A retry will allow the document to wait out any temporary issue and then run successfully a bit later, all without human intervention. This is a wonderful tool for the resilience of your integration, particularly when set before an HTTP Client connector. However, “hard” problems that do not change over time, such as invalid connector credentials or payload data issues, cannot be bypassed this way. In these situations, the failure will stand.
Finally, bear in mind that the Catch branch does not fire between Retries. The document will flow into the Catch branch only after all Retries have been exhausted. This is both a limitation and a feature – a limitation because you can’t use the Catch logic to change anything between Retries, but a feature because it won’t trigger your alerts and error handling multiple times!
Design Note: Prevents Exceptions By Default
Keep in mind that a Try/Catch will automatically treat any error it detects as caught and handled. By design, Boomi will not throw exceptions for caught errors, so your integration will appear green in Process Reporting. Because it isn’t considered an error, no platform alert notifications are sent. Even if you subscribe to PROCESS.EXECUTION – ERROR Alerts on your account, you won’t be notified.
This might give the impression that everything is in order, so it depends on how you configure the Catch branch to handle the issue and properly notify the appropriate stakeholders.
Even if you have a custom alert system that sends notifications to the logs or by email, without appropriate action, it can still be difficult to identify which execution triggered a failure in a sea of executions. This is particularly true for an integration that runs often.
To address this, use one or more of the following solutions to ensure problems are noticed in a timely manner:
- Put a Branch shape on the Catch path, and in the final branch, add an Exception shape. This will ensure that the integration appears as an error in process reporting and trigger email alerts to anyone who has subscribed to PROCESS.ERROR events. Be sure to place the Exception after all other custom error handling is done.
- Use a Notify shape with “Enable Events” selected. This will generate a USER.NOTIFICATION event that will send an email to anyone on your account who is subscribed to user notifications. The email will include a useful link directly to the execution in error.
- Using a Mail connector to notify admins of errors is a common tactic in custom error-handling solutions. Be sure the messaging includes the integration name and a date/time. You might even consider adding the “Execution ID” process property to the message data. This will allow direct access to the execution under Process Reporting by selecting Add Filter > Execution ID and pasting the recorded Execution ID.
Design Note: Useful Document Reporting
In Part 1 of this series, I discussed how the Try/Catch block will “Try” the document that originally enters the shape. Any downstream errors, regardless of interim changes to the document, will be traced back to this original document. In your Catch branch, you can reference document data in your error handling, but be aware that it will be drawn from the original version of the document that started the Try/Catch off.
For this reason, it is best practice to place the Try/Catch after you retrieve the data you will actually be working with. If your logic flow kicks off a Try branch, later pulls data from a Connector, and that Connector data causes an error, no details about that document will be available because it isn’t the original! However, placing the Try/Catch after the Connector will produce useful document-level reporting if an error occurs.
In this illustration, we will map an incoming Flat File to XML, simulating an adaptation to send the data to an endpoint. We’ve hardcoded it to trigger an error on the Try Branch, and in the Catch branch, we’ll email the failing document to an admin as part of our error reporting.
First, let’s see what happens when we place the map on the Try branch:
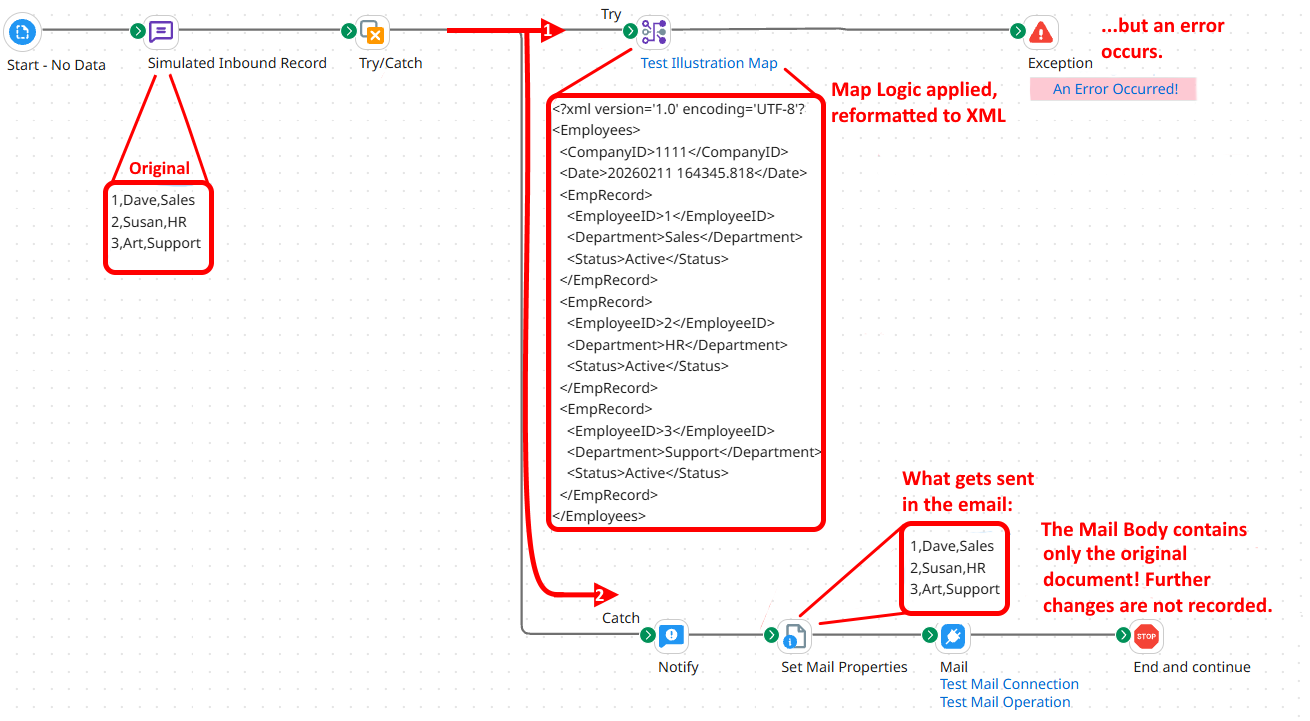
We only receive the original document! Under normal operation, outside of Test Mode, we would therefore have no insight into the content of the updated document that actually failed.
Now let’s see what happens if we put the map before the Try/Catch:
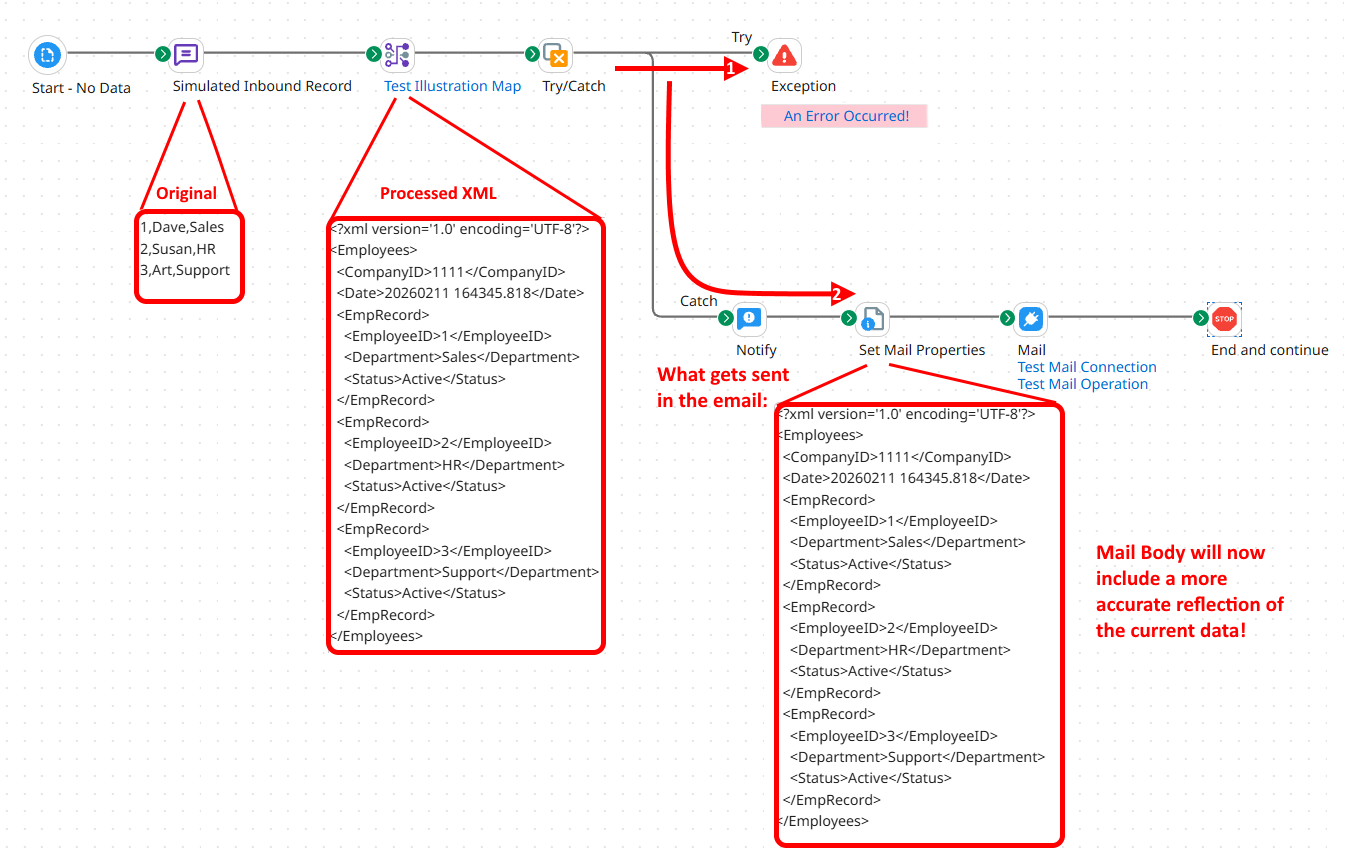
This is a much more useful result. The email body will include the updated document and will better reflect the data as it existed at the time the error occurred.
Finally, two points that expand on this recommendation.
- You generally should avoid placing a Try/Catch at the start of your process to cover the entire execution, unless it is a fairly short and simple integration. Instead, place the Try/Catch block before the potential trouble spot. For example, placing one immediately before the final destination connector lets you observe the document as it existed at the time the error occurred (or as close to that time as possible).
- Taking this to its logical conclusion, you especially do not want to place a Try/Catch immediately after a No Data Start Shape. A No Data Start Shape generates a blank document to start the integration flow. If that in turn flows directly into a Try/Catch, then this empty document is what the Try/Catch will link all subsequent errors to. Needless to say, a blank document is pretty useless for troubleshooting!
Design Note: Strategically Placing Multiple Try/Catches
We can take the above recommendations and assemble them into a comprehensive set of guidelines for placing your Try/Catches. To recap, we know that you:
- Shouldn’t place Try/Catches at the very beginning of an integration,
- Should place them before potential trouble spots, and
- Should put them as far forward as you can, so that it records your documents when they’re closer to their final state.
Building on this, we can make the most efficient use of Try/Catches by configuring them to handle specific problems and custom-tuning them to anticipate issues that might arise in that Try block.
Different trouble spots will call for different behavior! Here are a few examples of strategies you can use when setting Try/Catches before specific integration logic.
- If you’re sending data to an endpoint maintained by a particular administrator, any email alerts set on that Catch branch could copy that admin, while also notifying the Boomi admin as usual.
- An endpoint known to experience temporary network hiccups and outages can have a Retry set, while endpoints that have never exhibited this behavior don’t waste processing time on it.
- You don’t always want to use the All Errors failure trigger setting! If the process flow includes field validation logic, for example, monitoring only for Document Errors will help you catch a bad field and react accordingly. Meanwhile, any Process Errors that occur are likely to be serious and unexpected and will throw a full exception.
Don’t be afraid to use multiple Try/Catches throughout your integration – the performance impact is minor, while the benefits can be significant.
Application Errors and Status
Properly retrieving error details is critical to handling the error. There are a few settings and document properties that provide useful information when an error event occurs.
Return Application Error Responses
This setting is available in many connectors and is often misunderstood. It is sometimes mistakenly used as if it were a switch to turn on error reporting.
In reality, this option instructs the Operation to return any error material as document data and to record the connection as successful. It doesn’t throw an exception because it has successfully returned the error data as requested!
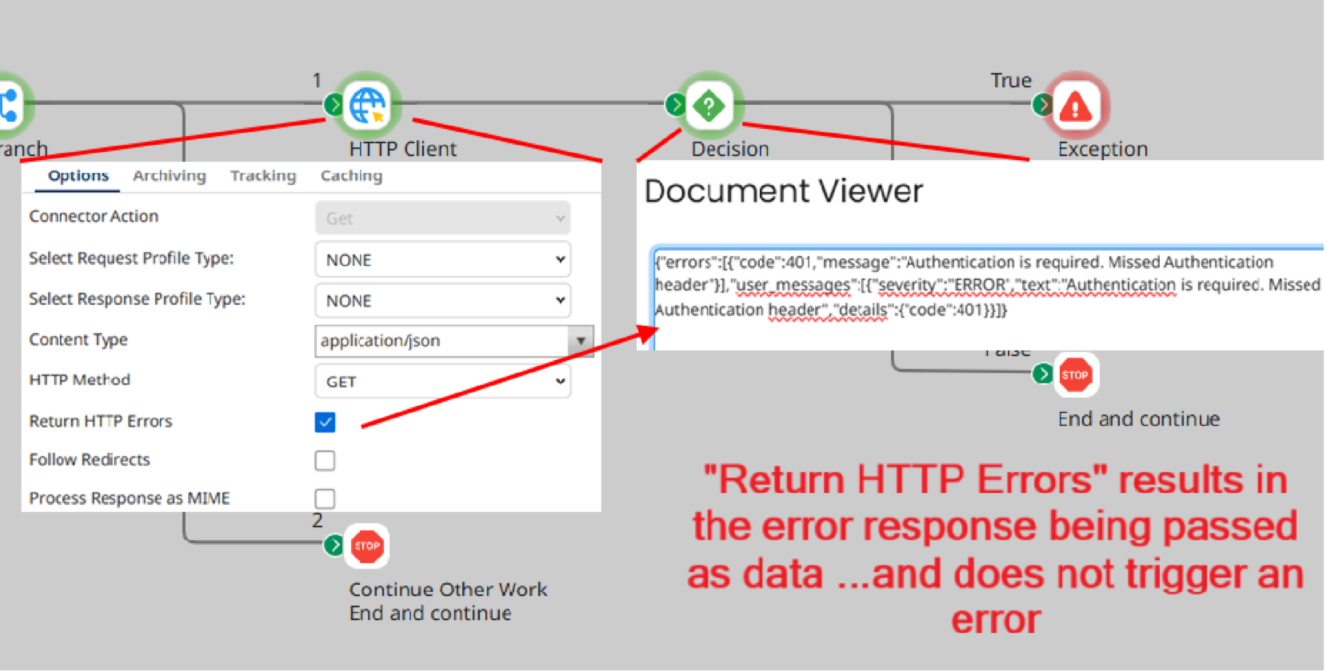
This action populates three key pieces of information:
Document Property: Application Status Code contains the numeric error code, such as 401 for a 401 Unauthorized response.
Document Property: Application Status will contain the text associated with the Status Code (see above), spelling out the code’s meaning.
Response Profile: The exact format of the response profile varies by connector, but it will include the underlying error message as a profile element. This will be the message reported by the endpoint itself, which will sometimes provide more in-depth information about why an error occurred.
For example, if the error code is a 400 Bad Request, the message taken straight from the endpoint might tell you why, directly reporting the reason the request is unusable.
With this information, you can improve your error handling. For example, you can use the Status Code value to direct the process flow to the appropriate branch’s logic, dynamically reacting to different circumstances. This empowers you to develop advanced postmortem strategies that a simple triggered exception might not allow. You can also use this error data to customize your messaging and populate your logs or alerts.
If you still want it to trigger an exception in the integration (and thus appear as an error in Process Reporting), use an Exception shape at the end of any other error processing you decide to do.
Application Document Properties Versus Try/Catch Message

Above, we touched on the Application Code and Application Status properties. When using these properties, remember that they cannot be referenced directly on the Catch branch of a Try/Catch. If you try this, it will return NULL because these properties are assigned to the new Document IDs created by the Try branch. They don’t apply to the original document that gets sent down the Catch path on error.
You can reference the Application Code and Application Status properties freely while you’re still in the work area of the Try path, after a Connector has returned its response.
If you set up custom error handling in the Catch branch, however, be sure to use the Document Property “Try/Catch Message” instead. This property contains the text of any exception that was raised on the Try path. This could be the content of an Exception shape you’ve customized, or an error raised directly during execution, so long as it’s an error type the Try/Catch is set to look for.
It can sometimes be useful to record the content of the failed document itself using the document property “Current Data”. However, once again, bear in mind that it will record the document content that existed when it first entered the Try/Catch. It might not reflect the state of the document at the time the actual error happened.
Building a Good Error Message
Let’s put all of this together with some additional tips on how to build the best and most useful error message you can!
Messages for Process Reporting
When you manually set an Exception Step, bear in mind that whatever you put in here will be delivered as one line under “Error Message”. Therefore, it is best to format this output so it is legible on a single line. Here’s one example:
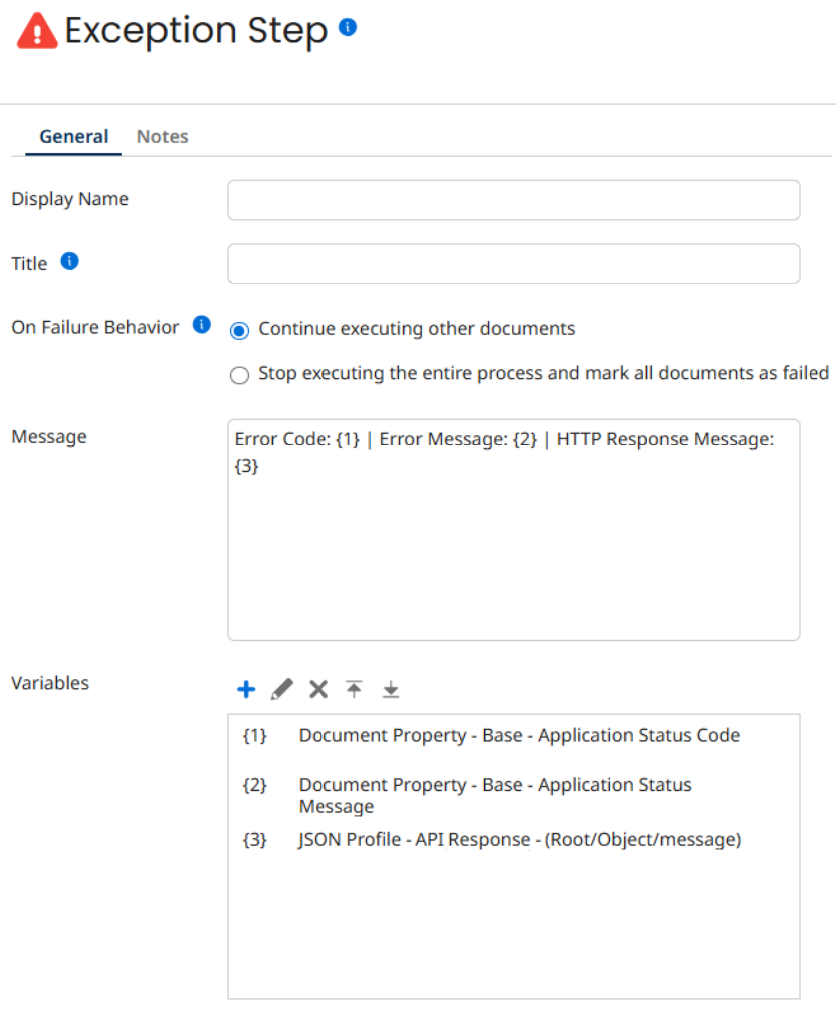
This yields the following when you open the errored execution in Process Reporting:

There is one departure from this behavior. If this Exception shape is set within a Try branch, the string won’t immediately be presented to Process Reporting. It will instead be available elsewhere in the process under the Metadata Document Property “Try/Catch Message”.
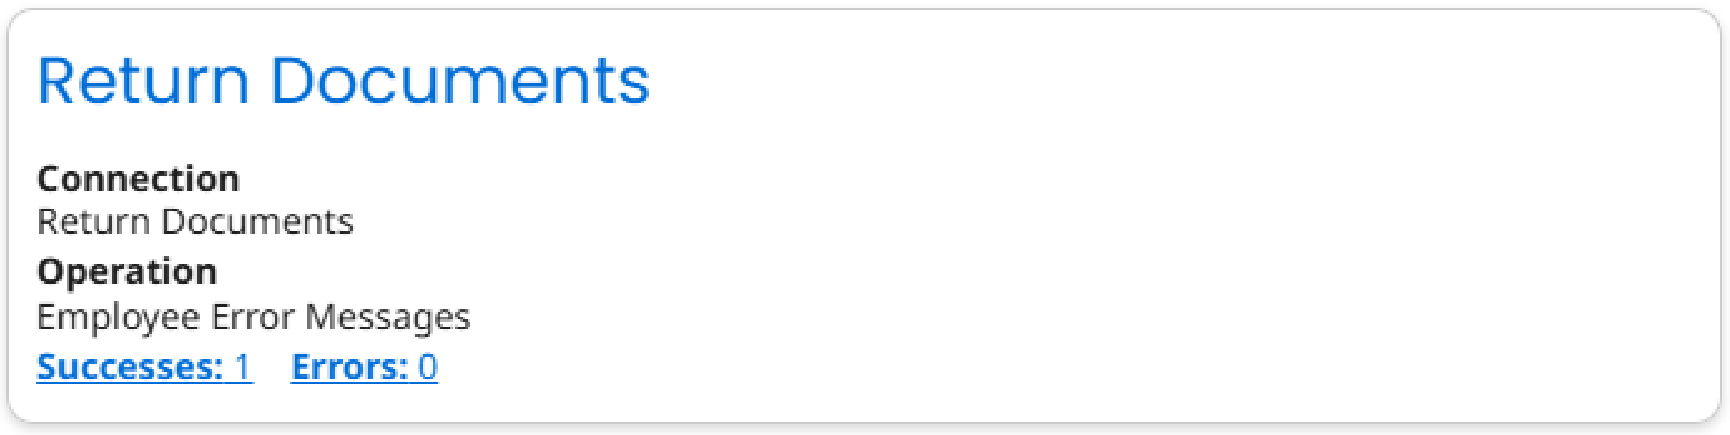
If you need to output more detailed information than one line will hold – for example, the contents of a document – it is best practice to use a Return Documents shape. A lesser-known use for Return Documents is to place it in the Main / Parent process, which adds it to the Process Execution Details pane and appears as another Document category. It will be labeled with the same text you used for the Return Documents shape on the canvas.
Here is an example of a properly-labeled Return Documents entry in the Execution Details pane:
Messages for the Process Log: The Notify Shape
A Notify shape is a good secondary method for error reporting, as it writes its contents to the Process Log. When you view the process log in Process Reporting, the Notify line will be clickable and open a pop-up window with the message. This window allows more room for text.
However, if you download the Process Log, the contents of the Notify shape will all be printed on the same line, losing carriage returns and other formatting. Furthermore, there is a 10,000-character limit! For this reason, Notify isn’t a good fit for dumping the contents of entire documents into the Current Data property, especially if the documents are large.
Messages for Email
You really have room to breathe when building an Email message. You will also get a chance to customize the Subject line to make sure it presents a useful summary that catches the attention of the admin.
For the Subject line, declare clearly that this email represents an error, and then present the name of the process and a timestamp. The following is one example:
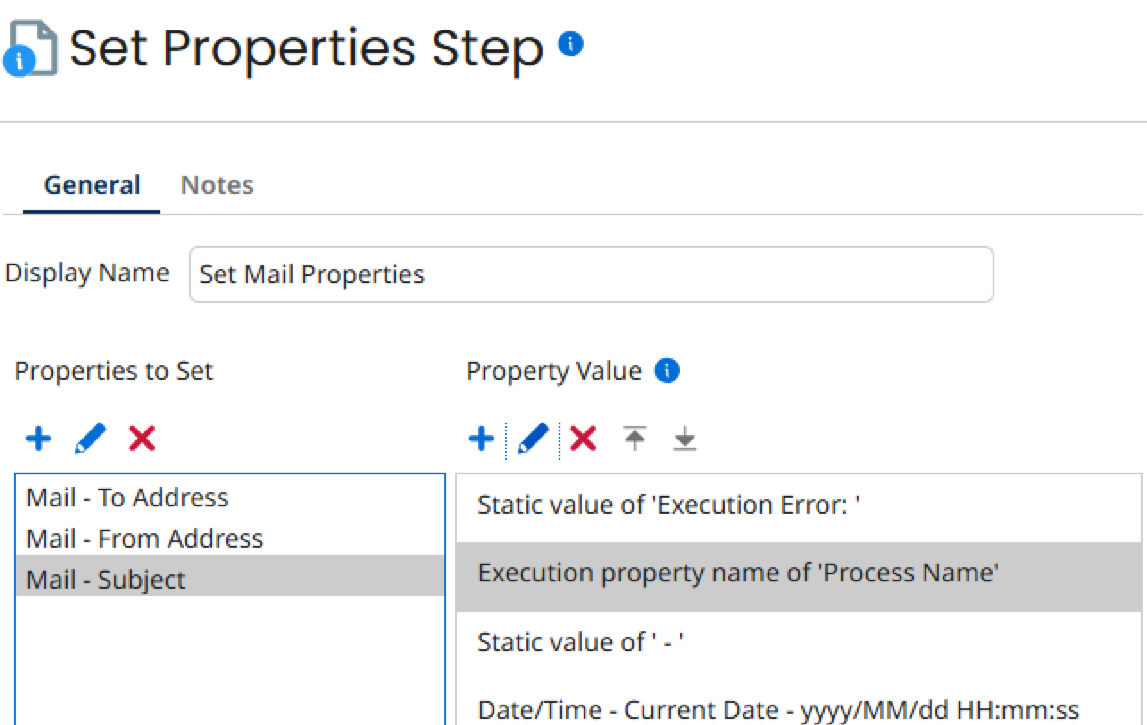
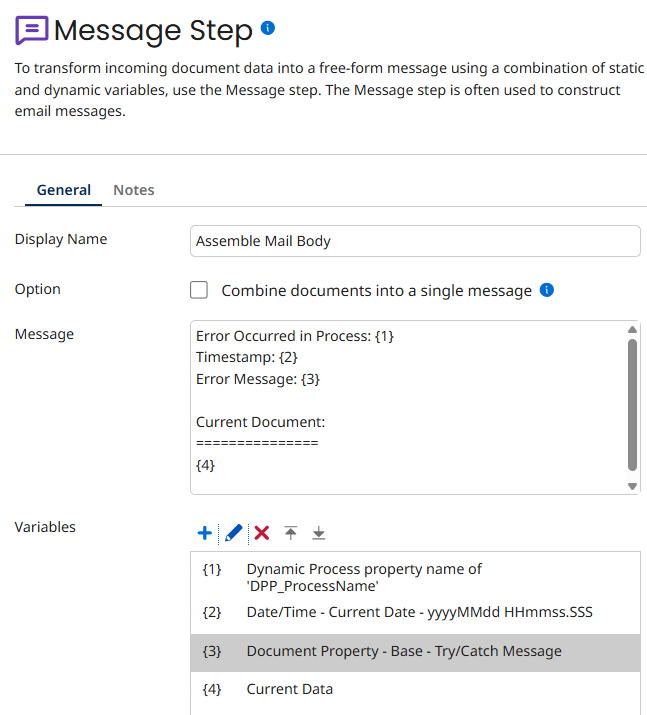
The body of the Mail message is where you can really assemble all of the relevant details of an error. You can easily include the body of the failing document, as well.
The Mail body can be set as a document property or assembled in a Message shape to form the document that flows into the Mail connector. I prefer the Message shape option because it’s easier to format.
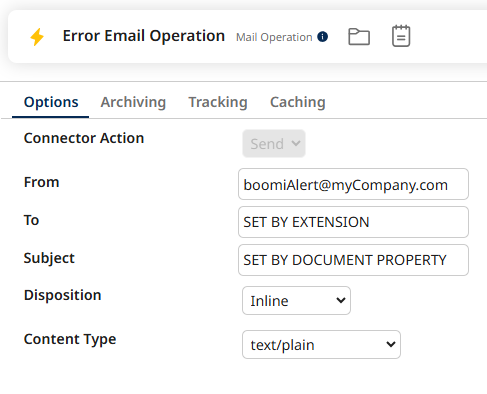
If you use the Message Shape method, make sure your Mail operation is configured to handle the document correctly. You can set it to Inline (the document becomes the body of the email) or Attachment (the document is attached to the email). In both cases, you choose the Content Type it should expect; for simply printing the custom error message to a mail body, text/plain will do.
Conclusion
The ability to customize your error handling and alert messaging is an extremely powerful feature of Boomi. With the tips above, you can make the most of these tools with minimal frustration. If you’d like further assistance in setting up a powerful, easy-to-maintain Boomi solution for your Enterprise needs, XTIVIA would be happy to help! Contact us here to discuss the options.
Reference and Further Reading
Understanding Try/Catch Shape Behavior
Avoid placing a Try/Catch shape immediately after a No-Data Start Shape
Boomi Error Handling Best Practices