In this blog post, I’ll focus on testing React/Redux apps with the Visual Studio Code editor. The following repo is a companion to this blog post.
The Big Picture
There are many opinions about what constitutes best practices when it comes to building and testing apps, and there are many schools of thought about best testing practices. One of the better-known tactics is Test Driven Development (TDD). TDD rightly teaches us that tests should be of primary importance, and all code should be written to be testable from the start. However, in the real world, I’ve personally found it doesn’t pay to be too religious about TDD. The reason is that in the crucial early stages of a project, I’m often working toward a Minimum Viable Product (MVP). If my goal is a working proof of concept, writing tests at such an early stage seems like it could introduce some unwanted friction, but that’s just my opinion.
My real-world coding and testing style is usually something like this:
1. Set up a project with a maximum degree of “static testing.” Static testing isn’t properly testing at all; rather, it’s anything that can improve your code, so you don’t need a large amount of testing in the first place. I would classify code formatting, linting (including complexity analysis), and type-checking as forms of static testing.
2. Build a Minimum Viable Product (MVP) and simultaneously test it as I am building it with click-testing. “Click testing” is using the UI of your app as a user would. It’s any form of non-automated testing. While it’s true that developers are usually terrible at systematically click-testing their own apps, in the early stages, that’s how apps get tested as they are built, and there are browser dev extensions that make this process easier — i.e., React Dev Tools and Redux Dev Tools, which I highly recommend. But as the app gets built, click-testing doesn’t scale.
3. Add automated testing. An automated test is a code you write to automagically verify the behavior of your application. Automated testing helps developers:
- Catch their own bugs directly without overreliance on a QA team.
- Write better code because testable code is almost always better code. A key part of this is that dependencies should be decoupled so they can be mocked.
- Document code is better because tests serve as a living form of documentation, resistant to getting stale.
- Have a little fun because seeing all the green passing checks or coverage reports can be satisfying, releasing dopamine, like scoring points successfully in a game.
- Deploy code with more confidence because tests can be automatically run as the app is deployed on Continuous Integration (CI) servers.
4. Aggressively refactor code. With automated tests in place, aggressive refactorization can be done with far more confidence since automated tests can immediately validate the change. Refactorization is not just for performance improvement. Refactoring for code clarity is usually far more important. The code should look consistent, have sufficient comments, and follow the conventions of the larger project. Consider refactoring code for clarity as a gift for future developers who will have to maintain the project.
Get Started
To get started, I recommend cloning my repo:
$ git clone https://github.com/bkinseyx/testing-react-redux-toolkit

$ npm i
In VSCode, Ctrl+shift+p and execute the command “Extensions: Show Recommended Extensions,” and install each of these if not already installed.
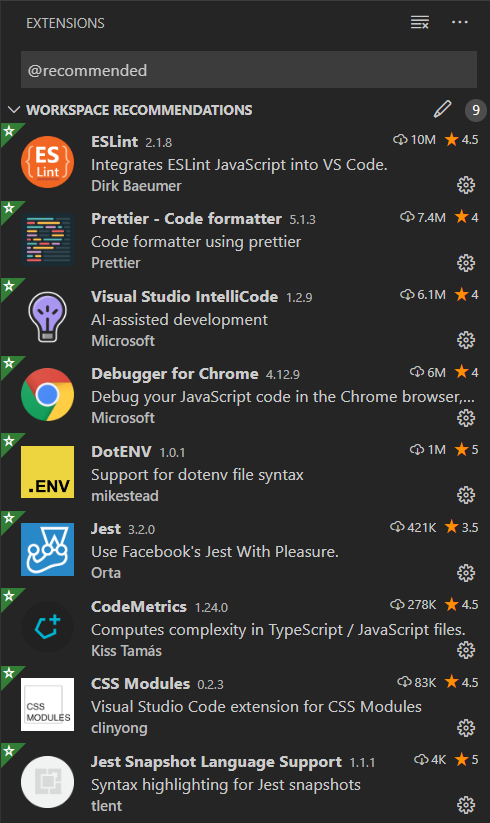
There is a lot of firepower here.
Jest
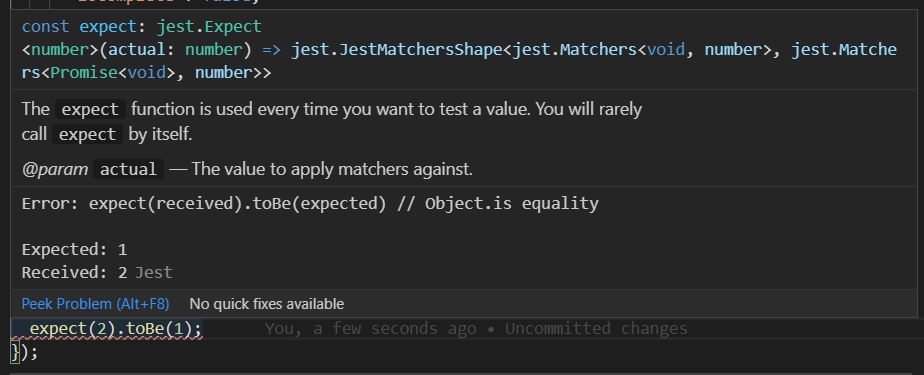
Create React App comes with a test runner called Jest. Jest provides a common language for testing assertions.
const expected = true;
const actual = false;

test('actual should be expected', () => {
  expect(actual).toBe(expected);
});
React Testing Library
Create React App now comes bundled with the excellent “React Testing Library” by Kent C. Dodds. The React Testing Library encourages best practices by helping test React components in a user-centric way. With React Testing Library, you can mock-render React components, fire events on them, and test for expected results. It’s not a full e2e testing solution like Puppeteer in that there is no actual (headless) browser. It’s all simulated, and for unit/integration tests, that’s good enough.
React Testing Library uses a guiding principle of testing DOM nodes themselves rather than instances of React components directly. So, it’s not supposed to be easy to get into the internals of the component. Instead, you typically set props and trigger events and analyze the DOM elements and mock event handlers. Another nudge is that the React Testing Library discourages querying for DOM elements by tag or class. While those options are still available as a fallback, it’s instead encouraged to search for elements based on their accessibility roles and text values. For more details, see “Which query should I use?”
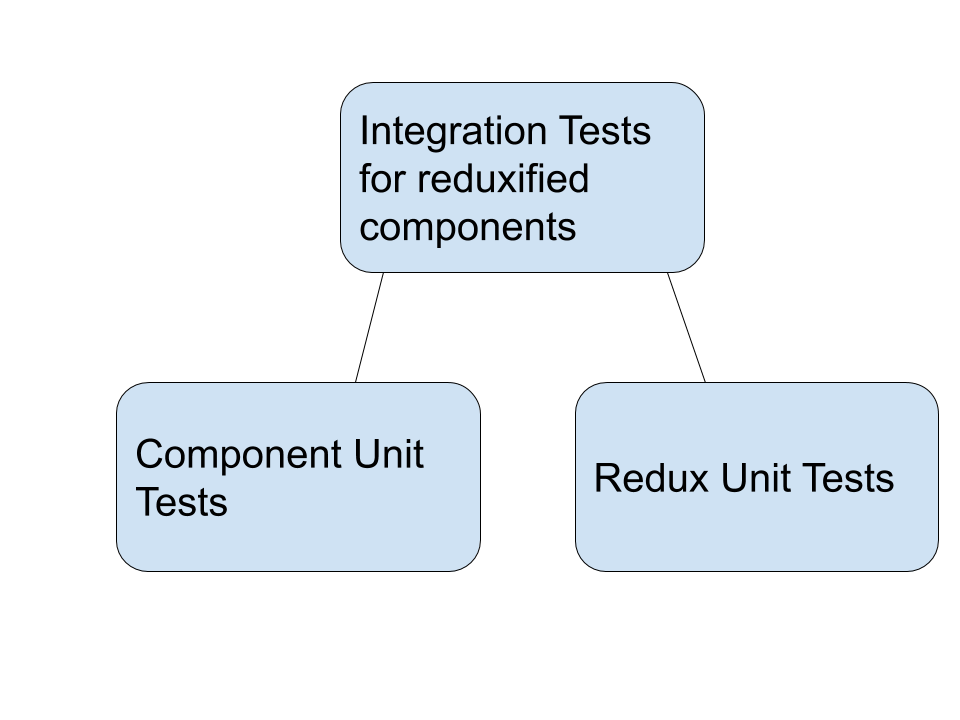
Component Unit Tests
The most straightforward tests in this app are component unit tests.
Typically, in a redux application, the components are thin, and most of the business logic is implemented with redux reducers/actions and selectors. But it still is worthwhile to test components, especially if they have any kind of logic in them whatsoever.
Let’s take a look at an example:
import React from 'react';
import { render, screen, fireEvent } from '@testing-library/react';

// this is the component we are going to be testing
import { CustomCheckbox } from './CustomCheckbox';

// this is an event handler function that we will mock
const changeHandler = jest.fn();

test('render the checkbox and click on it', () => {
  const { rerender, asFragment } = render(
    <CustomCheckbox
      onChange={changeHandler}
      checked={false}
      label={'My Label'}
      idPrefix={'myTest'}
    />,
  );
  // this is an inline snapshot.
  expect(asFragment()).toMatchInlineSnapshot(`
    <DocumentFragment>
      <div>
        <label
          for="myTest-input"
        >
          My Label
        </label>
        <input
          class="form-control checkbox"
          id="myTest-input"
          type="checkbox"
        />
      </div>
    </DocumentFragment>
  `);
  // React testing library encourages you to get elements the way
  // a real user would-- in this case, by the label.
  const checkbox = screen.getByLabelText('My Label');

  // Our first event
  fireEvent.click(checkbox);
  expect(changeHandler).toHaveBeenCalledWith(true);

  // React testing library doesn't automatically rerender controlled
  // form elements.  Instead we have to change the 'checked' prop and
  // explicitly rerender.
  rerender(
    <CustomCheckbox
      onChange={changeHandler}
      checked={true}
      label={'My Label'}
      idPrefix={'myTest'}
    />,
  );

  // now when we click, the checkbox will be set to false
  fireEvent.click(checkbox);
  expect(changeHandler).toHaveBeenCalledWith(false);
});
Redux Unit Tests
It’s a best practice to encode all client-side business logic into redux: reducers, actions, and selectors. This logic can be tested independently of any react components that use it.
This is an example of a Redux unit test:
import { store } from 'app/store';
import { updateToDo } from '../toDoSlice';

test('updateToDo test', () => {
  let state = store.getState().toDo;
  const originalToDo = state.toDoList.find((p) => p.toDoId === 1);
  expect(originalToDo?.isComplete).toBeTruthy();
  expect(originalToDo?.description).toBe('eat tacos');

  store.dispatch(updateToDo({ toDoId: 1, isComplete: false }));
  state = store.getState().toDo;
  let changedToDo = state.toDoList.find((p) => p.toDoId === 1);
  expect(changedToDo?.isComplete).toBeFalsy();

  store.dispatch(updateToDo({ toDoId: 1, description: 'be merry' }));
  state = store.getState().toDo;
  changedToDo = state.toDoList.find((p) => p.toDoId === 1);
  expect(changedToDo?.description).toBe('be merry');

  store.dispatch(
    updateToDo({ toDoId: 1, description: 'eat tacos', isComplete: true }),
  );
  state = store.getState().toDo;
  const backToOriginalToDo = state.toDoList.find((p) => p.toDoId === 1);

  // snapshots can be objects
  expect(backToOriginalToDo).toMatchInlineSnapshot(`
    Object {
      "description": "eat tacos",
      "isComplete": true,
      "profileId": 1,
      "toDoId": 1,
    }
  `);

  // deep object equality
  expect(backToOriginalToDo).toEqual(originalToDo);
});
Note that we have to getState() after each dispatch to get the updated state.
Reduxified Component Integration Tests
Integration tests are defined as tests that integrate multiple “modules” of code together. In this case, we are testing both the component itself and the redux logic that drives it. A “reduxified” component is a component that is wrapped by a react-redux Provider component. Integration testing of reduxified components gives you a second chance to catch buggy logic you might have missed with the component and redux unit tests by themselves.
Here is an example of a reduxified component integration test:
import React from 'react';
import {
  render,
  screen,
  fireEvent,
  RenderResult,
} from '@testing-library/react';
import { Provider } from 'react-redux';

import { store } from 'app/store';
import { ToDoItem } from './ToDoItem';
import { ToDo, reset } from 'features/toDo/toDoSlice';

const renderItem = (toDo: ToDo): RenderResult =>
  // the ToDoItem component is now "reduxified"
  render(
    <Provider store={store}>
      <ToDoItem toDo={toDo} />
    </Provider>,
  );

const getToDo = (toDoId: number): ToDo => {
  const toDo = store.getState().toDo.toDoList.find(
    (p) => p.toDoId === toDoId
  );
  expect(toDo).not.toBeUndefined();
  // Typescript doesn't understand that ToDo must be defined here,
  // so we explicitly cast
  return toDo as ToDo;
};

test('renders ToDoItem', () => {
  const toDo = getToDo(1);
  const { asFragment } = renderItem(toDo);
  expect(asFragment()).toMatchSnapshot();
});

test('ToDoItem description field', () => {
  let toDo = getToDo(1);
  const { asFragment, rerender } = renderItem(toDo);
  let textInput = screen.getByLabelText('Description');
  expect(textInput).toHaveValue('eat tacos');
  fireEvent.change(textInput, { target: { value: 'live, laugh, love' } });

  textInput = screen.getByLabelText('Description');
  toDo = getToDo(1);
  expect(toDo).toMatchInlineSnapshot(`
    Object {
      "description": "live, laugh, love",
      "isComplete": true,
      "profileId": 1,
      "toDoId": 1,
    }
  `);

  // it is necessary to reduxify the component when you rerender also
  rerender(
    <Provider store={store}>
      <ToDoItem toDo={toDo} />
    </Provider>,
  );
  expect(textInput).toHaveValue('live, laugh, love');
  expect(asFragment()).toMatchSnapshot();
});

test('ToDoItem isComplete field', () => {
  // Whenever you do multiple redux tests in the same file,
  // it's best practice to reset the state.
  // Otherwise the state from a previous test could bleed into
  // a new one and cause unexpected issues.
  store.dispatch(reset());
  let toDo = getToDo(1);
  const { asFragment, rerender } = renderItem(toDo);

  // It's best practice to get an element the same way a real user
  // would get an element. In this case by the label text.
  const isCompleteCheckbox = screen.getByLabelText(/complete/i);
  expect(isCompleteCheckbox).toBeChecked();

  // this is how we check/uncheck a checkbox
  fireEvent.click(isCompleteCheckbox);
  toDo = getToDo(1);
  expect(toDo).toMatchInlineSnapshot(`
    Object {
      "description": "eat tacos",
      "isComplete": false,
      "profileId": 1,
      "toDoId": 1,
    }
  `);

  // it is necessary to reduxify the component when you rerender also
  rerender(
    <Provider store={store}>
      <ToDoItem toDo={toDo} />
    </Provider>,
  );
  expect(isCompleteCheckbox).not.toBeChecked();
  expect(asFragment()).toMatchSnapshot();
});
Snapshot tests
In case you are not familiar with them, snapshot tests are a great tool to add to your testing toolbox. Snapshot tests match a previous snapshot of data with a new snapshot of data. Snapshot data can be a string, rendered HTML, or a POJO (plain old JavaScript object). If they are different, the test will fail. If a snapshot test fails, you will have an option to either update the snapshot or investigate further. Snapshot tests are not meant to replace traditional unit test expect statements, which test specific bits of data, but rather augment them. I find that snapshot tests are a great “early warning” system to bring to my attention that something has changed, no matter how minor or trivial it might seem at first. In contrast, traditional tests that test specific data are more focused on correctness. Jest supports both inline snapshots, good for small snapshots, and snap files when the snaps are large and interfere with code readability inside your test file. Syntax highlighting of snapshots is provided by the Jest Snapshot Language Support extension.
Running Tests
If you have the VSCode Jest extension, you don’t have to do anything to run your tests, and they will be run in the background as you edit and save your code. Problems will be highlighted and appear in the Problems tab of your integrated terminal:

You can also hover over the highlighted code to get the details of the error:
If, for some reason,n you want to run your tests from the command line, you can either do it in watch mode (which is somewhat superfluous with the VSCode Jest extension):
npm test |
Or you can run tests in CI (continuous integration) mode, which is essentially the same thing but doesn’t watch the files and so runs non-interactively:
npm run test-ci |
Debugging Tests with VSCode
In the case that it’s not apparent why your test is failing, you can step through your test with VSCode’s debugger. Just like you can debug your app with VSCode, you can debug your tests also. First, set breakpoints in your code by clicking to the left of the line you want to debug. This creates a red circle to represent the breakpoint.

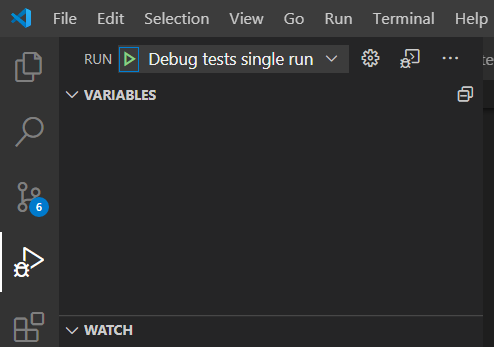
In this project, I set up a launch configuration called Debug Tests Single Run. If you are not familiar with VSCode launch configurations, you can launch it by clicking on the green triangle.
Now you have the full power of debugging:
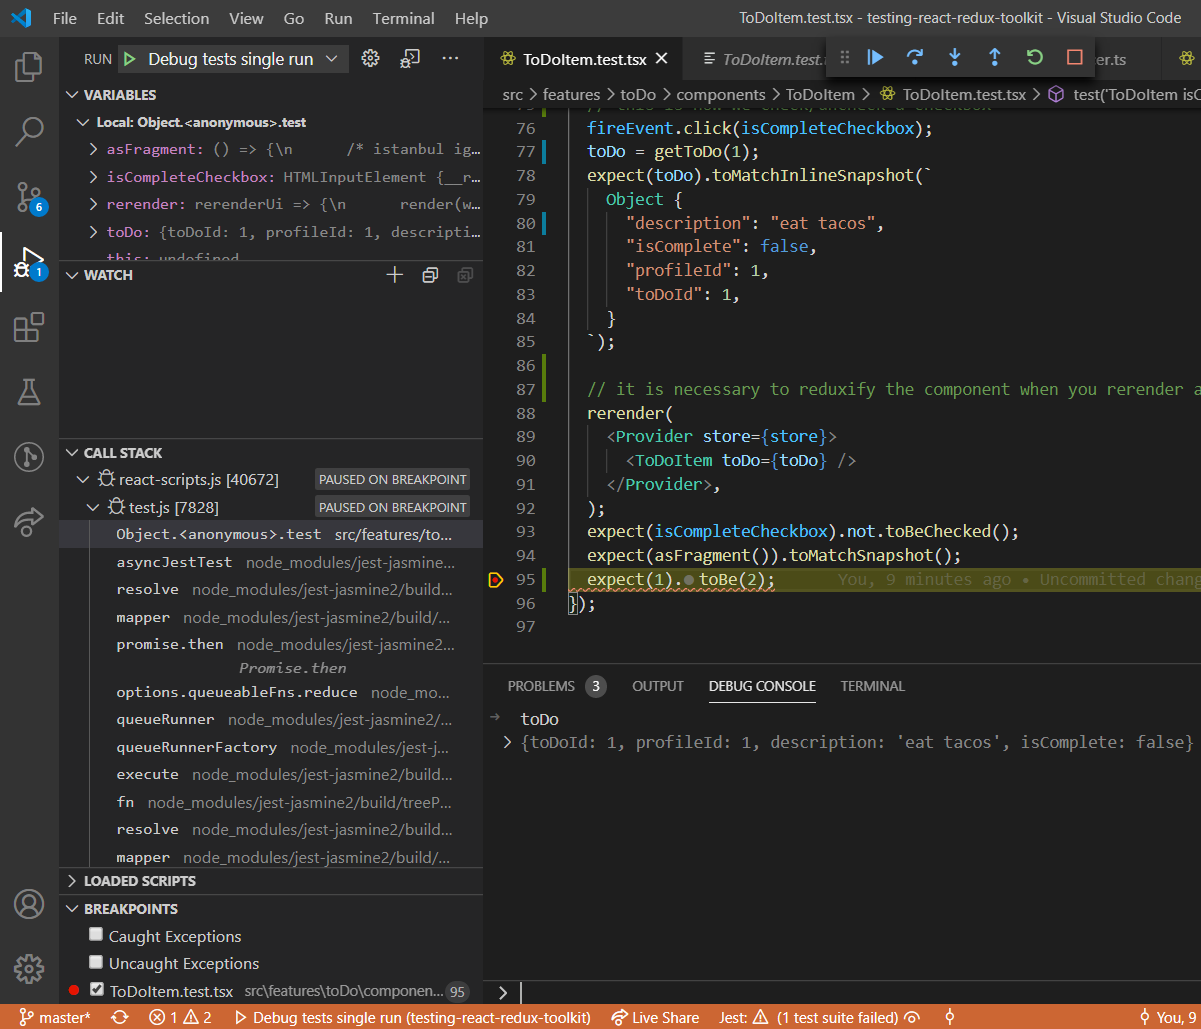
You can step into code over code, and you can execute expressions in the debug console of the integrated terminal. A full discussion of the power of debugging inside VSCode is beyond the scope of this blog post, but you can read more about it here.
Debugging Tests with Google Chrome
Just as you can debug your app with the Google Chrome browser, you can debug your tests in Google Chrome, too. I’m not completely sure what the advantages are of debugging in Chrome vs. VSCode, but if you are already familiar with debugging in Chrome and want to try it for your tests, this might be a good option for you. First, put a debugger statement somewhere in the test you want to debug:
import { store } from 'app/store';
import { updateToDo } from '../toDoSlice';

test('updateToDo test', () => {
  // this will set a breakpoint when you debug this test in your browser
  debugger;
  let state = store.getState().toDo;
  const originalToDo = state.toDoList.find((p) => p.toDoId === 1);
  expect(originalToDo?.isComplete).toBeTruthy();
  expect(originalToDo?.description).toBe('eat tacos');
Now run the following npm script:
npm run test-debug |
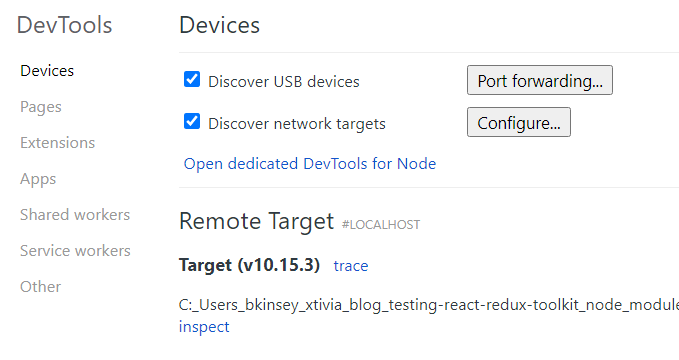
In your browser, open a link to about: inspect. Next, click the inspect link:
This will open up Chrome’s debugger tool.
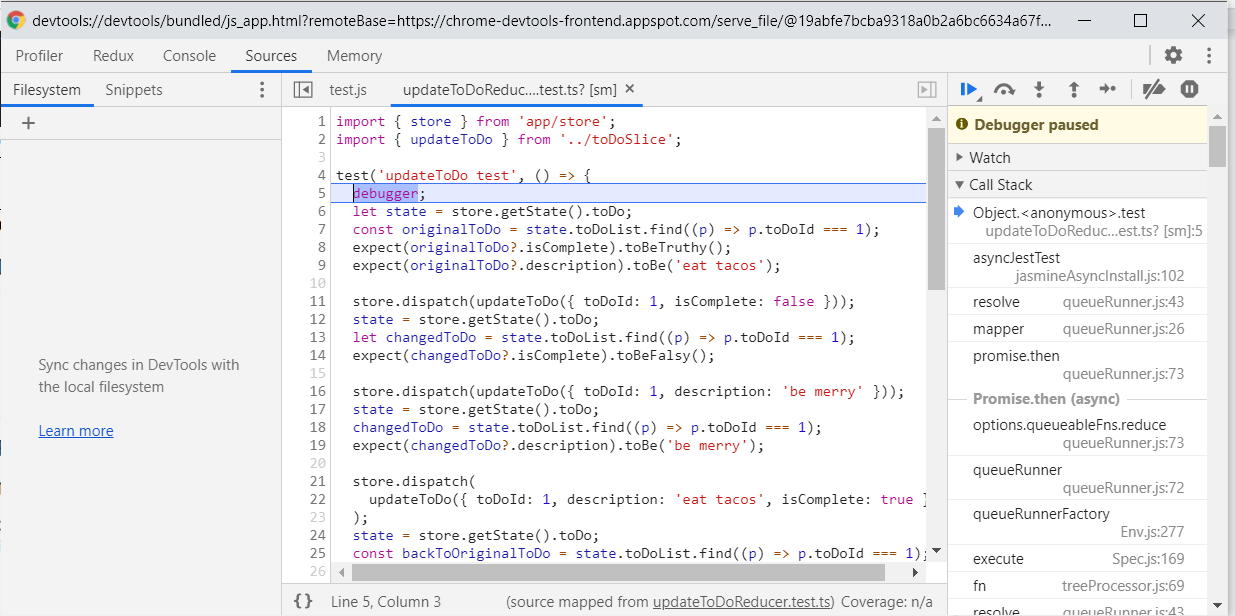
And you can step through the tests as normal. You can learn more about Chrome’s debugger here.
Test Coverage
Test coverage in a Create React App is accomplished with a tool called Istanbul. I strive for 100% test coverage of the code that should be tested. Why not? It’s fun. Seriously though, it pays to be systematic.
Sometimes, I want to deliberately omit files from the coverage statistics. In this project, we ignore the files by adding them to the jest configuration in package.json prefixed with “!”
  "jest": {
    "collectCoverageFrom": [
      "src/**/*.{ts,tsx}",
      "!/node_modules/",
      "!src/serviceWorker.ts",
      "!src/index.tsx"
    ]
  },
Sometimes, we want to deliberately omit testing certain blocks of code that we know are irrelevant for testing. In this case, I want to ignore that code that checks for “hot module reloading.” We do this by adding a special comment /* Istanbul ignore next */, like this:
import { configureStore, ThunkAction, Action } from '@reduxjs/toolkit';

import rootReducer from './rootReducer';

export const store = configureStore({
  reducer: rootReducer,
});

/* istanbul ignore next */
if (process.env.NODE_ENV === 'development' && module.hot) {
  module.hot.accept('./rootReducer', async () => {
    const newRootReducer = (await import('./rootReducer')).default;
    store.replaceReducer(newRootReducer);
  });
}

export type RootState = ReturnType;
export type AppThunk = ThunkAction<
  ReturnType,
  RootState,
  unknown,
  Action<string>
>;
(Note that Typescript types never get included in jest test coverage statistics.)
The VSCode Jest plugin has a new feature for overlaying the test coverage onto your source code in the editor. I was unable at this time to get it to work. So, for now, this project uses an npm script to generate a coverage report:
npm run coverage |
This generates an HTML coverage report, which you can open in a browser: /coverage/lcov-report/index.html
In this case, I have 100% statement, function, and line coverage. Not bad.
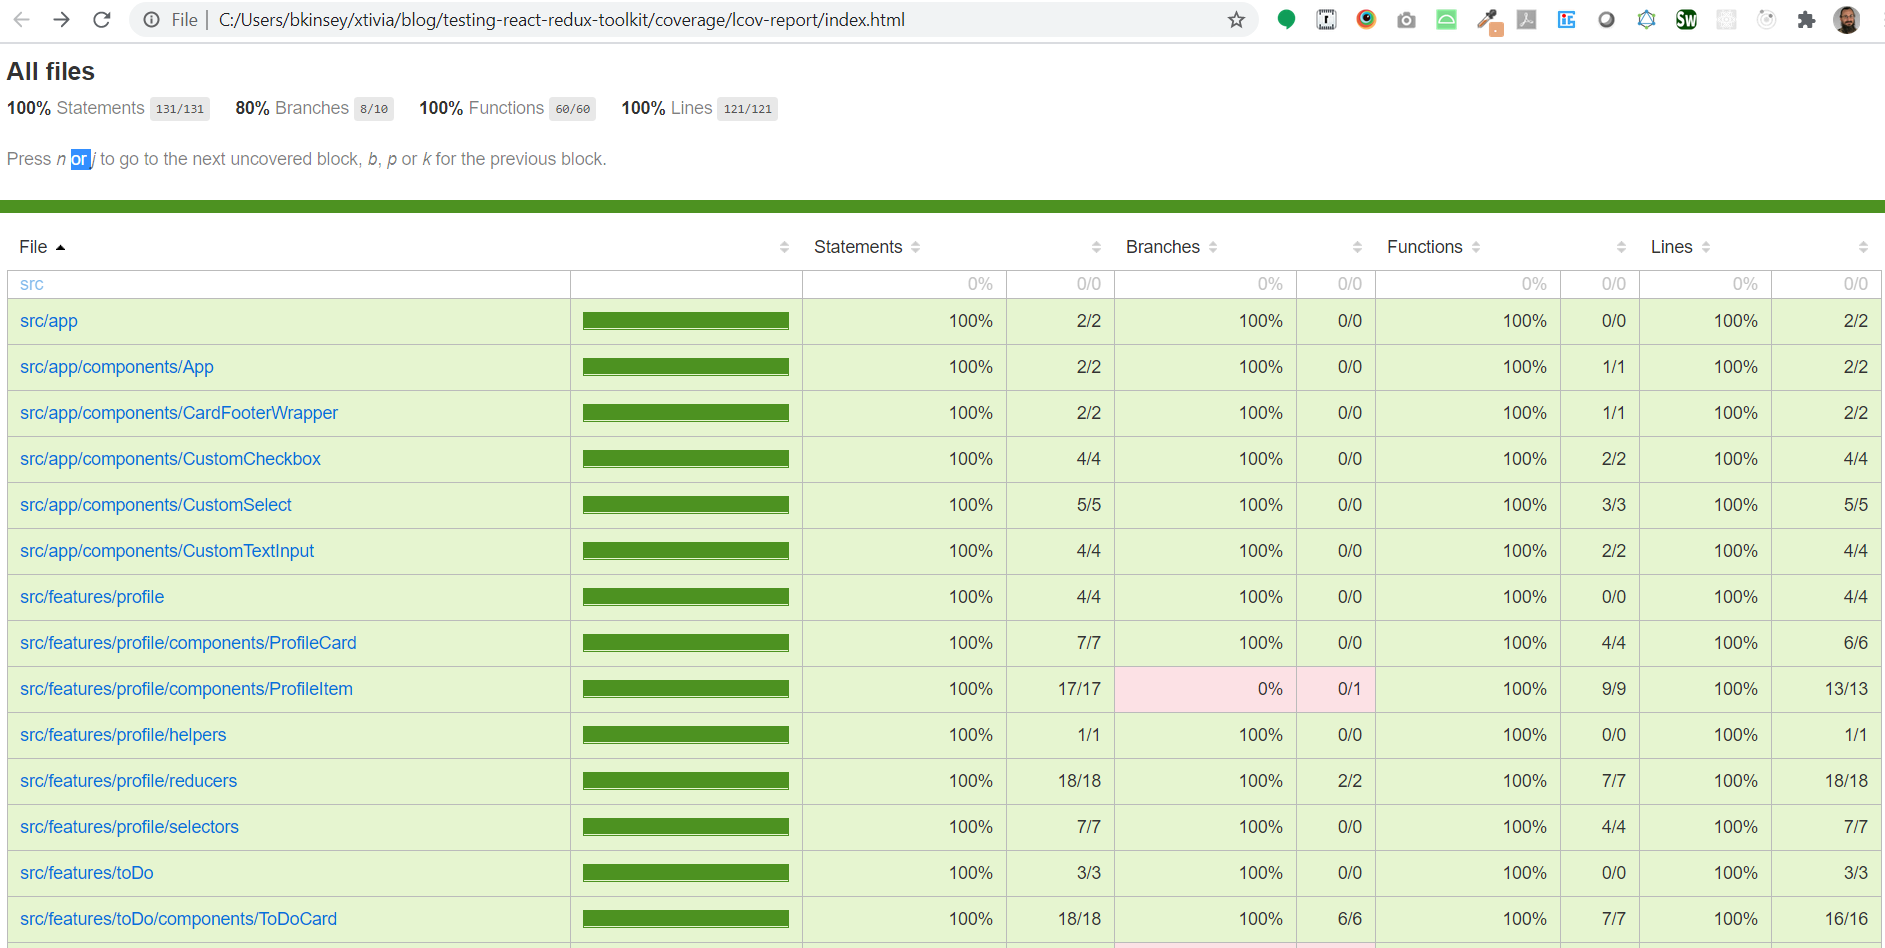
I’m going to click on the src/features/profile/components/ProfileItem link to see what I’m missing.
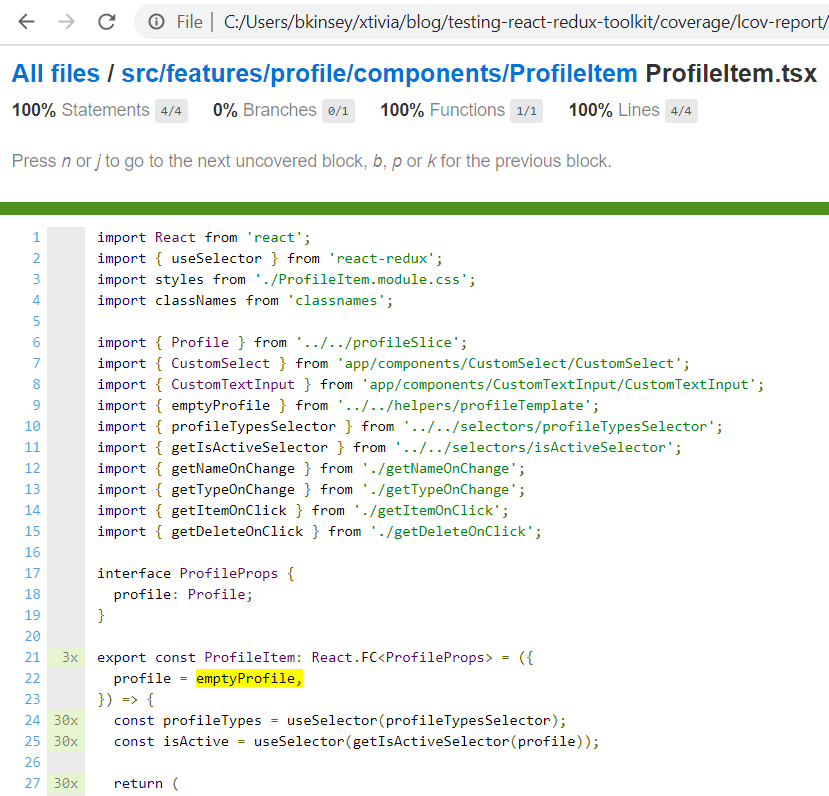
In this case, I can see it’s a prop default that hasn’t been tested.
Summary
I used to see automated testing as dry and mostly pointless. But with modern tooling, testing can actually be fun. And I have seen with my own eyes that testing can indeed catch subtle buggy logic that would otherwise have caused issues down the road. While I’m not religious about Test-Driven-Development, I am completely sold on the value of automated testing in general.
If you have any questions at all, please contact us via comments on this blog post or reach out to us here.