
SUMMARY:
To resolve issues of unreliable email delivery from Salesforce, organizations must implement DKIM (DomainKeys Identified Mail) keys to authenticate outbound messages and ensure they are not marked as spam.
- DKIM verifies email authenticity by assigning outbound emails a private key. In contrast, the public key is published as a TXT record in the domain’s DNS for recipient email providers to confirm.
- Users must choose an RSA Key Size (either the standard 1024-bit or the stronger 2048-bit) and confirm that their DNS provider supports the desired key length before creation.
- The activation process requires Salesforce to generate CNAME and Alternate CNAME records, which must then be published to the domain’s DNS records.
- If the ‘Activate’ button is disabled, users should wait up to 48 hours for DNS records to publish or use online tools like dmarcly.com or mxtoolbox.com to check for correct CNAME publication.
Properly adding and activating these DKIM keys is an essential security measure that protects senders and recipients from phishing and email spoofing, ultimately boosting the reliability of email delivery.
Table of contents
Are you noticing emails sent from Salesforce are not being received? Have you configured automation or flows intended to send notifications via email, but no errors are reported, and emails are not received? Are users sending emails directly from Salesforce but experiencing unreliable delivery?
The issue is likely related to DKIM Keys not being added to and activated in your Salesforce organization.
What is DKIM?
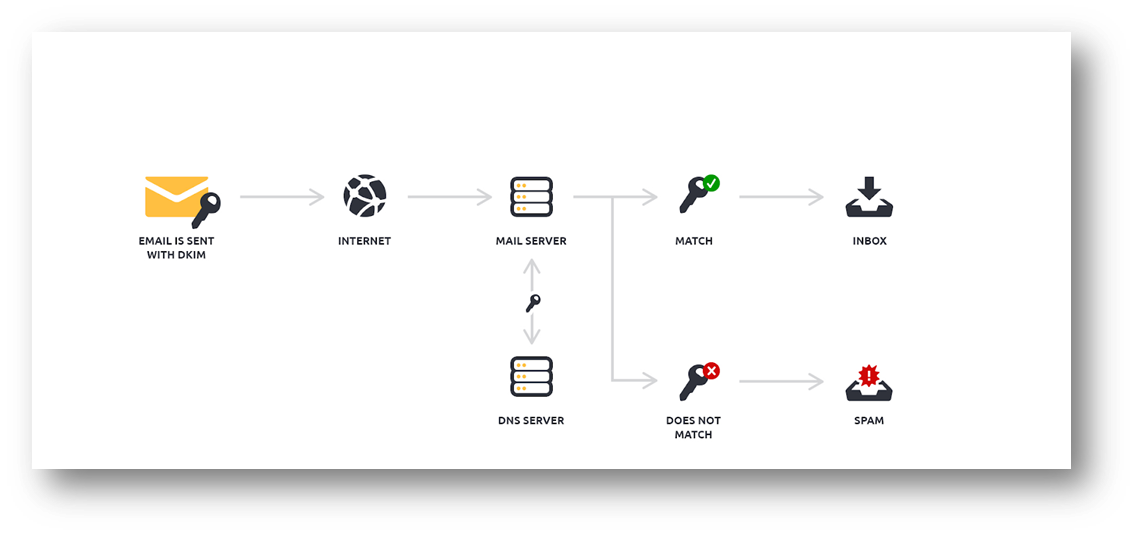
Salesforce uses DKIM keys to verify that outbound emails are legitimate and not spam. Emails are assigned a private key, and the public key is published as a TXT record in your domain’s DNS to allow recipient email providers to confirm authenticity.
The graphic below explains how DKIM works:
Process for Adding and Activating DKIM Keys in Salesforce
1. On your home page, click on Setup in the upper right corner
2. In the Quick Find search box, type in “DKIM” and click on DKIM Keys
3. Click Create New Key; you should see a screen like this:

Select the RSA Key Size
- Before choosing a key size, research possible limitations and security requirements, such as complying with industry-specific security regulations like FIPS (Federal Information Processing Standards). The standard is 1024, but if you want increased security, you can choose 2048. Remember that 1024 is still the standard, and before you choose 1024 or 2048, check your DNS provider and see what length of DKIM key is supported because they need to match.
- 1024-bit vs. 2048-bit DKIM keys—1024-bit DKIM refers to the key length of 1024 characters. The longer the key length, the more challenging it is for hackers to break the DKIM key. For several years, the standard was 512-bit. However, it became apparent that the 512-bit keys were vulnerable and easily cracked.
- While the 1024-bit is far more secure, it’s imperative to stay ahead when securing your emails. Many experts believe the 1024-bit will become vulnerable over the next few years.
- 2048-bit keys. With double the key length, 2048-bit keys provide enhanced tampering protection and the strongest signing for automated security domain authentication. They will be secure against cryptographic attacks for the next several years.
- Is 2048-bit widely supported? This is a common question since the key length is double that of 1024-bit keys. Some domain name system (DNS) providers have limits on the number of characters, although most fully support the key length of 2048-bit keys. Those DNS providers that don’t support 2048-bit keys have unique workarounds, so it’s worth contacting them to discuss different solutions.
4. In the Selector Field, enter a unique name. We recommend that if this is a Sandbox environment, you include that in the name, as these entries are unique in Sandbox vs Production.
- Examples: SalesforceProduction1, SalesforceSandbox1, SalesforceUAT1…
5. In the Alternate Selector, enter a unique name
- The Alternate Selector allows Salesforce to auto-rotate your keys
- Examples: SalesforceProduction2, SalesforceSandbox2, SalesforceUAT2…
6. In the Domain field, enter your domain name
- Examples: xtivia.com, google.com, amazon.com
7. In Domain Match, choose how you want the domain to match.
- Typically, you set this to just the company’s domain name, such as cocacola.com. You’ll see this populated by default; you don’t need to do anything else in most cases.
- However, in some cases, you may want to include sub-domains as well, so here are the instructions from Salesforce on what can be entered in this field:
- A comma-separated list of domain patterns that the domain name must match before Salesforce signs an email with this DKIM key. For example,
- example.com — DomainOnly. Sign if sending domain matches at the domain level only (“example.com,” but not “mail.example.com”)
- *.example.com — SubdomainsOnly. Sign if sending domain matches at the subdomain level only (“mail.example.com,” but not “example.com”).
- Example.com,*.example.com — DomainAndSubdomains. Sign if sending domain matches at the domain and subdomain levels (“example.com” and “mail.example.com”)
8. Click Save
9. After clicking Save, Salesforce will create a TXT file for the DKIM Key to DNS.
- You will see the text, “We’re in the process of publishing the TXT records for this DKIM Key to DNS…”
10. After a few seconds, refresh your page.
11. When the DNS publication is complete, you will see that your CNAME and Alternate CNAME records appear on the DKIM Key Details page.
12. Publish the CNAME and Alternate CNAME records to your domain’s DNS
- Sign in to your domain host
- Get your unique CNAME record
- Add the CNAME record to your domain DNS records
- This would be handled by the person who handles the DNS records for the domain.
If your client needs a better understanding of DKIM Key, below is a sample email you can send to their Administrator.
Hello Administrator,
For Salesforce to reliably send emails using your organization’s domain name, we need some CNAME entries added to your organization’s DNS entries.
Adding these DKIM keys ensures good email deliverability, as it protects both the sender and recipient from the dangers of phishing, email spoofing, and spam.
Here are the CNAME records you need to add:
<<Copy-Paste the 2 CNAME records here>>
If you want to read more on DKIM keys, I have added a link to a Salesforce article on SPF and DKIM FAQ
https://help.salesforce.com/s/articleView?id=000389240&type=1
13. Don’t forget the important last step! You must ACTIVATE the DKIM keys. To do this, the CNAME records should be published on the domain. This is usually quick but can take 24 to 48 hours.
14. Once the CNAME records have been published in the DNS, return to the Salesforce page where the DKIM keys were defined and check if the Activate button is enabled.
- If it’s enabled, the CNAME records have been added successfully, and all you have to do is click on the ACTIVATE button, and you’re all set! You should see the Active checkbox checked on the DKIM entry.
- If the Activate button is disabled, you may need to wait about 24 hours for the records to be published. If, after 24 hours, the Activate button is still disabled, see the troubleshooting steps below.
DKIM Activation Button is Disabled – Troubleshooting Steps
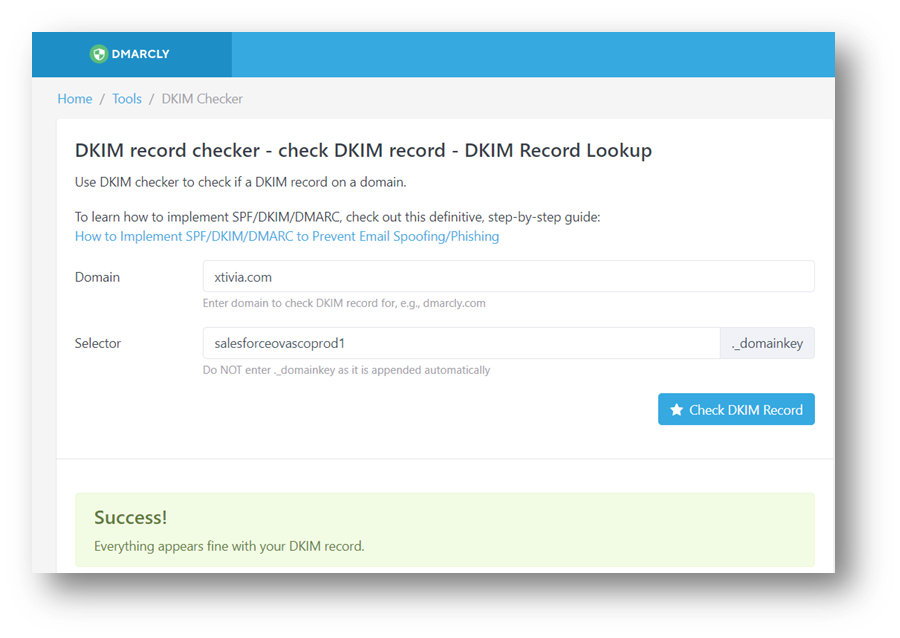
- Check if your DKIM Key has been published correctly. Use online tools like dmacly.com or mxtoolbox.com to check if the CNAME records have been correctly published, as this is usually the issue.
Navigate to:
https://dmarcly.com/tools/dkim-record-checker
Or
https://mxtoolbox.com/dkim.aspx
Type in your domain and selector
- You will see Success if DKIM is published correctly
- You will see “Public key not found” if not
Here’s an example of what it looks like when the CNAME record is successfully found:
Here’s an example of what it looks like when the CNAME record is NOT successfully found:

Remember, our certified CRM experts are ready to help. Trust XTIVIA for your CRM implementation, and ask about our CRM Admin On-Demand service. Call us today!