
AngularJS is a great framework for Single Page Applications (SPAs) – it’s easy to learn and use. There’s no reason not to (and actually every reason to) create your Liferay portlets as AngularJS SPAs. Our organization considers this a primary implementation technique.
The purpose of this blog post is to explain how to create an instanceable Liferay portlet with an AngularJS front-end. This kind of portlet can be added to the same page multiple times and display different data depending on each portlet’s preferences.
When developing AngularJS applications (apps), one usually sets the attribute ng-app on the HTML element that will contain the application. You are limited to declaring and bootstrapping one app per HTML page when using this technique. Try declaring two apps in this manner, and you will see lots of console errors. Plus your apps will not work. So how can we have multiple AngularJS apps on the same page and even multiple instances of the same portlet? The answer is to manually bootstrap AngularJS. Instead of allowing AngularJS to automatically bootstrap using the ng-app attribute, we will instead make the bootstrap call directly and pass in a unique ID for each instance.
The first step will be to make sure the Liferay portlet is instanceable by setting the proper configuration. You also need to namespace all global JavaScript functions and variables, html elements ids, and input field names.
In the liferay-portlet.xml file, configure the portlet to be instanceable as shown below:
<portlet>
<portlet-name>ng-instanceable-portlet</portlet-name>
 <icon>/icon.png</icon>
 <instanceable>true</instanceable>
 <header-portlet-css>/css/main.css</header-portlet-css>
 <footer-portlet-javascript>/js/main.js</footer-portlet-javascript>
</portlet>
The key here is to set instanceable to true.
Namespace all form and input elements properly using <portlet:namespace/>, for example:
...
<form name="<portlet:namespace/>fm" id="<portlet:namespace/>edit-pref-form" action="${updatePreferencesURL}" method="post">
...
<input id="<portlet:namespace/>radio1" type="radio" name="<portlet:namespace/>radioElement" value="Radio 1"/>
To make a portlet instanceable we need to manually bootstrap AngularJS. This code snippet shows an example of how to initialize an app with app-specific parameters.
<div id="<portlet:namespace />"  ng-cloak>
      <div ui-view></div>
</div>
<script>
      var config = {namespace:'<portlet:namespace />',
                    groupName: groupName, people: people};
      bootstrap(config);
</script>
The config object will contain values required by the AngularJS app module, its controllers and services that are unique to each portlet instance. The values of groupName and people come from the back end, which in turn are dependent on selected preferences, as shown below (two instances of the portlet on the same page with different preferences). We’ll talk about the call to bootstrap() in a bit.
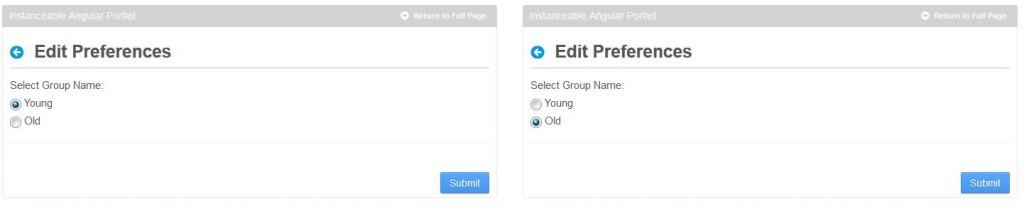
The selected groupname determines which list of people is retrieved.
If all the custom JavaScript code is within jsp files, we will not require the Config object. Instead, we can namespace all the global variables like this:
var <portlet:namespace/>groupName = '${requestScope.groupName}';
var <portlet:namespace/>people = '${requestScope.people}';
That way all the variables are unique to each instance. The reference portlet for this blog has the AngularJS code within .js files and hence will need the Config object.
bootstrap(config) is a custom function call. This function initializes the AngularJS app module, configures routers, loads controllers and services, and then eventually calls the function to manually bootstrap AngularJS.
function bootstrap(config) {
  /** Initialize app module **/
  var app = angular.module(config.namespace, ['ui.router']);

  /** Configure routers **/
  app.config(['$stateProvider', '$urlRouterProvider',
   function($stateProvider, $urlRouterProvider) {
     $urlRouterProvider.otherwise('/');
     $stateProvider
       .state('people', {
          url: '/',
          templateUrl: path + '/partials/people.jsp',
          controller: 'PeopleCtrl'})
       .state('personDetails', {
          url: '/' + config.namespace + '/personDetails/:groupName/:id',
          templateUrl: path + '/partials/personDetails.jsp',
         controller: 'PersonDetailsCtrl'
       });
   }]
  );

  /** Load controllers and services **/
  loadControllers(app, config);

  /** Manually bootstrap AngularJS **/
  angular.bootstrap(document.getElementById(config.namespace),
                   [config.namespace]);
}
The function call loadController(app, config) is made to load all controllers. The reference portlet has no services; if it did, there would have been another call to load services, that is, loadServices(app, config).
Below is the loadControllers() function:
function loadControllers(app, config){
  app.controller('PeopleCtrl', ['$scope', function($scope) {
    $scope.groupName = config.groupName;
    $scope.people = config.people;
    $scope.deletePerson =  function(id){
      for(var i=0; i<$scope.people.length; i++) {
        if($scope.people[i].id == id){
          $scope.people.splice(i,1);
        }
      }
    };
  }]).controller('PersonDetailsCtrl', ['$scope', '$stateParams', '$state',
                  function($scope, $stateParams, $state) {
    $scope.people = config.people;
    $scope.id = $stateParams.id;
    $scope.groupName = $stateParams.groupName;
    $scope.person = {};
    for(var i=0; i<$scope.people.length; i++) {
      if($scope.people[i].id == $scope.id){
        $scope.person = $scope.people[i];
      }
    }
    $scope.backToPeople = function(){
      $state.go("people");
    };
  }]);
}
Below are the controller templates:
people.jsp
<div class="chart-display-wrapper">
  <div class='group-name'><h2>{{groupName}}</h2></div>
  <div class="table-responsive">
    <table class="table">
      <thead>
        <tr><th>#</th><th>Name</th><th>Age</th><th>Action</th></tr>
      </thead>
      <tbody>
        <tr ng-repeat="person in people">
         <td><a ui-sref="personDetails({groupName: groupName,id: person.id})">
           {{person.id}}</a>
         </td>
         <td><a ui-sref="personDetails({groupName: groupName,id: person.id})">
           {{person.name}}</a>
         </td>
          <td>{{person.age}}</td>
          <td>
             <input type="button" class="btn btn-danger"
                ng-click="deletePerson(person.id)" value="Delete"/>
          </td>
        </tr>
      </tbody>
    </table>
  </div>
</div>
personDetails.jsp
<div>
  <span style="font-weight:bold">Group: </span>
  <span>{{groupName}}</span>
</div>
<div>
  <span style="font-weight:bold">Id: </span>
  <span>{{person.id}}</</span>
</div>
<div>
  <span style="font-weight:bold">Name: </span>
  <span>{{person.name}}</</span>
</div>
<div>
  <span style="font-weight:bold">Age: </span>
  <span>{{person.age}}</</span>
</div>
<hr>
<div>
  <input type="button" class="btn btn-primary"
    ng-click="backToPeople()" value="Back"/>
  </input>
</div>
The screen shot below shows the different instances of the portlet configured to show different data.
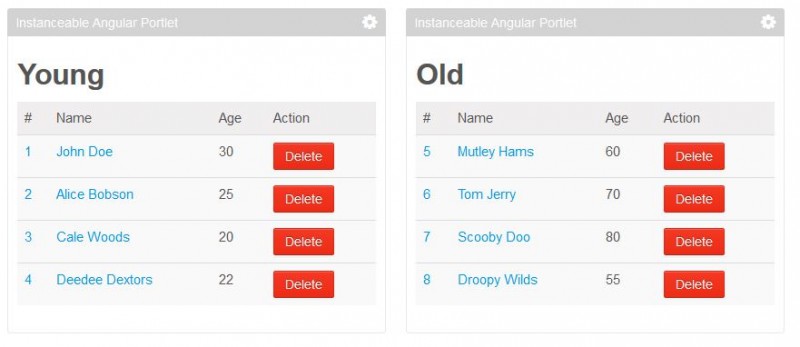
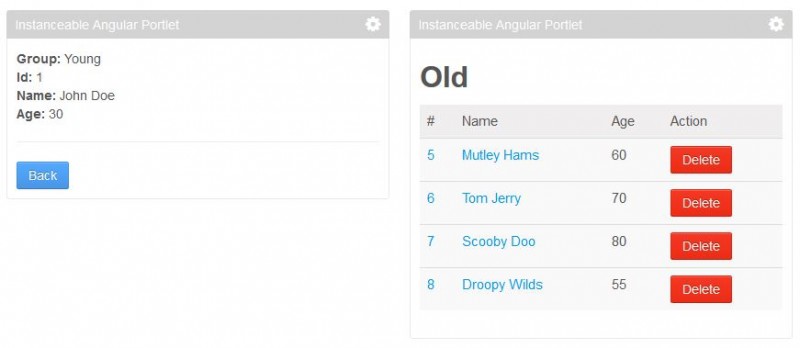
The delete action can be performed on each instance without interfering with another. Also, a user can also navigate back and forth to different routes; in this case a user can view the details of a person and then navigate back to the people page without interfering with the routes of another instance. The example below shows how the portlet instances operate independently, even though they appear on the same page.
You may find some additional details that are helpful here: https://www.liferay.com/web/fimez/blog/-/blogs/angular-adventures-in-liferay-land