For a navigation menu with longer sub menu navigation items, multi column menu navigation layout is the latest design trend which provides a solution for better usability and space management. It’s even nicer to have an image that can be part of the navigation.

Thankfully the power of Liferay + CSS3 makes it possible for us to create some robust navigation and drop-down menus. As Javascript libraries have less or no control over the custom design of liferay navigation items, we will deal this by attaching a webcontent article to the Main Menu Item.
Let’s see how it can be achieved.
1. Create a custom page attribute “menu-article-id” in Portal from Control Panel -> Portal -> Custom Fields -> Page.

you can set the Custom page attribute for a specific page by going to Site Pages -> “Click on a Page” -> Custom Fields
2. Grant the VIEW permission of the attribute to all the roles. By default only the Owner Role has the permission to VIEW
3. In your theme’s navigation.vm you can get the page custom attribute with the below code.
$menuID = $nav_item.getLayout().getExpandoBridge().getAttribute("menu-article-id")This is how the navigation.vm will look:
<nav class="$nav_css_class" id="navigation">
 <h1>
 <span>#language("navigation")</span>
 </h1>
<ul> #foreach ($nav_item in $nav_items) #set ($menuID = $nav_item.getLayout().getExpandoBridge().
getAttribute("menu-article-id"))#if ($nav_item.isSelected()) <li class="selected"> #else <li class=""> #end <a href="$nav_item.getURL()" $nav_item.getTarget()>
<span>$nav_item.icon() $nav_item.getName()</span></a> <div class="child-menu">
#if ($menuID != "" && $menuID)
$journalContentUtil.getContent($group_id, $menuID, null, "$locale", $theme_display)
#else
#if ($nav_item.hasChildren())
<ul>
#foreach ($nav_child in $nav_item.getChildren())
#if ($nav_child.isSelected())
<li class="selected">
#else
<li>
#end
<a href="$nav_child.getURL()" $nav_child.getTarget()>$nav_child.getName()</a>
</li>
#end
</ul>
#end
#end </div>
</li>
#end
</ul>
</nav>You can use the same CSS styles which were used in liferay default theme’s custom.css
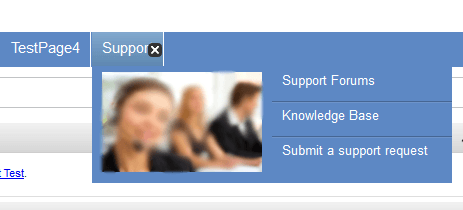
4. Now let’s create a Basic Web Content article in Control Panel -> Web Content.
<div style="width: 360px; left: 0px;">
 <ul style="width: 180px;">
 <li>
 <a href="YOUR LINK TO A LIFERAY PAGE">
<img height="100" src="images/tech_support.jpg" width="160" /></a></li>
</ul>
<ul style="width: 180px;">
<li>
<a href="YOUR LINK TO A LIFERAY PAGE"><span>Support Forums</span></a></li>
<li>
<a href="YOUR LINK TO A LIFERAY PAGE"><span>Knowledge Base</span></a></li>
<li>
<a href="YOUR LINK TO A LIFERAY PAGE"><span>Submit a request</span></a></li>
</ul>
</div>5. Now take the content id of the article and set that to the Custom Page attribute of the Page you would like to show the WebContent based Menu Nav.
The theme will take care of fleshing the Webcontent to the Main menu item.
If you would like to show the default single column behaviour you can just clear the menu-article-id Custom Page attribute.