This hands-on tutorial gives you an introduction to the process for integrating Liferay with OpenTelemetry to extract logs, traces, and metrics from Liferay. We’ll spin-up Liferay using the pre-packaged Liferay DXP container from LIferay, Inc. and integrate it with a locally-run Jaeger container using the OpenTelemetry connector.
Instrumenting Liferay with OpenTelemetry: Prerequisites
To run through the tutorial steps, you’ll need a recent version of Docker installed. Make sure you have the latest version of Docker installed and available from a terminal prompt.
You’ll want the latest version of the OpenTelemetry Java Agent downloaded as well. As of the time this document was authored, you can download the newest version of the agent JAR file here.
To make communications between the Liferay container and the Jaeger container simpler, we create a Docker network to be used by those two containers; to do so, issue the following command in a terminal window:
docker network create --subnet 172.18.0.0/16 liferay-netStart Jaeger Container
Jaeger is an engine geared towards distributed tracing and monitoring for application operations; out of the box, Jaeger can run in multiple modes. We’ll be using the all-in-one container for this exercise, as we’re not looking to scale out the collection infrastructure.
To pull the latest Jaeger container from Docker Hub, issue the following command:
docker pull jaegertracing/all-in-one:latestTo start up the Jaeger container, issue the following command:
docker run -d --name jaeger --net liferay-net --ip 172.18.0.2 \
-e COLLECTOR_ZIPKIN_HTTP_PORT=9411 \
-p 5775:5775/udp -p 6831:6831/udp -p 6832:6832/udp \
-p 5778:5778 -p 16686:16686 -p 14268:14268 \
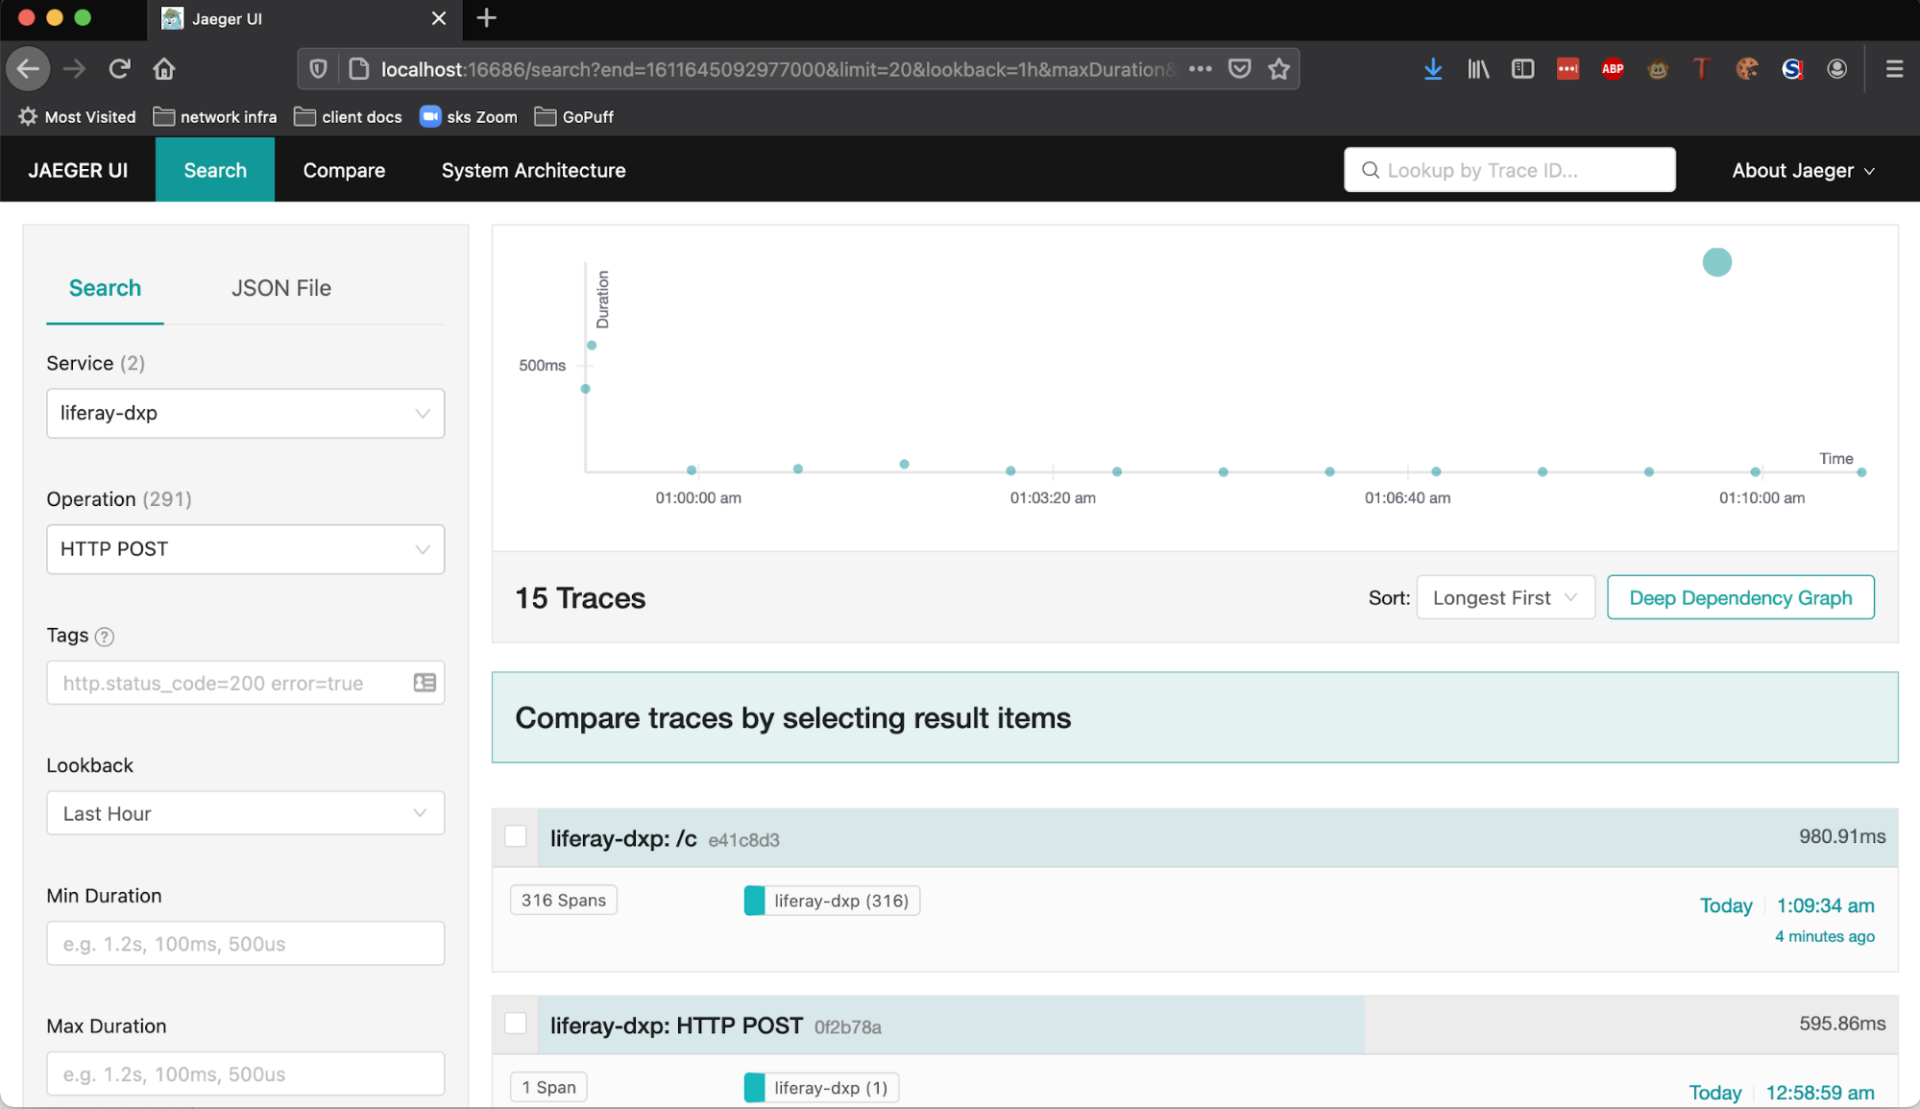
-p 14250:14250 -p 9411:9411 jaegertracing/all-in-one:latestThis will start up a Jaeger instance with local ports mapped to localhost; to access the Jaeger UI, open a web browser and visit http://localhost:16686/search. Once opened, you should see the following screen:

Start Liferay Container
Running Liferay in a container is fairly straightforward. However, there are a few considerations to take into account when spinning up a Liferay container. Liferay provides a custom Docker container image that bundles a Liferay instance up with the OpenJDK Java JVM and Apache Tomcat to make a convenient, flexible deployment of Liferay possible via containers. The container allows you to mount a separate volume containing configuration and library field, which is copied into the $liferay.home location during container initialization. For this exercise, we set up a liferay-home folder containing the following structure:
.
├── files
│   ├── portal-ext.properties
│   └── tomcat
│       ├── bin
│       │   └── setenv.sh
│       └── lib
│           └── opentelemetry-javaagent-all.jar
└── scripts
    └── remove_unneeded_modules.sh
The file structure in the files directory will be copied to the container’s $liferay.home directory as-is, and the files in the scripts directory will be executed before bringing up the Liferay process inside the container. To connect the Liferay instance to the Jaeger instance, the following files or file contents must be present:
- The Tomcat setenv.sh file needs to have a line that looks like the following:
CATALINA_OPTS="${CATALINA_OPTS} -Dapplication.name=liferay -Dapplication.home=/opt/liferay/tomcat -Dotel.exporter=jaeger -Dotel.exporter.jaeger.endpoint=172.18.0.2:14250 -Dotel.exporter.jaeger.service.name=liferay-dxp -javaagent:/opt/liferay/tomcat/lib/opentelemetry-javaagent-all.jar"This line loads the OpenTelemetry agent into the Liferay JVM and instructs the agent to connect to the Jaeger collector via the IP address we specified for the Jaeger container instance.
- The OpenTelemetry Java Agent needs to be present in the Tomcat
libdirectory.
Next, we’ll pull down the liferay/dxp container using the following command:
docker pull liferay/dxp:7.3.10-ga1This retrieves the current GA1 release container for Liferay DXP 7.3. You may wish to check the Liferay Docker Hub tags page to see if there’s a more recent container available. Next, we start up an instance of the Liferay container, mounting the above directory to the /mnt/liferay mount point:
docker run -m 4g -p 8080:8080 --net liferay-net \
    -v $(pwd)/liferay-home:/mnt/liferay \
    -e JAVA_VERSION=zulu11 liferay/dxp:7.3.10-ga1
Note that the command above will map port 8080 on the container to http://localhost:8080; this is how you’ll access the Liferay instance.
You can view a proof-of-concept implementation of this on XTIVIA’s Github organization.
Instrumenting Liferay with OpenTelemetry: Validate Connectivity
Once both the Jaeger and Liferay containers have initialized, you should start seeing trace data from your Liferay instance appear in your Jaeger UI. This example POC tags all Liferay data with the liferay-dxp service name in Jaeger. In the Jaeger UI, you’ll see the Service dropdown populated with that service name and be able to query the trace data coming in.
Instrumenting Liferay with OpenTelemetry: Next Steps
Now that you’re ingesting data from your Liferay DXP instance into your Jaeger instance, you can proceed with tagging specific spans and instrumenting your custom code to gather performance or business metrics. Note that this proof-of-concept is not intended to be a production-level OpenTelemetry/Liferay integration. For that, we need to set up a highly-available collector & storage backend infrastructure using Elasticsearch, and we would likely also integrate Kafka as an intermediary to smooth out telemetry data collection spikes. For that type of scenario, XTIVIA recommends using the Jaeger Operator if your Liferay infrastructure runs in Kubernetes. The best way to attach the collector to the Liferay container for other containerized Liferay architectures depends largely on the container orchestration platform used.
If you have questions on how you can best implement observability best practices into your custom application and/or need help with your Liferay DXP implementation or overall Cloud Services, please engage with us via comments on this blog post or reach out to us here.