At XTIVIA, we often perform health checks and performance tuning for clients that have issues with the CPU utilization or memory usage periodically maxing out in the middle of production by the execution of a job or report that consumes much of the available resources leaving normal OLTP operations hanging. The sad truth is no matter how well you tune a database instance or even individual SQL statements to improve performance, there will always be some processes that are going to be resource hogs.
Unfortunately, we are not always in a position to just throw new hardware at the problem and as a matter of fact, dedicating new hardware can often cause as many problems as it solves. So how are we to handle those times where we must overcome performance bottlenecks that are inevitable in many environments?
Say, for example, you have an instance that houses multiple applications. One of those applications is a reporting application that runs expensive and complex reports as part of normal business operations. Whenever these reports run, the resources on the server are consumed and all other requests are, for all intents and purposes, at a standstill. In this case, the ideal solution would be having SQL Server recognize when these reports are being invoked and limit the amount of resources that are allocated to the report.
Conversely, let’s say we have another application that is mission critical and we’d like to guarantee that that application gets all of the resources it needs to complete its processing in a timely manner.
In either case, to correct option might be the Resource Governor included in SQL Server 2008 and later. Using the Resource Governor, SQL Server can recognize specific users and either limit or guarantee the appropriate amount of resources for any particular process or application.
To use this tool we must first enable the Resource Governor by opening SSMS and navigating to ‘Management’ then right-clicking on ‘Resource Governor’ and checking the ‘Enable Resource Governor’ checkbox then click ‘OK’.
With the Resource Governor enabled we now must define which processes get what resources. To accomplish this we must build a few objects within our instance.
The first object we need to build is a ‘classification’ function registered to the Resource Governor. This function is executed every time a request is made and resource contention exists and is used to route requests to the correct ‘workload groups’.
Next object we need is a ‘workload group’ which is used to group one or more processes into a single logical unit to which resource allocation rules can be applied.
Finally, we need a ‘resource pool’ that contains the definitions of the resource allocation specific to the processes we are trying to control.
Using this convention, we can limit CPU and memory resources for troublesome applications or guarantee resource availability for essential applications.
So let’s explore the steps we need to take to use the Resource Governor.
Enabling the Resource Governor:
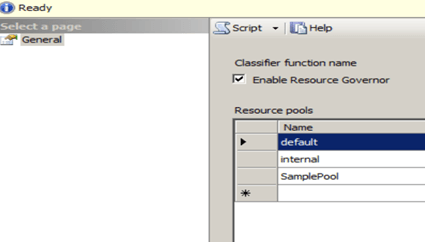
- Open SSMS
- Click on ‘Management’
- Right-click on ‘Resource Governor’
- Choose ‘Properties’
- Check the ‘Enable Resource Governor’ checkbox
- Click ‘OK’
Step 1: Create classifier function
- Alter the following script to fit your circumstances
- Run this script against ‘Master’
USE MASTER
GO
CREATE FUNCTION dbo.ClassifierName() RETURNS SYSNAME
WITH SCHEMABINDING AS
BEGIN
DECLARE @Workload_GroupName SYSNAME
IF SUSER_SNAME() = ‘UserName’ ß Name of user invoking the process
SET @Workload_GroupName = ‘GroupName’ ß Name of the workload group
ELSE
SET @Workload_GroupName = 'default'
RETURN @Workload_GroupName
END
GO
Step 2: Associate classifier function to Resource Governor
- Open SSMS
- Click on ‘Management’
- Right-click on ‘Resource Governor’
- Choose the classifier you just created from the ‘Classifier function name’ drop down list box.
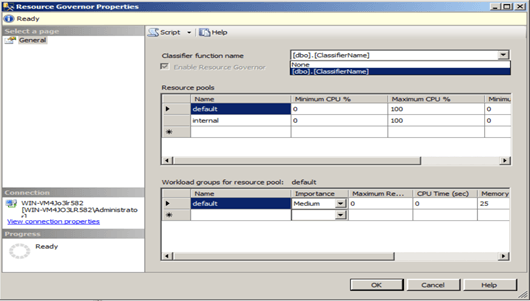
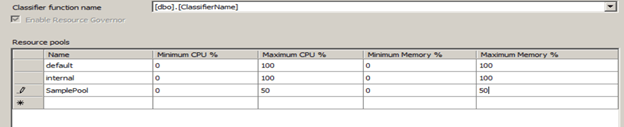
Step 3: Create the resource pool
- In the ‘Resource pools’ grid, click on the asterisk to create a new row
- Enter the name of the new group you want to create into the name column
- Designate the resources you wish to allocate.
- Minimum CPU % – used to guarantee CPU resources
- Maximum CPU % – used to limit CPU resources
- Minimum Memory % – used to guarantee memory resources
- Maximum Memory % – used to limit memory resources
NOTE: The ‘Minimum CPU %’ column must total 100% or less.
You can also use the following script:
CREATE RESOURCE POOL [SamplePool]
WITH
(
min_cpu_percent=0,
max_cpu_percent=50,
min_memory_percent=0,
max_memory_percent=50
)
Step 4: Adjust workload group for new resource pool
- Enter the name of the group you wish to create
- Designate the workload group settings
- Importance – can be Low, Medium or High
- Group Max Requests – max number of requests that can be run in parallel by this group
- CPU Time (sec) – The maximum amount of CPU time that can be used by this group for any one request
- Memory Grant % – maximum memory in percent that this group can use for any one request
- Grant Time-out (sec) – maximum amount of time this group can wait for memory to become available
- Degree of Parallelism – maximum DOP this group can use
- Click ‘OK’
Or use the following script:
CREATE WORKLOAD GROUP [SampleGroup]
WITH
(
group_max_requests=0,
importance=Medium,
request_max_cpu_time_sec=300,
request_max_memory_grant_percent=25,
request_memory_grant_timeout_sec=0,
max_dop=0
) USING [rp_ReportApp]
GO
Step 5: Verify the objects were created
- Expand the ‘Management’ folder
- Expand the ‘Resource Governor’ list
- Expand the ‘Resource Pool’ list (you should see your new resource pool)
Expand the new resource pool (you should see your new group
Or use this script:
SELECT pool_id, name
FROM sys.dm_resource_governor_resource_pools
GO
SELECT group_id, name, pool_id
FROM sys.dm_resource_governor_workload_groups
GO
Step 6: Monitoring the Resource Governor
- Open ‘perfmon.exe’
- Expand ‘Monitoring Tools’
- Click on ‘Performance Monitor’
- Click the green ‘+’ to add a counter
- Expand ‘SQLServer.Resource Pool Stats’
- Choose ‘CPU usage %’
- Click ‘Add’
- Choose ‘Used memory (kb)’
- Click ‘Add’
- Choose the pool you wish to monitor
Click ‘OK’
Dedicating Processes to Specific Users:
It’s important to remember that what we want is for SQL Server to recognize requests that require resource allocation and to route those requests to the correct resource pool. To accomplish this, we need SQL Server to recognize which user is making a request. For that reason, it’s suggested that the processes you are trying to manage be invoked by a specific user. This is not an unusual practice as many applications utilize ‘service accounts’ to perform their tasks.
Performance tuning is one of the most tedious tasks confronting the average DBA and the fact that tuning can only take you so far makes the Resource Governor a valuable tool to help streamline your database operations. This short article only outlines the bare minimum tasks that need to be performed in order to begin using the SQL Server Resource Governor. There are many reasons and benefits of using this tool but as always, I urge you to thoroughly research any task that will impact your production environment. The Resource Governor can give you much better performance if applied correctly to your environment but it can also have unforeseen impact on other processes if not planned thoughtfully and tested thoroughly.