
We see increasing interest in the marketplace to integrate Jaspersoft with Liferay, and at XTIVIA, we have successfully implemented a truly integrated, fully responsive User Experience on Liferay that delivers dashboards and reports leveraging your Jaspersoft investment. This article describes an approach for achieving Liferay Jaspersoft security integration, using Jaspersoft PreAuth to deliver secure reports on Liferay.
Jaspersoft Report Server has multiple ways to authenticate using CAS, LDAP, or an external database. These authentication mechanisms are targeted towards achieving user authentication on the Jaspersoft server. However, this article explains the details of establishing a trust relationship with Jaspersoft server in order to render the reports on a Liferay Portal page using Visualize.js in a custom portlet.
Note: Not all use cases are created equal. This solution architecture provides a fine-grained way of achieving user data propagation from the main user repository (Liferay in this example) and Jaspersoft. PreAuth is one of many authentication mechanisms provided by Jaspersoft. If your use case is different than what is explained here, please review your authentication options as there may be a more appropriate alternative for your scenario.
For those of you familiar with Single Sign On (SSO) and SAML, you could draw the analogy of Liferay acting as the Identity Provider and Jaspersoft Report Server acting as the Service Provider in order to understand the relationships. The terms identity provider and service provider are more used in the context of SAML achieved SSO. However, we are not using SAML here. The rationale of using these terms is only to establish the context that Liferay is source repository of all the users, their roles, their organization hierarchy (if it exists), etc. Jaspersoft Report Server uses the user information provided by Liferay (in a secure way) to create/update the user details (including the roles and organization hierarchy) in Jaspersoft user DB.
Getting Started
Understanding Pre-Authentication
As the name suggests, this mechanism assumes the user is successfully authenticated on a trusted system (Liferay) and is trying to render the reports from a remote Jaspersoft Report Server instance using Visualize.js. PreAuth is designed to handle scenarios where the user repository is located in an external identity provider which acts as the user authentication system and holds the user account information and access rights (like user roles, organization hierarchy etc). This mechanism assumes the incoming user request to the Jaspersoft Report Server has all the required details of the user to successfully create the user account in Jaspersoft user repository.
Let’s delve into the details of the integrating Liferay with Jaspersoft Report Server to render the reports securely. In order to achieve the required level of security, we need to synchronize the user details into the Jaspersoft server. This article assumes Liferay Portal is used as user repository. Users will login to Liferay and navigate to the reports page where user details are securely sent to the Jaspersoft Report Server using Visualize.js. Upon receiving the user details, Jaspersoft Report Server will create/update the user details using the Pre-Authentication module. The diagram below depicts the high-level architecture of integrating Liferay Portal with Jaspersoft Report Server using Visualize.js and Jaspersoft’s PreAuth module to establish user identity on the Jaspersoft server.
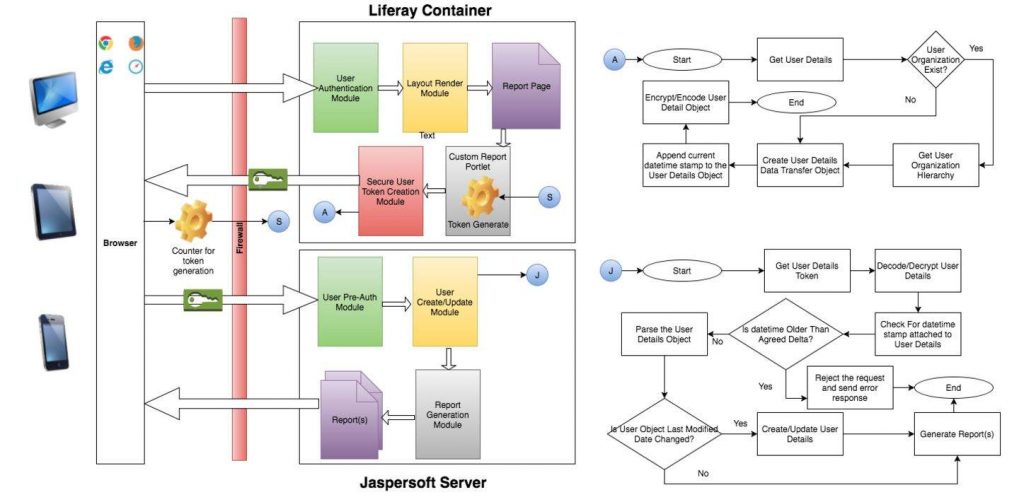
Figure 1: High-Level Architecture of Liferay – Jaspersoft PreAuth
Architecture
Let’s take a deep dive into the high-level architecture depicted in Figure 1. As already mentioned earlier, this high-level architecture assumes the users already exist on Liferay Portal and uses Liferay Portal to successfully authenticate. The high-level flow is as follows:
- User successfully logs in to Liferay and is redirected to the Report rendering page. On the report rendering page, we will add the custom report portlet
- The custom report portlet will render the user details, concatenate the user details as per the standards defined by the Jaspersoft PreAuth modules, concat the current timestamp
- Encrypt the user details and Base64 encode it. Send the encoded user details to the front end where Visualize.js will use it to connect to Jaspersoft and render the report
- Once the Jaspersoft server receives the report request, it will check for the PreAuth request parameter. Once the PreAuth request token is identified, the configured PreAuth Spring module will come into play
- The PreAuth module will decode and decrypt the user details string and check for the current timestamp to validate the token expiry date
- Assuming the current timestamp is in the acceptable delta, parse the delimited user details and create or update the user in Jaspersoft as appropriate
- Upon the user provisioning completion, Jaspersoft Report Server serves the requested report by applying the user authorization details. If the user is not authorized to view the report, an appropriate message will be sent back as the response to the request sent by the Visualize.js code snippet. If the user is authorized to view the report, Jaspersoft will send the requested report as the response
Now that we have seen the high-level flow of the PreAuth, let us try to delve into the details of the individual modules that participate in this mechanism. Let us start with the Liferay Container. It contains different modules that will help in creating a PreAuth token.
Note: Liferay Portal platform provides a variety of features to create multi-tenant enterprise applications. There are many cool features like CMS, advanced authorizations, workflows, digital asset management, etc. The depiction shown in Figure 2 only shows the modules of the Liferay Portal that are of interest in the context of this article. There are a lot of business/logical flows behind the modules which are not covered in this article since they are considered out of scope.
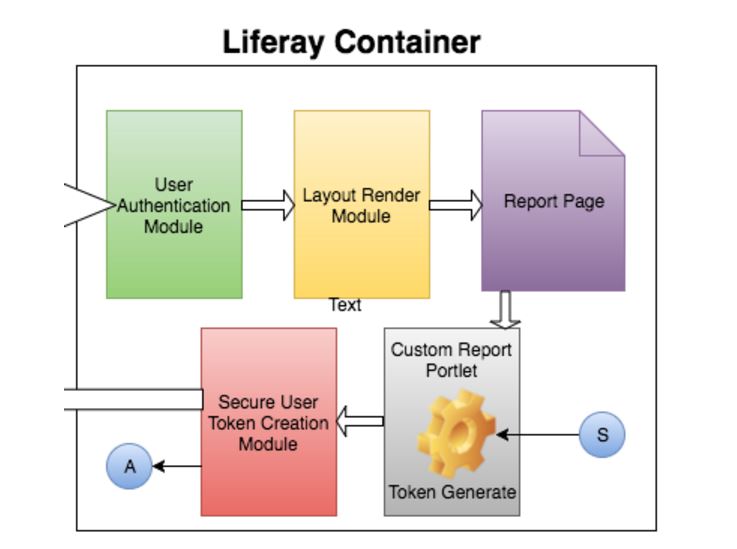
Figure 2: Liferay Container showing the modules participating in PreAuth
- User Authentication Module: This module takes the user’s credentials from the request, authenticates it using the configured Liferay authentication mechanism, and establishes a user session. If the user enters invalid credentials, the authentication will not succeed
- Layout Renderer Module: Upon successful authentication, the Layout Renderer module will render the report page. The Layout renderer module will play the role of authorization. It will see whether the logged-in user has access to the requested page and redirect the user accordingly
- Report Page: A page in Liferay is nothing but a Layout. The Layout renderer module renders the appropriate layout. The rendered layout will have a portlet or multiple instances of the portlet (this is a custom portlet that we developed) configured on the layout
- Custom Report Portlet: Custom Report Portlet, as the name suggest, is a custom portlet developed by XTIVIA to render the Jaspersoft reports using Visualize.js library. This portlet will hold the logic of rendering the required user data that needs to be sent to Jaspersoft and converted into a token that will be sent to Jaspersoft via Visualize.js. Figure 3 depicts the flow for the token formation.
Note: The implementation details of the Custom Report Portlet are not covered in this blog article as it is considered out of scope for this context. XTIVIA will soon release this as a Marketplace application compatible with Liferay 6.2 EE as well as Liferay DXP.
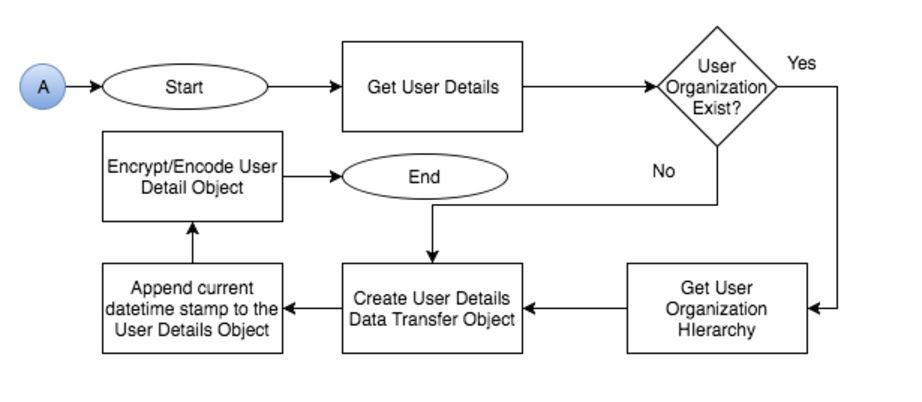
Figure 3: Flow for user data token creation on Liferay
- Get the user details required by the Jaspersoft Report Server to create/update the user. The information includes, but not limited to, user screenName, emailAddress, firstName, lastName etc. As a good practice, always make sure you include the user UUID and use this as the unique identifier to identify the user on Jaspersoft
- Based on the requirements, you can also fetch user roles, their organization hierarchy, user groups, etc
- Once you have all the required user information, append the user information into a pre-defined (see callout #5) string format. The pre-defined string format will be dictated by the Jaspersoft Report Server. This can be any format that works best in your situation
- Also append the user’s lastModifiedDate so that it can be used on the Jaspersoft side to ensure whether the user record needs an update or not
- Get the current timestamp and append it to the user details string created in the previous step. The current timestamp is used to validate the expiry time of the token that will be sent to Jaspersoft. This is a crucial security step to ensure access to the Jaspersoft Report Server is restricted if the token were stolen and used to access reports directly from the Jaspersoft Report Server. By appending the timestamp, Jaspersoft will check the validity of the token by making sure the time difference between the appended timestamp and current time on Jaspersoft server when it receives the request is not more than the pre-configured delta value (This can be something like 60 seconds or 10 minutes or whatever that works for your scenario)
- The next step is to encrypt the user details string (with current timestamp appended) using an encryption algorithm like AES 128 or any other algorithm that is approved by your company standards. Importantly, make sure you are using a 2-way encrypt/decrypt supported algorithm as this will be decrypted on the Jaspersoft side. Why encrypt?
- Visualize.js sends the user token via http(s) to the Jaspersoft server (it is strongly recommended to connect to Jaspersoft server using SSL to avoid token interception). Since the user details are sent via wire, the chances of a middle man attack is very high and the user details can be hijacked. The encryption helps in encrypting the user details and prevents the hijacker from tampering with the token>
- Base64 encode the encrypted user details and hand it over to the Visualize.js script so it can securely render the reports from the Jaspersoft server
Pre-Defined String: The pre-defined string should comply with the format that Jaspersoft defines as Jaspersoft uses this format to delimit the user details and save it to the user DB. For an example, the concat user details can be in the format of
u=jdoe|r=Manager,Organizer|o=Xtivia-Austin-Texas-USA,o=Xtivia-Colorado Springs-Colorado-USA |firstName=john|lastName=Doe|[email protected]|uuid=123e4567-e89b-12d3-a456-426655440000|lastModifiedTimestamp=1469674564%currentTimestamp=2499674564If you carefully observe the currentTimeStamp, which is appended at the end, I have % as the delimiter instead of | so that it currentTimeStamp can be easily identified from rest of the user details
To this point we have mostly focused on the role of Liferay and building the PreAuth token that will be transferred to Jaspersoft Report Server as part of a request for a report. The next section explains about how Jaspersoft processes the request and uses the PreAuth module to provision the user(s).
The Jaspersoft Report Server interprets the incoming report request, looks for the PreAuth request parameter, and if it exists will invoke the PreAuth Spring module configured to process the PreAuth tokens to provision the user details. Let’s take a closer look at the process flow shown in Figure 4.

Figure 4: Jaspersoft Pre-Authentication Token Processing Flow
- Jaspersoft receives the request and looks for PreAuth request parameter. If it exists, the PreAuth Spring module will come into play and handles the user provision and authorization
- Upon receiving the token, the custom created decrypt class will decode and decrypt the token
- Then it will retrieve the token validity timestamp from the decrypted user details string and compare it with the current timestamp. If the delta is beyond the pre-configured value (which can be 60 seconds or 10 minutes or whatever that works for your scenario), then the request will not be served and Jaspersoft server will send an error response. If the delta is within the pre-configured value, then the flow proceeds to the user provisioning module
- In the user provisioning module, the user details string will be delimited based on the Pre-Defined format as noted above. Next, it will verify whether the user record exists in Jaspersoft user DB. If no, then it will create a new user record and assign the user to the roles/organization hierarchy. If yes, then it will verify whether the incoming user details
lastModifiedTimestampis greater than the saved userlastModifiedTimestamp. If it is greater, then update the user records with the new values or else skip user update and process the authorization details and serve the report
Enabling Pre-Authentication on Jaspersoft
Jaspersoft uses Spring security to achieve the user authentication. Configuring PreAuth is very straightforward. Jaspersoft, as part of its distribution, provided a variety of sample configuration files which are used to enable additional modules. These files are located in the <js‑install>/samples/ folder. Under the samples folder, you will see a findexternalAuth-sample-config folder which holds different flavors of externalAuth files to enable external authentication. The file of our interest is sample-applicationContext-externalAuth-preAuth-mt.xml. This XML file is a spring context XML file and will be used to enable PreAuth via external authentication.
To enable the PreAuth, take a copy of sample-applicationContext-externalAuth-preAuth-mt.xml and rename it as applicationContext-externalAuth-preAuth-mt.xml. The Jaspersoft community has provided a beautiful explanation of this file. Going through the bean definitions from this file is almost duplicating the effort. To get a good understanding of this file, please read the Jaspersoft Community documentation. However, I’ll explain some of the important bean definitions that will participate in the token processing.
<bean id="proxyPreAuthenticatedProcessingFilter" class="com.jaspersoft.jasperserver.api.security.externalAuth.preauth.BasePreAuthenticatedProcessingFilter">

   <!– request parameter containing pre-authenticated token with user info –>
   <property name="principalParameter" value="pp"/>

   <!– tokenInRequestParam=false – principalParameter is read from header only. tokenInRequestParam=true – principalParameter is read from request url parameters only. If tokenInRequestParam is not specified, the authentication token is looked up in request header and, then, if not found, in request params –>
   <property name="tokenInRequestParam" value="true"/>

   <!– Works with the plain-text tokens by default –>
   <!– Substitute with your token decryption implementation of com.jaspersoft.jasperserver.api.common.crypto.CipherI interface –>
   <property name="tokenDecryptor">
	   <bean class="com.jaspersoft.jasperserver.api.common.crypto.PlainTextNonCipher"/>
   </property>
   <property name="externalDataSynchronizer">
	   <ref local="externalDataSynchronizer"/>
   </property>
   <property name="authenticationManager">
	   <ref local="preAuthenticatedManager"/>
   </property>
   <property name="authenticationDetailsSource">
	   <bean class="com.jaspersoft.jasperserver.api.security.externalAuth.wrappers.spring.JSAuthenticationDetailsSourceImpl">
		   <property name="clazz">
			   <value>com.jaspersoft.jasperserver.api.security.externalAuth.preauth.BasePreAuthenticatedGrantesAuthorityDetails</value>
		   </property>
	   </bean>
   </property>
   <property name="jsonRedirectUrl" ref="authSuccessJsonRedirectUrl"/>
</bean>
proxyPreAuthenticatedProcessingFilter: This Spring bean is used to enable PreAuth. This bean causes the Spring Security filter chain to handle the authentication processing via proxy bean instead of using the default internal filter chain.
<property name="principalParameter" value="pp"/>:This property helps in triggering the token based authentication.principalParameteris expected to be present in the incoming request. The value of the key should be “pp”. Meaning, the request should havepp=<token>either in the request header or in the request parameter. You could use another value instead of “pp” with the value of your choice.<property name="tokenInRequestParam" value="true"/>:This property acts as a flag to locate the token in the request. A value oftrueindicates the token is coming in as a request parameter, whereas a value offalseindicates the token is coming as a request header. Absence of this property will cause the code to look first in request header and then in request parameters<property name="tokenDecryptor"> <bean class="com.xtivia.jaspersoft.cipher.CustomCipher"/> </property>:tokenDecryptor aids in decrypting the token. Replace the bean class with your custom implementation. The custom implementation should implement Jaspersoft’s decrypt algorithm interface CipherI.com.xtivia.jaspersoft.cipher.CustomCipheris a custom implementation that we created for our use case. The following code snippet shows a sample decrypt method implementation (the following snippet does not show the complete implementation of token decryption. It only shows a part of the implementation. Please make sure you are using the same algorithm that you used to encrypt on the Liferay side)
public class CustomCipher implements CipherI {

	private static final Log logger = LogFactory.getLog(CustomCipher.class);

    @Override
    public String decrypt(String text) {
        if(text != null){
            try {
            logger.info("string received: ["+text+"]");
                final SecretKeySpec key = generateKey(password);

                byte[] decodedCipherText = Base64.decodeBase64(text);

                byte[] decryptedBytes = decrypt(key, ivBytes, decodedCipherText);
                String message = new String(decryptedBytes, CHARSET);
                return message;
            } catch (UnsupportedEncodingException e) {
                e.printStackTrace();
            } catch (NoSuchAlgorithmException e) {
                // TODO Auto-generated catch block
                e.printStackTrace();
            } catch (GeneralSecurityException e) {
                // TODO Auto-generated catch block
                e.printStackTrace();
            }
            return text;
        }
        return null;
    }
}
<property name="authenticationManager"><ref local="preAuthenticatedManager"/></property>:The bean provides the facility to process the authentication token. This property references topreAuthenticatedManagerbean. ThepreAuthenticatedManagerbean definitions looks as follows
<bean id="preAuthenticatedManager" class="com.jaspersoft.jasperserver.api.security.externalAuth.wrappers.spring.JSProviderManager">
	<property name="providers">
		<list>
			<!-- This bean calls upon preAuthenticatedUserDetailsService to create user details based on a token extracted from request by proxyPreAuthenticatedProcessingFilter -->
			<bean class="com.jaspersoft.jasperserver.api.security.externalAuth.wrappers.spring.preauth.JSPreAuthenticatedAuthenticationProvider">
				<property name="preAuthenticatedUserDetailsService">
					<bean class="com.jaspersoft.jasperserver.multipleTenancy.security.externalAuth.preauth.MTJSPreAuthenticatedUserDetailsService">
						<!-- Token format configuration example for token: u=obama|r=PRESIDENT,HUSBAND|o=WhiteHouse|pa1=USA,Kenya|pa2=Washington -->
						<property name="tokenPairSeparator" value="|"/>
						<property name="tokenFormatMapping">


<map>
								<entry key="username" value="u" />
								<entry key="roles" value="r" />
								<entry key="orgId" value="o" />
								<entry key="expireTime" value="exp" />
								<entry key="profile.attribs" >


<map>
										<entry key="profileAttrib1" value="pa1" />
										<entry key="profileAttrib2" value="pa2" />
									</map>


								</entry>
							</map>


						</property>
						<property name="tokenExpireTimestampFormat" value="yyyyMMddHHmmssZ"/>
					</bean>
				</property>
			</bean>
		</list>
	</property>
</bean>- The
com.jaspersoft.jasperserver.api.security.externalAuth.wrappers.spring.preauth.JSPreAuthenticatedAuthenticationProviderdictates the token format, the delimiter and the mapping of the user variables. As per the above example,tokenPairSeparatoris the pipe (|). However, you can change it to any other character. Please make sure that this is the delimiter that you use to construct the user details on the Liferay Portal. You can also update thetokenFormatMappingto meet your requirements.
Once you make the required changes to the applicationContext-externalAuth-preAuth-mt.xml file, please move the file into the <JS Server Install Location>/apache-tomcat/webapps/jasperserver-pro/WEB-INF folder and restart Jaspersoft server. Assuming all the changes in the applicationContext-externalAuth-preAuth-mt.xml file are made appropriately, after the server restart the external token authentication is ready to use.
The next step is to send the encrypted user details token created by the custom reporting portlet as the PreAuth principalParameter parameter (pp as per the configuration explained above) using the Visualize.js. Decryption, user provisioning, authorization and report serving will be taken care by the Jaspersoft Report Server.
Additional Reading
You can read more about integrating Jaspersoft reports with Liferay in another XTIVIA blog post titled “Do you want to integrate Jaspersoft Reports with Liferay?” on the XTIVIA site at https://www.xtivia.com/integrate-jaspersoft-reports-with-liferay/