Contentful is a leading agile content management platform that is flexible and supports digital experience innovation, at scale. However, with its Headless CMS approach, a key question that is uppermost in the minds of the content management team is whether Contentful supports What-You-See-Is-What-You-Get (WYSIWYG) editing. Not exactly, but it comes very close. You can easily build a Content Preview feature and tie that into the Contentful management interface such that content creators can click one button to preview exactly how their content will appear. This article is a tutorial on how to set up content previews for a Contentful-based website built in Next.js.
Developer: Why Implement a Preview Mode?
Content Editor: Isn’t it obvious? I WANT TO SEE HOW MY CONTENT CHANGES WILL LOOK WITHOUT HAVING TO WAIT ON A WEBSITE BUILD AND WITHOUT PUBLISHING MY CONTENT.
Preview mode allows the content manager to view an entirely new blog post or a modified website page with one click with no risk of breaking existing features, and no need to wait on builds. Yes, in this day and age, with the speed and agility of deployment platforms like Vercel, Netlify, Amplify, or Heroku, your builds are fast but not fast enough for the needs of your content team that wants instant previews. Additionally, as websites begin to scale in size, build times become longer and the need for a preview mode grows exponentially.
What you need to know before you start this Contentful, Nextjs Preview Setup Tutorial?
There is no need to be an expert in either Next.js or Contentful to follow along; however, this article assumes that the project has at least one content type, and the data is being fetched from Contentful by Next as static or server-side props.
It is important to understand the structure of Contentful APIs. Contentful provides four main REST APIs (Content Delivery, Content Management, Content Preview, and Images) and the GraphQL Content API. Both the REST and GraphQL APIs have their advantages and disadvantages depending on the scale and purpose of the project. It is wise to be prepared to implement both to maximize their advantages at different times.
The Setup in Next.js!
The setup process begins in Next. From the beginning of the project, following best practices makes the implementation far smoother. This means that even while a preview mode may not be set up, it can be prepared for with parameter defaults in server-side or static props.
export const getStaticProps = async ({ params, preview = false }) => {
	// Body.
}
It is important to default the parameter “preview” to false to prevent undefined values, or an accidental trigger of preview mode by the client. By default, “getStaticPaths” will not pass any value for preview to “getStaticProps.” This is what is meant by “best practice.” When working with Contentful, this can/should be present from the beginning.
With preview defaulted to false, it is completely safe to pass it into the data call. The function should be imported from a file containing the API calls to Contentful.
import { getPageBySlug } from '@lib/api';

export const getStaticProps = async ({ params, preview = false }) => {
	const page = getPageBySlug(params.slug, preview);

	return {
		props: {
			page,
		}
     }
}
Which API should I use?
This is the point of the project where one has to decide whether or not it makes sense to use GraphQL. In the case of this example, we are fetching the content of an entire page by its slug. For larger calls like this, it makes the most sense to use Contentful’s Content Delivery API. This was designed by Contentful to be readable and easy to implement quickly.
There are a number of ways to implement this function. The important piece is the logic to tell whether or not we want preview data. This can be done with simple ternary operators, “if” or “switch” statements that route to two different functions, or any other coding method for a two-way decision.
The Call to Contentful
For readability, we can create the calls as two separate variables. The value of “preview” will determine which is used.
const deliveryCall = {
	space: '<contentful_space_id>',
	environment: '<defaults_to_master>',
	accessToken: '<contentful_access_token>'
}
const previewCall = {
	space: '<contentful_space_id>',
	environment: '<defaults_to_master>',
	accessToken: '<contentful_preview_token>',
	host: 'preview.contentful.com',
}
In the example above, the difference between the calls is that the preview uses the preview token as opposed to the regular access token. The preview call must also specify the “host”, setting the value to “preview.contentful.com”.
As shown in the official Contentful documentation, this can then be used to create the client and get the desired entries from Contentful.
const contentful = require('contentful');

export const getPageBySlug = async (slug, preview) => {

	const call = preview ? previewCall : deliveryCall;

	const client = contentful.createClient({ call });
	const response = await client.getEntries({
		content_type: 'YOUR_CONTENT_KEY',
		'fields.slug[in]': 'THE_SLUG_YOU_ARE_LOOKING_FOR',
	})

	return response;
}
Depending on whether or not the preview parameter is set to true, the call will retrieve the draft content from the site. So, how do you set the value of preview from Contentful to true, and how would getStaticProps retrieve data on the client side?
Next.js API Routes!
Next.js found a way to solve these issues with API routes. These can be built with express,js like middleware functions, which are powerful tools for developers. These have many use cases and advantages for the developer building APIs, and in the case of preview mode, they are Next’s solution to the data fetching problem. With a single method, we can set Next.js into a preview mode which makes the “getStaticProps” function act as a server-side function.
Building the preview API
To get started, this step is as simple as adding the file “preview.js” to the pages/api folder in the Next.js project. The name is, of course, completely interchangeable, and there are cases that you may want to make multiple and more specifically named files. For example, it could be called “preview-landing.js” and only be responsible for the landing content type’s middleware.
There are two important query parameters to pass to the preview API endpoint. A “secret”, which is a key that will help ensure only the desired users will reach the preview, and the “slug” used to fetch the correct preview data. These will be destructured in the middleware function and used for verification of data.
Example URL: https://<your-site>/api/preview?secret=<token>&slug=<path>
export default async function handler(req, res) {
	const { secret, slug = null } = req.query;
}
Verifying request parameters
Next.js offers great documentation on how to use these values to verify the content that is being searched for. After destructuring the variables, we will compare the secret passed in to the secret we have created as an environment variable.
Straight from Next.js documentation:
if (secret !== process.env.CONTENTFUL_PREVIEW_SECRET || !slug) {
   return res.status(401).json({ message: 'Invalid token' });
}
The logic is simple: if the secret passed does not match the environment variable, or the slug is not present, the client will receive an “Invalid token” message. This response can and should be customized to provide more information for debugging purposes.
The slug can also be verified. The best way to do this is fetching the slug from Contentful with the same function created earlier:
// Above the handler function:
import { getPageBySlug } from "@lib/api";
// Fetch the headless CMS to check if the provided `slug` exists
const page = await getPageBySlug(slug, true)
// If the slug doesn't exist prevent preview mode from being enabled
if (!page.fields.sections.length) {
return res.status(401).json({ message: 'Invalid slug' });
}By checking for the section length in the response from the function, we can be sure that the response is both in Contentful, and has some data added to it. This is also an important step for the security of the site. The user will be redirected to the path from the fetched slug instead of using req.query.slug, as this could lead to open redirect vulnerabilities.
res.setPreviewData({});
const url = page.fields.slug;
res.setHeader('Content-Type', 'text/html')
res.write(
`<!DOCTYPE html><html><head><meta http-equiv="Refresh" content="0; url=${url}" />
<script>window.location.href = '${url}'</script>
</head>
</html>`
)
res.end()
As mentioned before, the use of “res.setPreviewData({})” will add two cookies to the client and set Next into preview mode. The “getStaticProps” function on the page that is fetched will conveniently now retrieve the preview data on the client side.
Exiting the preview API
Building the middleware function to exit preview mode is very similar to entering. Simply add the file “exit-preview.js” to the pages/api folder in the Next.js project. This function will only need to pull the URL from the preview in order to exit to the same page that is being previewed.
The best way to allow the user to exit the preview is by designing a custom banner that informs the user they are in preview mode. This can display responsively when “preview” passed from getStaticProps is set to true. A button should be added to the banner which links to:
import { useRouter } from "next/router";

const route = useRouter();

// Inside Link:
href={`/api/exit-preview?url=${route.asPath}`}
Inside the exit-preview file, the URL route parameter can be destructured and used to reroute the user to the correct page.
export default function handler(req, res) {
const { url } = req.query;
// Clear the preview mode cookies
res.clearPreviewData()
// Redirect the user back to the page they're previewing.
res.setHeader('Content-Type', 'text/html)
res.write(
`<!DOCTYPE html><html><head><meta http-equiv="Refresh" content=0; url=${url}"/>
<script>window.location.href = "${url}"</script>
</head>
</html>`
)
res.end()
}Enable Preview Mode Inside Contentful!
When running preview mode in the LocalHost, it is enough to add the preview access token and secret token to the .env.local file. If the purpose is to use a live build of the project, whether using Vercel, Amplify, or Heroku, the next step is to add these environment variables there. This will allow the builds to verify the secret and access preview mode.
From here Contentful makes it very easy to add the new preview path into the platform itself. Within the project on Contentful, an administrator can navigate to Settings > Content preview and click “Add Content Preview”.
After giving the content preview a unique name and description, the section below will be populated with all the content types in the space.

Each of these can be checked and given a unique preview URL. Contentful has extensive documentation on creating these URLs, but to make it work with the preview API set up in this article, the URL should be structured as follows:
https://<your-site>/api/preview?secret=<token>&slug={entry.fields.slug}
Contentful will automatically replace what is inside the curly brackets with the desired data, and that’s it! As long as the destination URL in Contentful is built with the API route, and the environment variables have been added exactly as they are expected, Contentful can now enter preview mode with one click.
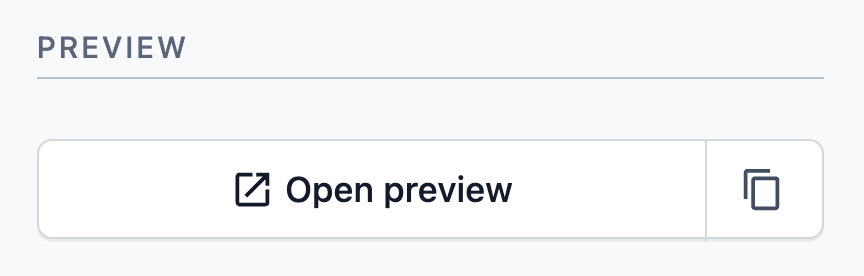
Simply navigate to the content entry of a content type that has been enabled for preview mode, and the open preview option will now link to the URL provided.
Summary: Contentful, Nextjs Preview Setup Tutorial
While this article was designed to be a step by step “how to,” do not hesitate to also rely on the Next.js preview mode documentation and the Contentful preview mode documentation.
If you have questions on any step of this process and/or need help with Contentful best practices, please engage with us via comments on this blog post, or reach out to us or use [email protected].
Additional Reading
You can also continue to explore Contentful by checking out 17 Contentful Best Practices, Tricks and Tips From The Trenches, or A Step-byStep Tutorial For Building a Custom Contentful App and Building a Custom Contentful App that Invokes an External API from a development perspective.