This is a multi-part series of how to integrate Liferay v6.x with an existing Active Directory server at your organization. It’s a fairly simple process if you know what to enter into the various fields, but one key thing that doesn’t come through on the configuration interface is that you will probably need to add a couple of properties to your portal-ext.properties file to get things to work the way you would expect. Convenient, huh?!?! The only way you would know this is if you were to read the Liferay Administrator’s guide which you can download at http://docs.liferay.com/portal/6.0/official/liferay-administrator-guide-6.0.pdf, at least until Liferay changes the link ;).
I am going to walk through several pieces of the Liferay Active Directory integration in this blog post. These goals exist at the high level:
- Configure Liferay to support authentication using Active Directory
- Setup your user as an omniadmin in Liferay
- Make appropriate changes to LDAP configuration properties not available through the Control Panel
- Discuss Active Directory Import / Export and why you might or might not want to use these features
If you’re planning to integrate Liferay with Active Directory directly on your production server, then you should make sure your imports and authentication works exactly correctly before you enable exporting. Most of the Liferay implementations I’ve done either don’t use exporting or they’re not integrating with LDAP. I can see where enabling exporting could be helpful for some scenarios, but in mid-sized and larger corporate environments it’s taboo.
Configuring Liferay to authenticate using Active Directory
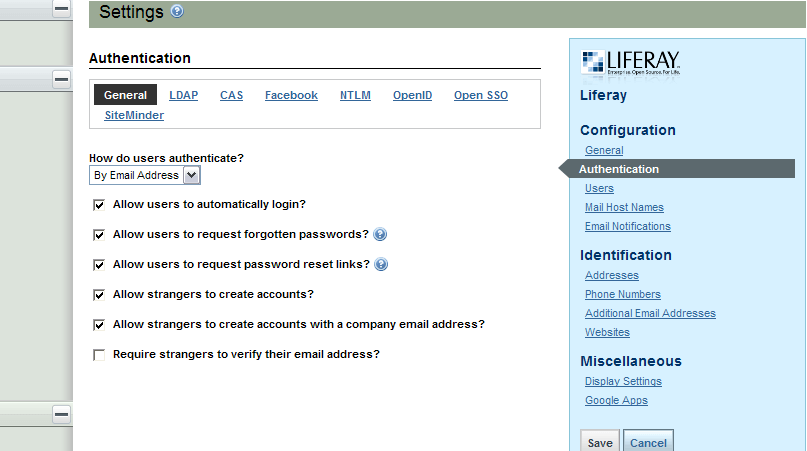
To get started, login as [email protected] using the password test (unless you have changed the omni admin email ID or password). Navigate to the Control Panel and go into Settings under the Portal heading in the nav bar. In the Configuration section on the right, click Authentication. The first thing we’re going to do is change the settings on the General tab. Here’s what you should be looking at.
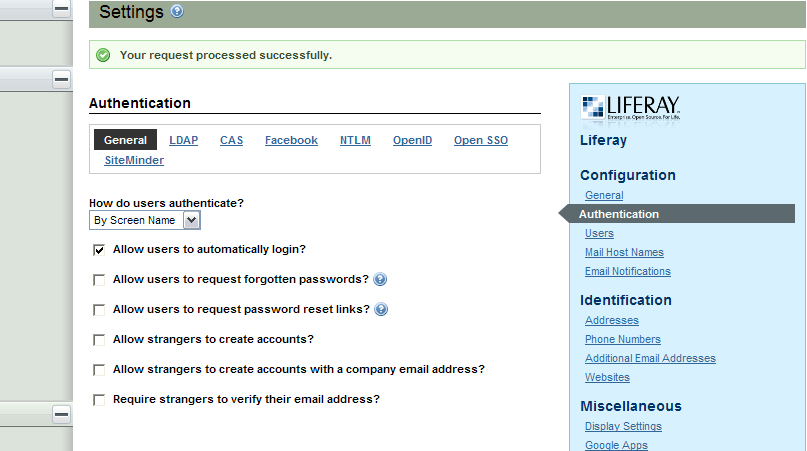
Change the drop down to By Screen Name and uncheck all boxes except Allow users to automatically login. Save your work. The General tab should now look like this:
Now switch to the LDAP tab. The first thing we want to do is add an Active Directory server. You can configure multiple LDAP servers if your implementation calls for it. Enter the Server Name for this configuration. That’s an easy field to miss and it’s not required. I normally just use the fully qualified domain name for the server because it’s easy to identify and relate to the networked environment. For demo purposes, I’m just going to call it My LDAP Server.
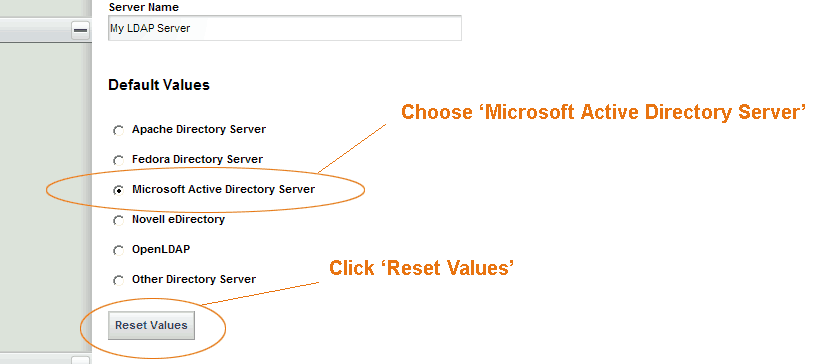
For the default values, choose Microsoft Active Directory Server and click Reset Values. This will populate the form with some common attributes used when integrating with Active Directory integration. When you click Reset Values you will be executing some client side JavaScript that changes the form values in the UI. You will not be changing to a previous configuration you had in place or removing any of the existing configuration parameters in the database.
The Connection section is the basic component for integrating Liferay Portal with Active Directory. The fields here are fairly straight forward, but Principal is a little tricky. The default configuration provided does not hint that this field should be a distinguished name (DN), rather it points you in the direction of using the sAMAccountName attribute on the user you will bind with.
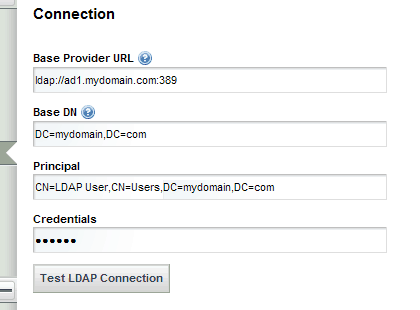
Notice also that I’m using the CN for Users container. Your Active Directory may have a Users Organization Unit, in which case you would use OU=Users instead. This user should have the appropriate access rights in Active Directory to act as an Administrator. For example, I would not be able to use my personal Active Directory user here because my account does not have the authority to browse and administer Active Directory accounts.
Liferay has two different methods by which to connect to LDAP; bind and password-compare. As indicated in the Administrator guide, bind is the default and most popular method for connecting to an LDAP server. Given that Active Directory does not allow you to read a user’s password, password-compare is not a viable option for AD. With other LDAP servers that are set up to store the password insecurely (I highly recommend revisiting your LDAP setup if this is your scenario :)), password-compare can work but I recommend against it. In a nutshell, use bind!
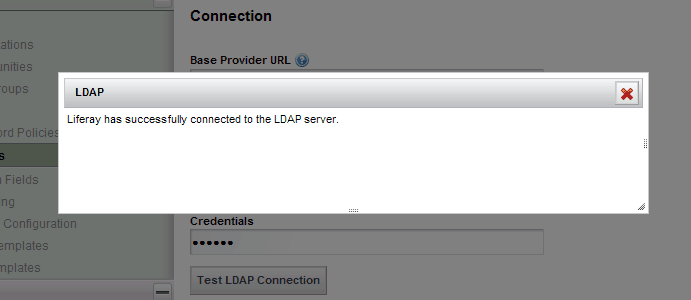
When you have your connection configured, click Test LDAP Connection to validate your configuration. You should see something similar to this:
In the next segment of this series, we will go through setting up the Users section. That segment will cover setting up the Authentication Search Filter and User Import Filter. We will also make modifications to the portal-ext.properties file and setup your user (and potentially others) as omniadmins in Liferay.