
For those of you that do not know what Okta is, an okta is a unit of measurement used to describe the amount of cloud cover at any given location such as a weather station. Isn’t that cool? I didn’t know that there was a unit of measurement for that!
Anyway, that it not the Okta I am talking about. This is.
This is a pretty straight forward example of how you can integrate Liferay and Okta using SAML 2.0. Depending on your environment, version, etc., the values and images might change a little bit, but this will help you to start :).
Okta configuration
1) Go to the Okta website and create a test account for 30 days. It will create a site for you. We will be using https://xtivia.okta.com for our example.
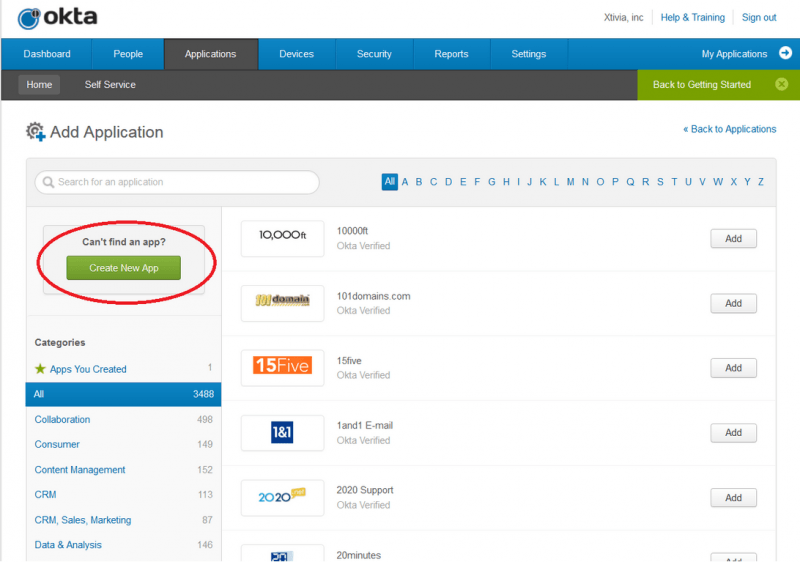
2) Create the app in your okta account. As Liferay is not one of the default apps, you will need to add a new one.
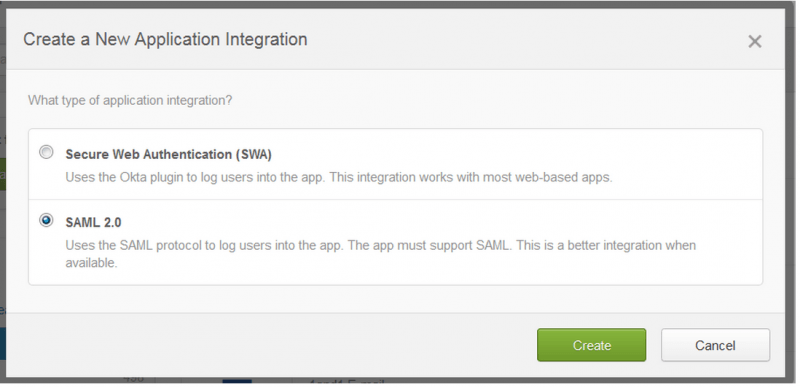
Pick the SAML 2.0 integration option.
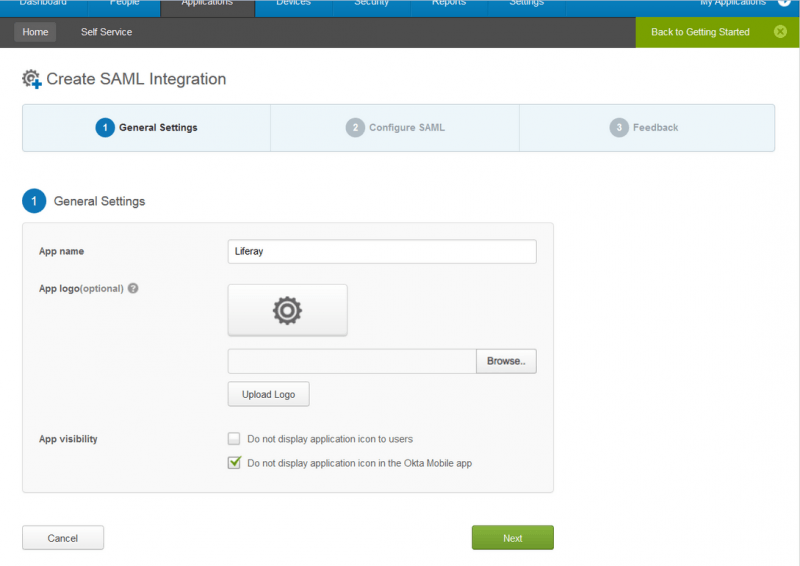
Enter the app name your users will see. You can add a logo to it if you want.
Configure SAML.
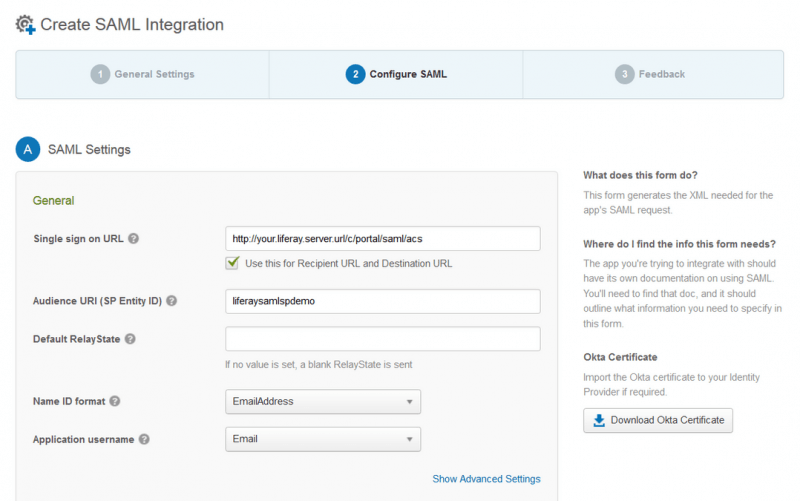
There are some important fields in here:
- The Liferay SSO url
- The audience URI (“liferaysamlspdemo”)
- The name ID format and Application username (we will be using “email address” for both in this example).
Check the Advance Settings and the Attribute Statements:
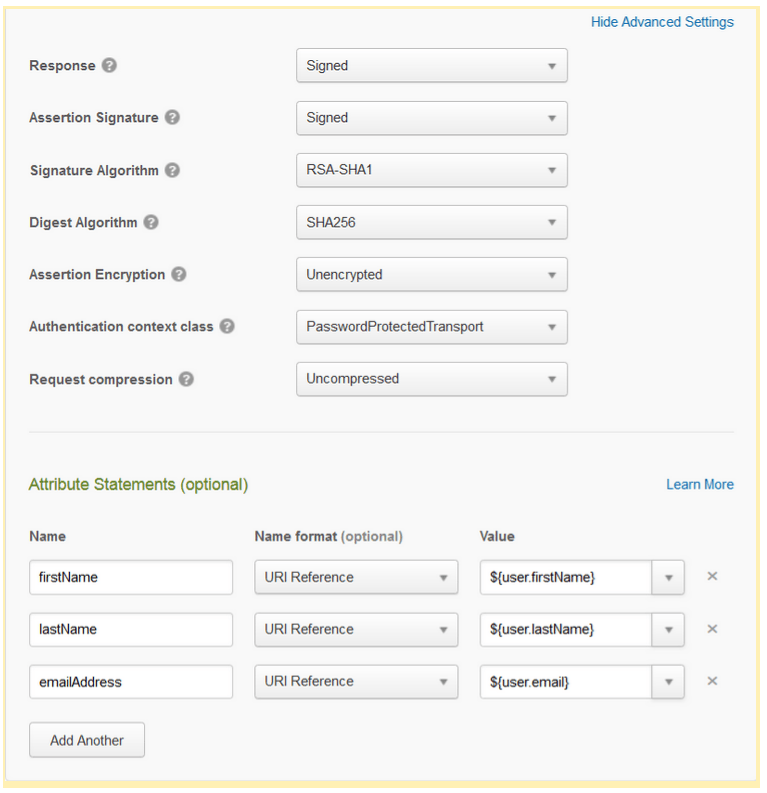
Both the Advance Settings and the Attribute Statements are important.
- The Advance Settings will need to be paired to the signature values in the Liferay server.
- The Attribute Statements will have to be paired to Liferay’s values, so the system is able create the users.
NOTE: If screenName is also needed, it should be paired to $(user.login) in the same way as firstName (paired to $(user.firstName)), lastName ($(user.lastName)) and emailAddress ($(user.email)).
To finish, you must provide feedback. Check This is an internal application that we created and you should be done.
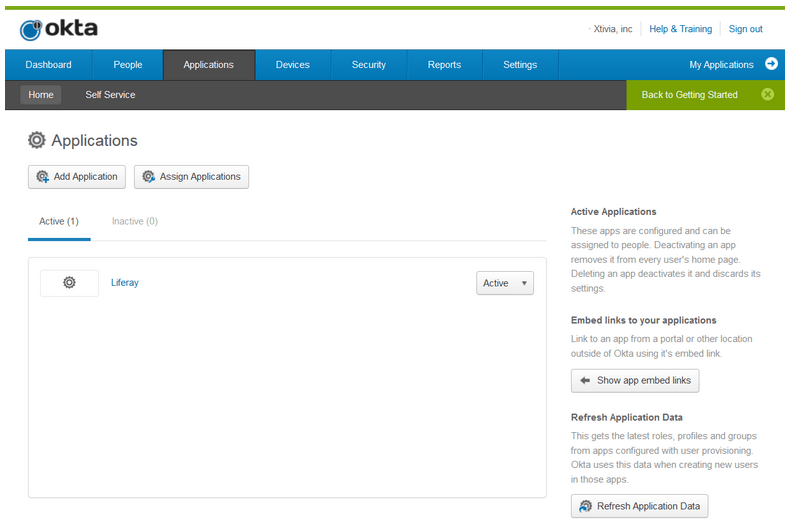
Once you click on Finish, the app will be available to be managed under “Admin -> Applications“.
3) Download the SAML metadata to link the Liferay server with Okta.
From “Admin -> Applications“, click on your recently created app.
The app contains 6 different sections. We will be focused only on General and Sign On for the moment.
- General: This section shows the initial configuration, in case you need to edit it.
- Sign On: This section contains the information relevant to the SSO.
Go to the Sign On section. You will download the metadata from there.

Click on View Setup Instructions. You will reach the SAML2 configuration screen, something similar to the next image:
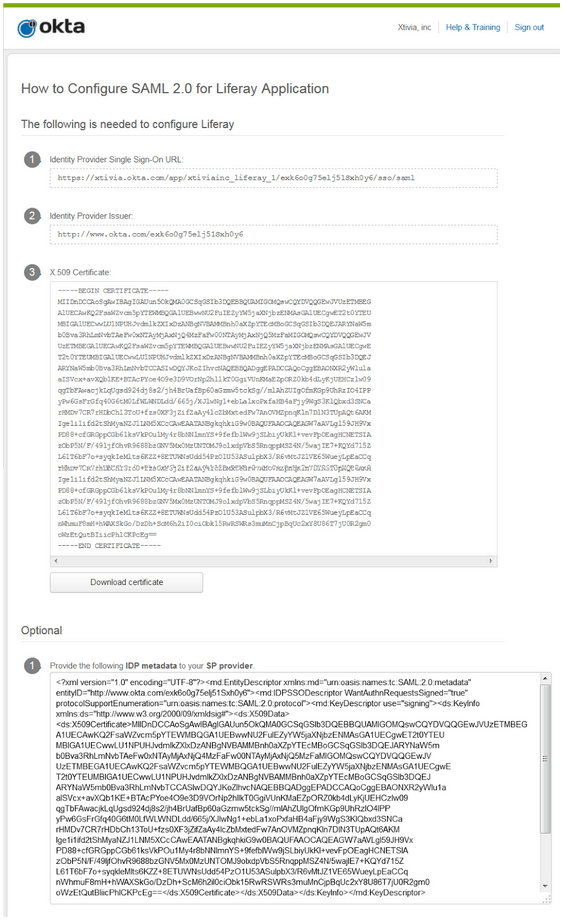
The information that is going to be relevant in this page is the Identity Provider Issuer and the IDP metadata. Copy and save the metadata in a file named “OktaMetadata.xml”.
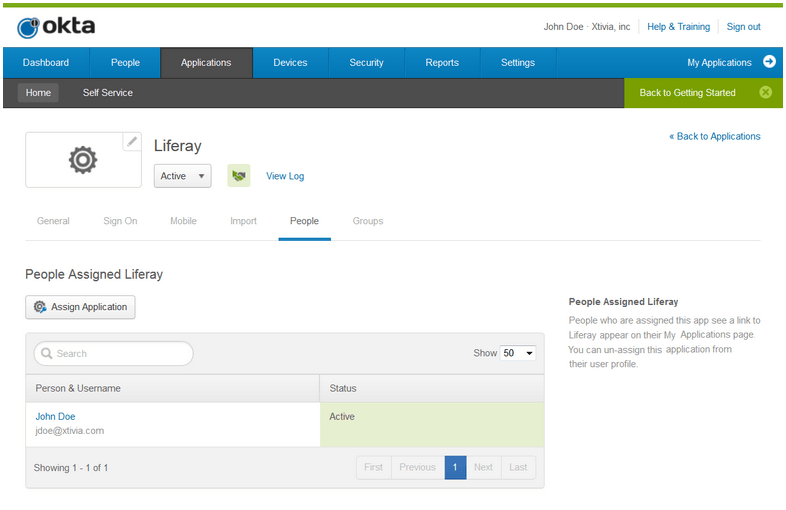
4) Be sure that you have at least one user assigned to this app. It can be your user, as you are administrator of “xtivia.okta.com”. Logout..
Liferay configuration
Download and install a Liferay bundle
1) Go to www.liferay.com and download the last release (LR 6.2 EE SP11).
2) In Windows, unzip the server in “c:ServersVanilla LR 6.2 EE”.
3) Copy the “license-portaldevelopment-developer.xml” file into “C:ServersVanilla LR 6.2 EEdeploy”.
4) Create a MySQL schema with the name “Okta” with utf-8 default collation. Put mysql.jar into “C:ServersVanilla LR 6.2 EEtomcat-7.0.42libext”
5) Start the Liferay Server and in the wizard change the database configuration. Select mysql and update the jdbc url with “jdbc:mysql://localhost/okta?useUnicode=true&characterEncoding=UTF-8&useFastDateParsing=false”
Create the keystore
1) From the command line, execute this:
keytool -genkey -keyalg RSA -alias liferaysamlspdemo -keystore keystore.jks -storepass liferay -validity 360 -keysize 2048It will create a “keystore.jks” file in the current folder.
2) Copy the recently created “keystore.jks” file into “C:ServersVanilla LR 6.2 EEdata”.
Download, install and configure the SAML plugin
1) Once the server is up and running, log in using “[email protected]” as user and “test” as password. Go to the Store section (“Admin -> Control Panel -> Apps -> Store“).
2) Log in with your www.liferay.com account (update the marketplace plugin if required) and search for the “SAML 2.0 Provider EE” plugin and download it.
3) Go to the “Purchased” section, look for the downloaded plugin and install it.
4) Copy the previously created “OktaMetadata.xml” file into “C:ServersVanilla LR 6.2 EEdata”
5) Create or edit the portal-ext.properties file with this:
##
## SAML
##
# Enable SAML Plugin
saml.enabled=true
# Set the role to sp on the Service Provider side
saml.role=sp
# Set the SAML entity id, it matches the alias we used to setup the keystore
saml.entity.id=liferaysamlspdemo
# The metadata location for Identity Provider
saml.metadata.paths=${liferay.home}/data/OktaMetadata.xml
#
# Keystore
#
# keystore type
saml.keystore.type=jks
# location of the keystore
saml.keystore.path=${liferay.home}/data/keystore.jks
# pwd for accessing the keystore
saml.keystore.password=liferay
# pwd for accessing the certificate of the entity in the keystore
saml.keystore.credential.password[liferaysamlspdemo]=liferay
#
# Service Provider
#
saml.sp.default.idp.entity.id=http://www.okta.com/exk6o0g75elj51Sxh0y6
saml.sp.sign.authn.request=true
saml.sp.assertion.signature.required=false
saml.sp.clock.skew=3000
saml.sp.session.keepalive.url=http://your.liferay.server.url/c/portal/saml/idp/keepalive
# Service Provider user attribute mappings
saml.sp.user.attribute.mappings=emailAddress=emailAddressnfirstName=firstNamenlastName=lastNamenscreenName=screenName
In this example, we are not mapping the username from Okta. In this case, you will need to go as omni admin in your Liferay server to the “Control Panel -> Portal Settings -> Users”, and check the “Autogenerate User Screen Names” option.
5) Restart the server
6) Check the configuration. Log in as omni admin and go to “Control Panel -> Portal Settings -> SAML admin”, and review that you have something like this:
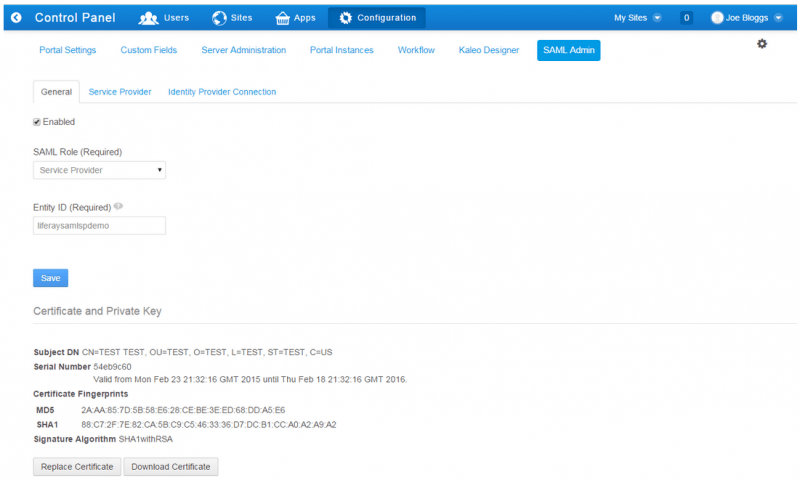
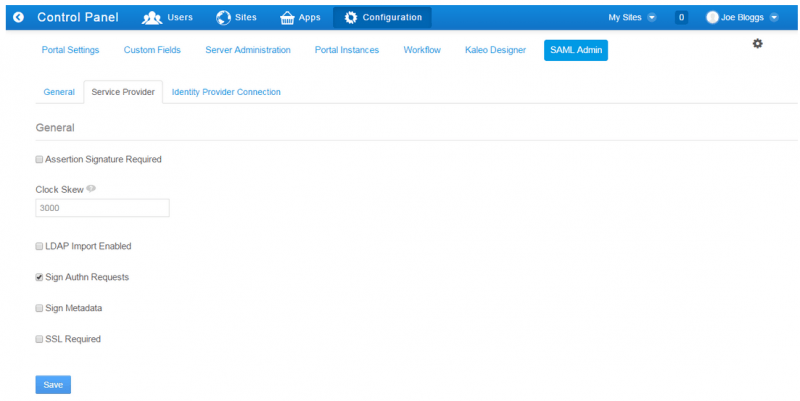
In the “Service Provider” tab,
And in the “Identity Provider Connection” tab,
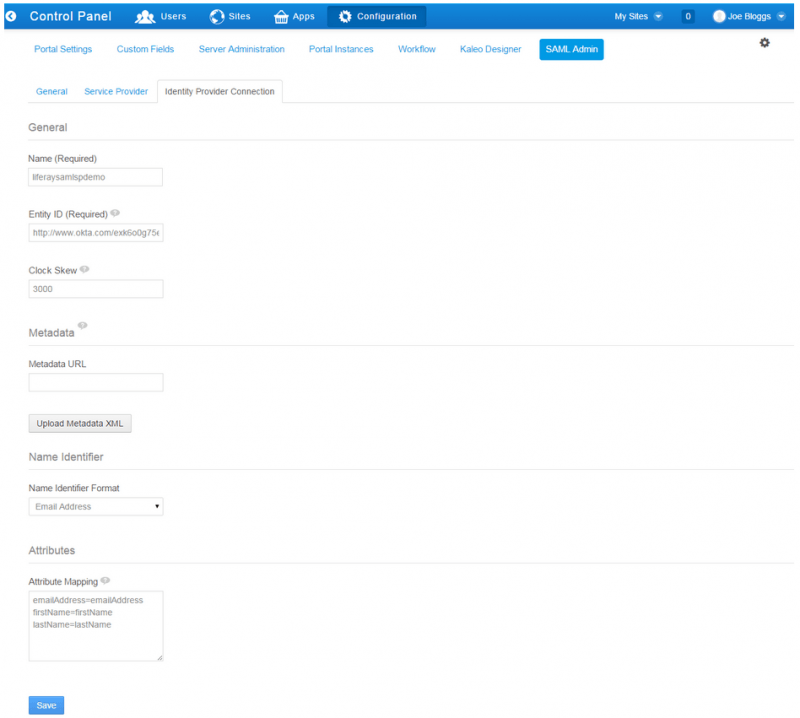
If you need to, you could upload the “OktaMetadata.xml” file using the “Upload Metadata XML” option from this screen.
NOTE: if screenName is not automatically generated in Liferay, the attribute mapping should be updated with screenName=screenName.
And that’s all! Test and enjoy it!