
Synchronous Web Service
A Synchronous web service is used when a client or a calling system is expecting an immediate process response for a process request. The client or a calling system blocks on the called thread and waits until it receives a response or times out. A synchronous web service can be used to retrieve information from a business process. Boomi allows us to expose an existing process as either a SOAP or a RESTful web service.
Building a Simple Hello Synchronous RESTful Web Service.
1. Create sample json request file “hellorequest.json” and response file “helloresponse.json” in a text editor.
Add the following text to the hellorequest.json file
{

	"firstName" : "Smith",

	"lastName" : "Jones"

}
Add the following text to the helloresponse.json file
{

	"message" : "Hello Smith Jones! Welcome to the Dell Boomi Platform."

}
2. Login to https://platform.boomi.com
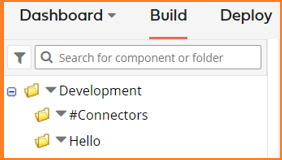
3. Create two folders #Connectors and Hello under your root folder in the component explorer.
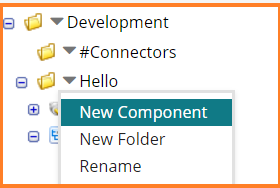
4. Create a JSON profile for input. Click on the down arrow ![]() prefixed to Hello folder and select New Component
prefixed to Hello folder and select New Component
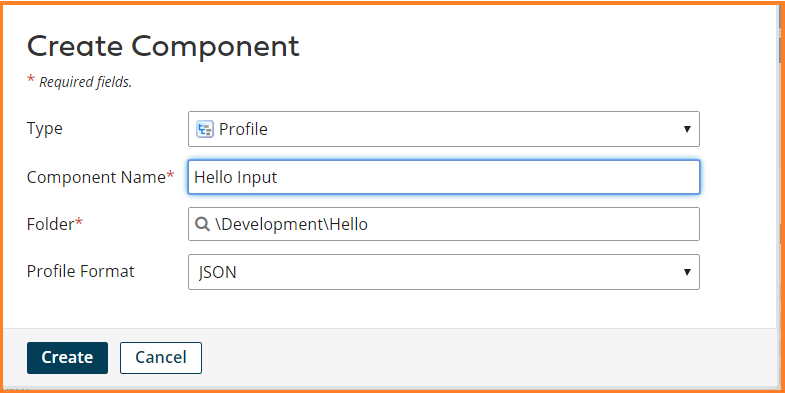
5. A Create Component dialog window appears.
Select the Type – Profile.
Enter the component name – Hello Input
Profile Format – JSON
Click Create.
6. Click on the Import button.

7. A JSON import wizard appears.
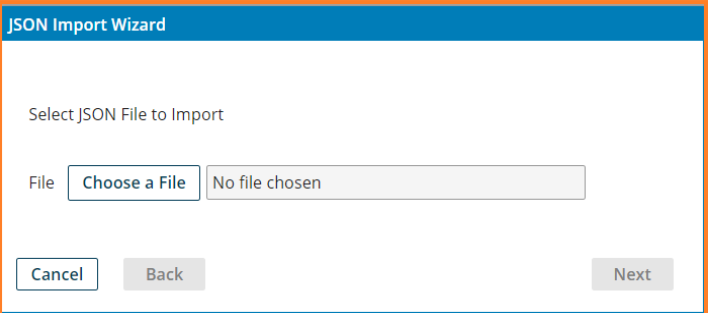
8. Click Choose a file. Select the hellorequest.json file that was created in step -1. Click Next. It will load the profile. Click Finish.
9. The Hello Input JSON Profile will be loaded. Click Save and Close
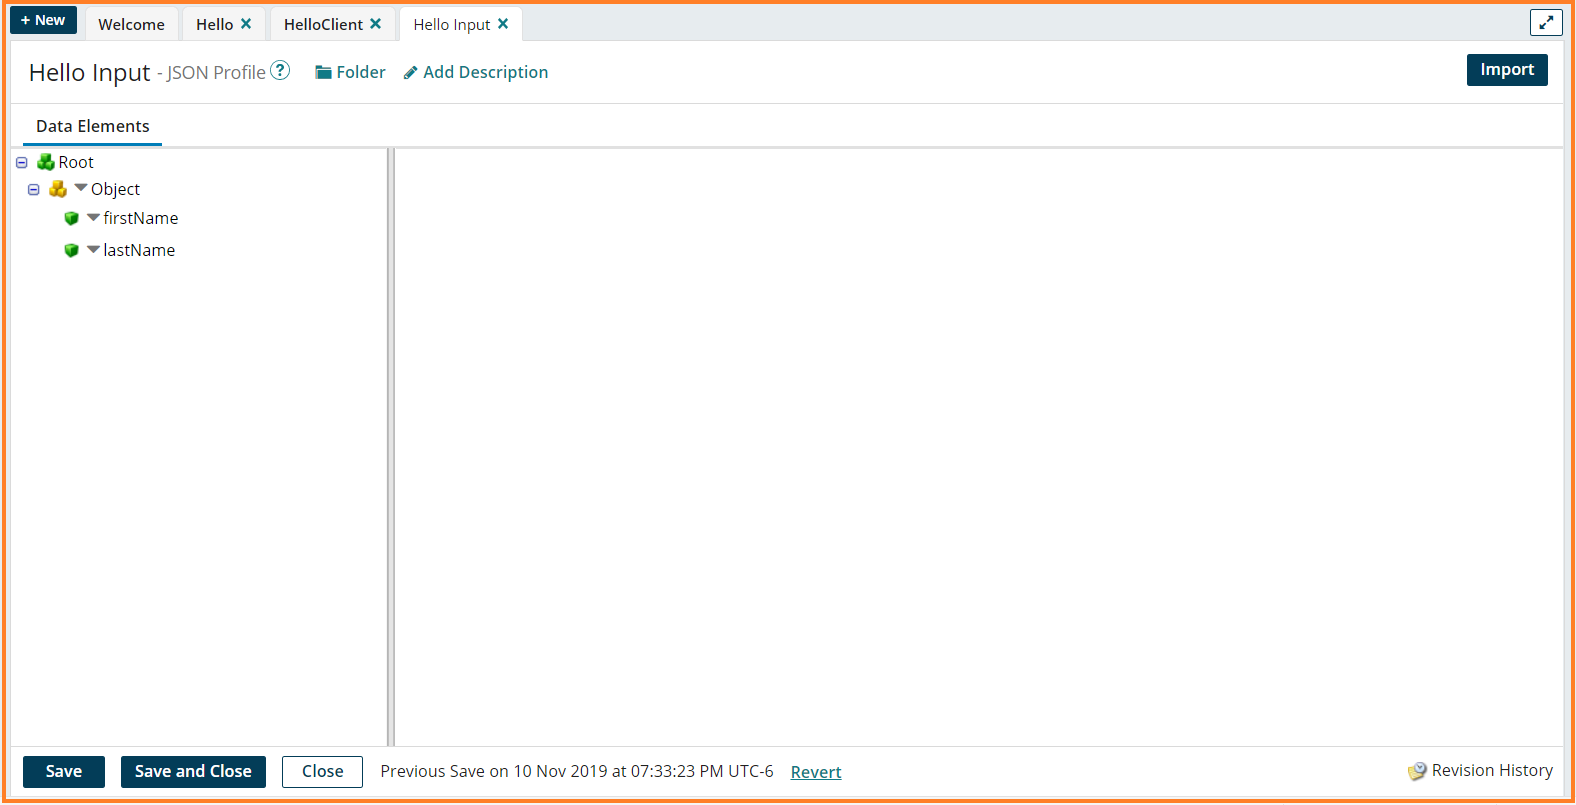
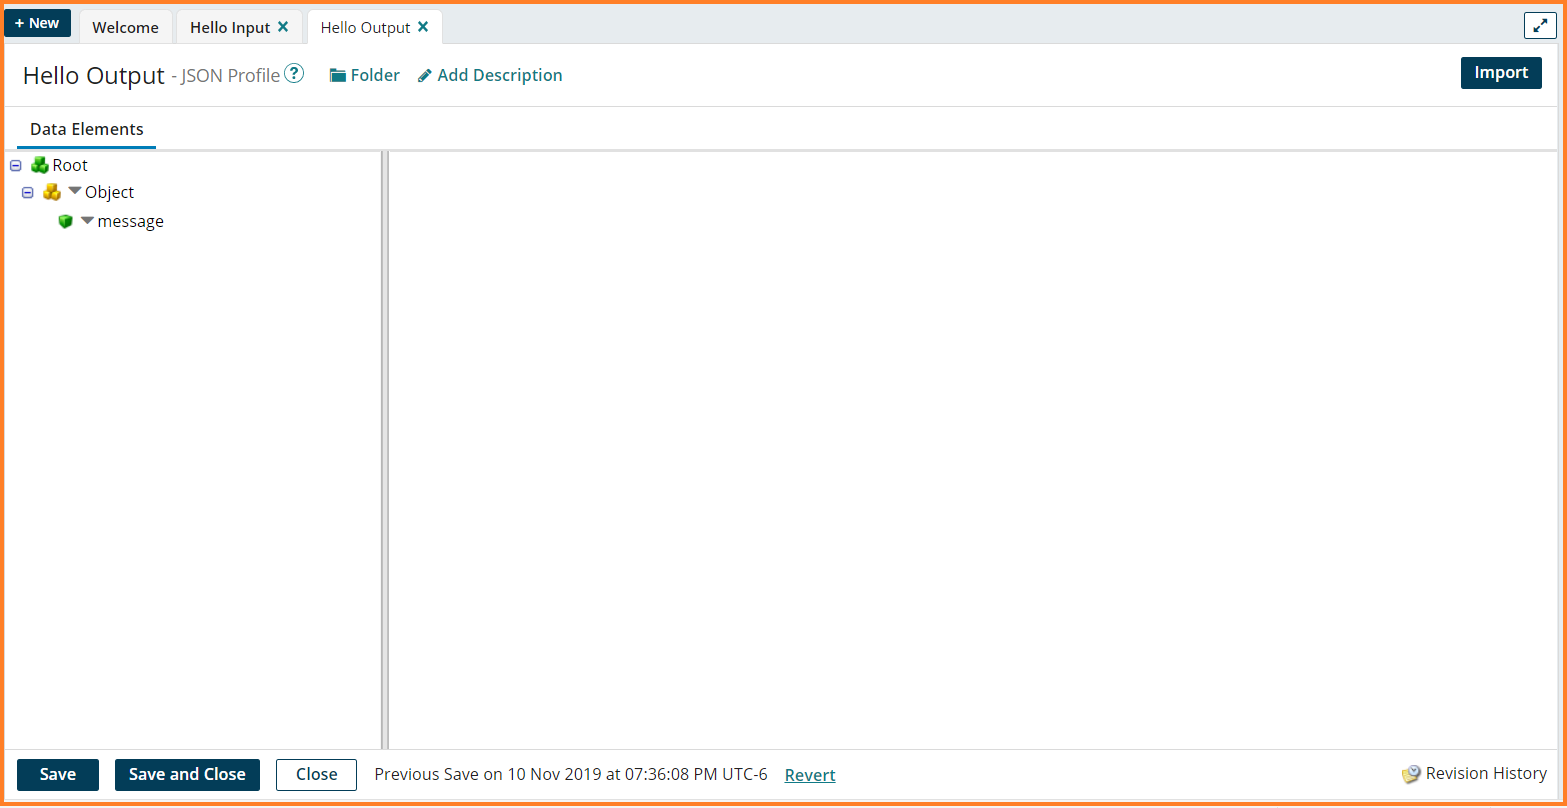
10. Repeat the steps 4-9 for the JSON output profile.
Please enter the following values in the Create Component dialog window appears.
Select the Type – Profile.
Enter the component name – Hello Output
Profile Format – JSON
Import helloresponse.json file in the JSON import wizard.
The Hello Output JSON profile will be loaded. Click Save and Close.
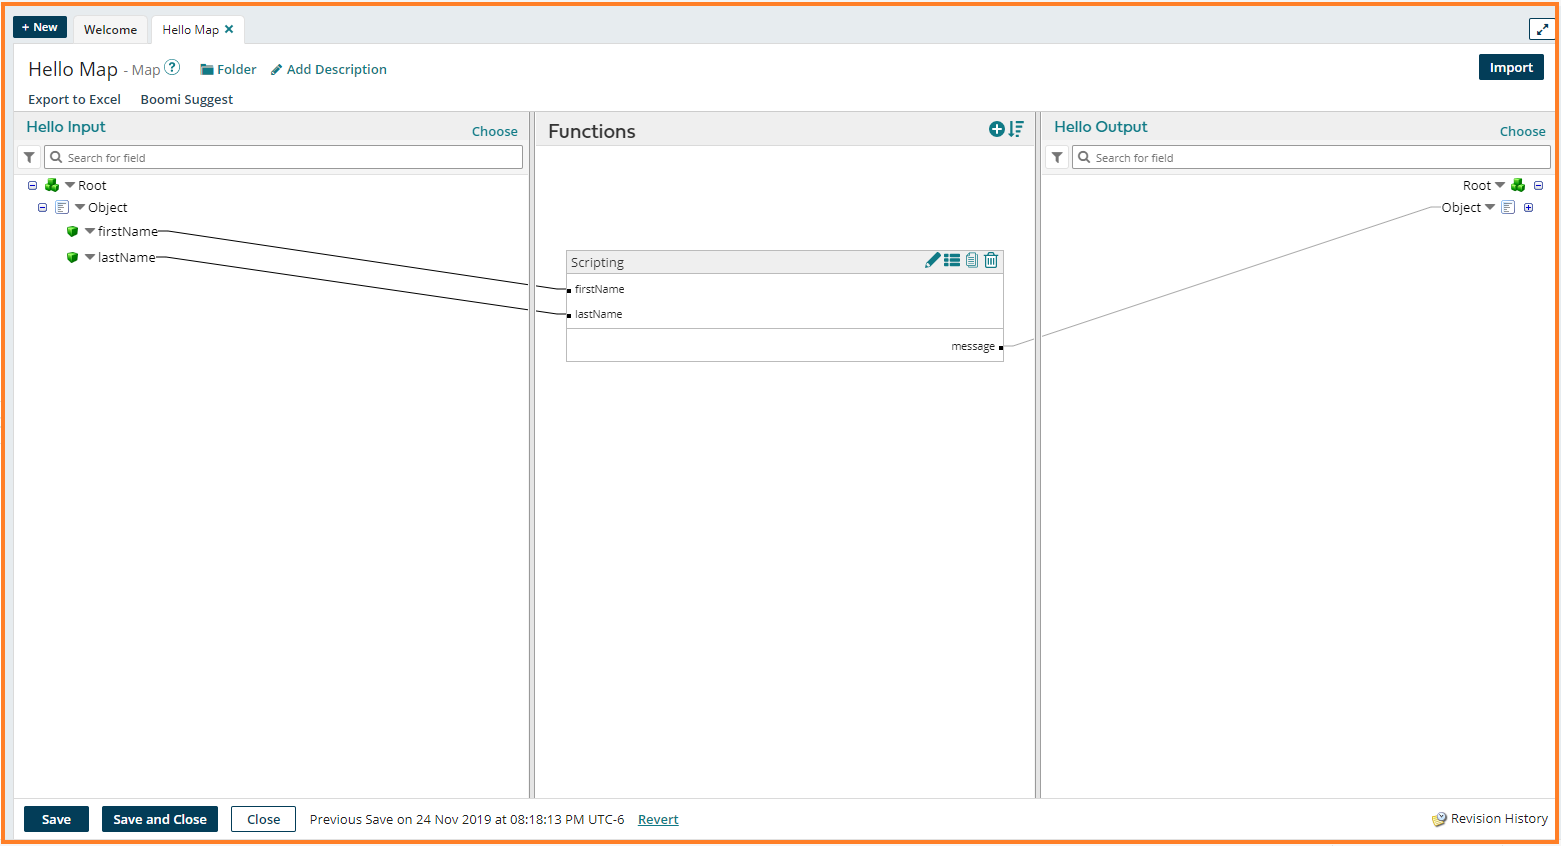
11. Create a Map Component to map the input request firstName and lastName values to the output message. Click on the down arrow ![]() prefixed to Hello folder and select New Component
prefixed to Hello folder and select New Component
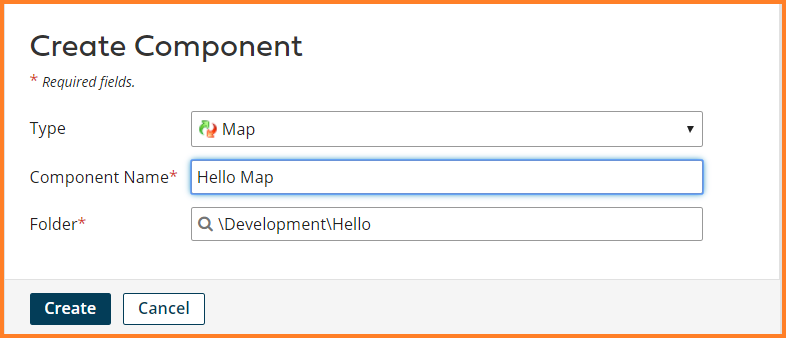
12. A Create Component dialog window appears.
Select the Type – Map.
Enter the component name – Hello Map
Click Create.
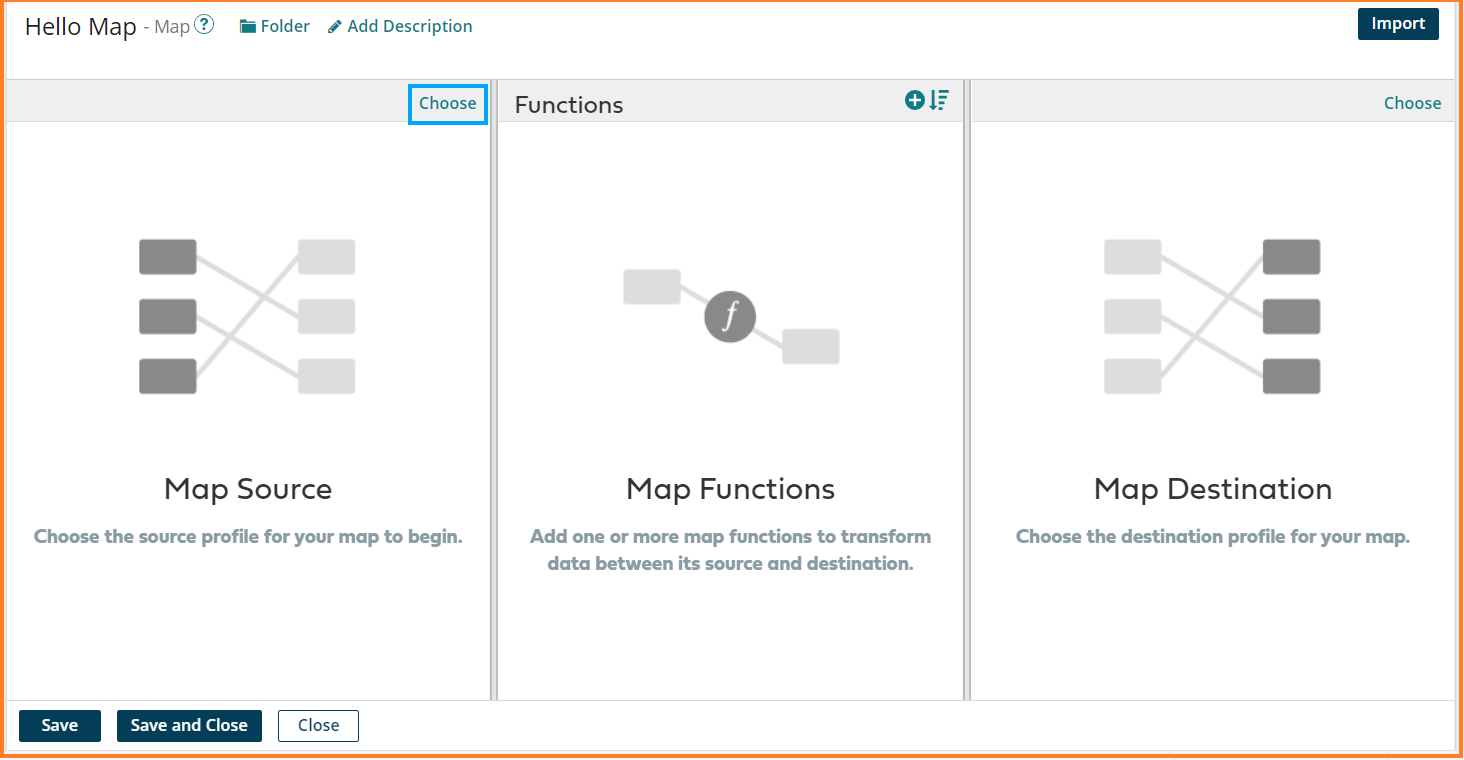
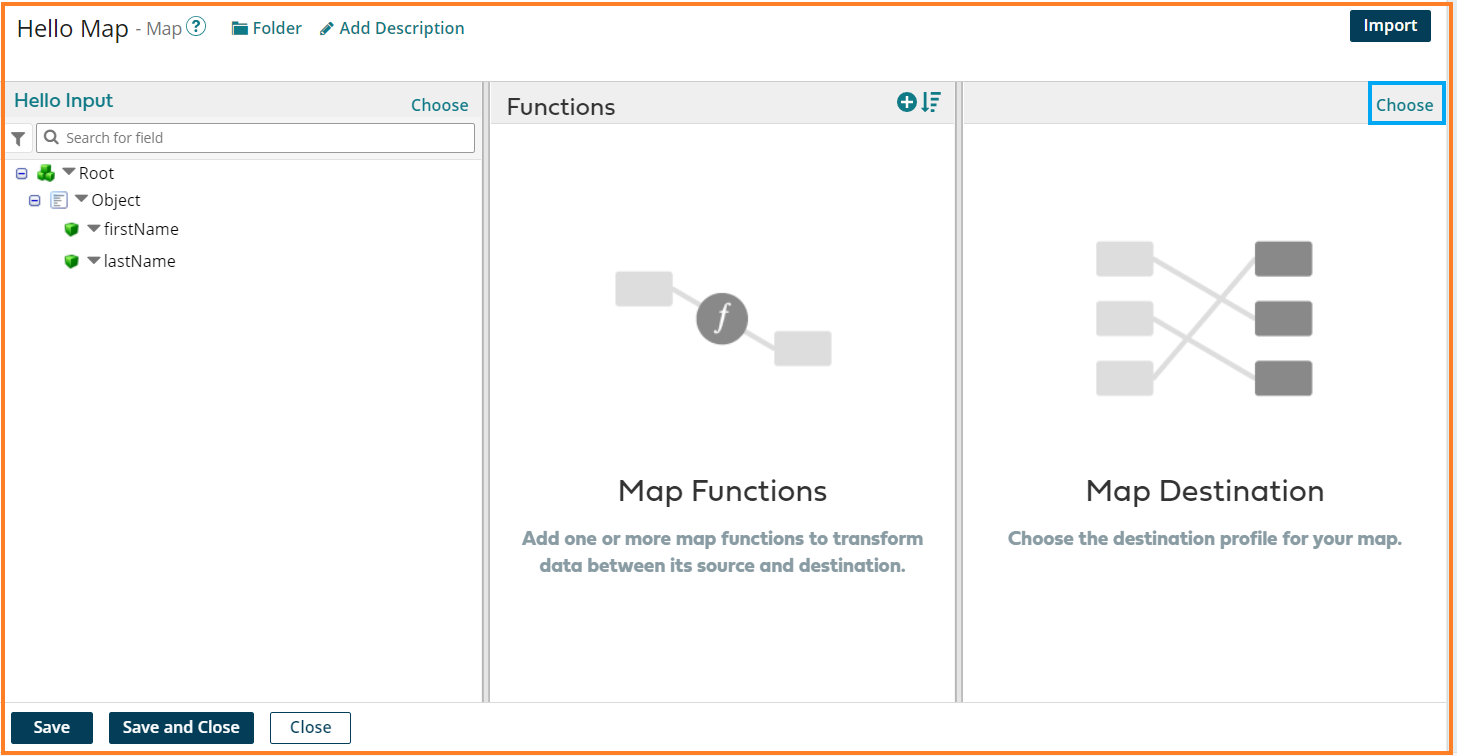
13. The Hello Map Component gets loaded. Click on Choose to select the source JSON Input profile Hello Input for the map.
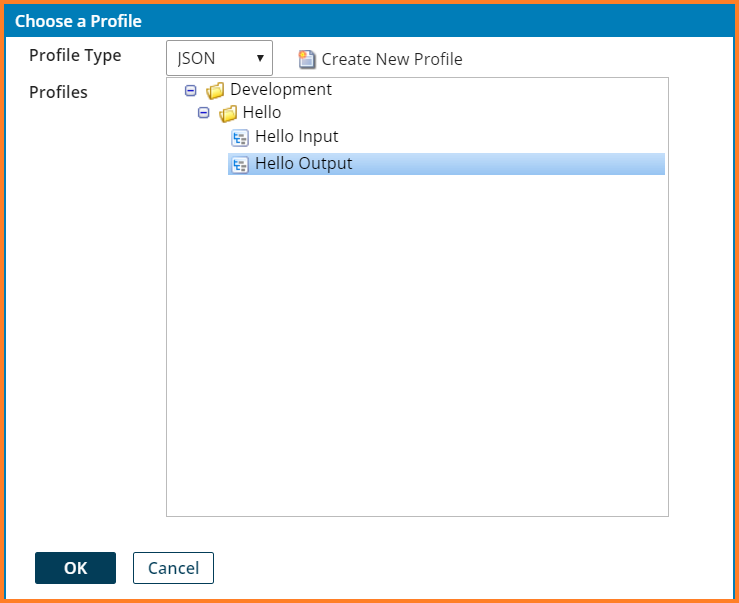
14. Choose a Profile dialog window appears. Select the profile type as JSON.Hello folder gets displayed in the Profiles display. Expand the Hello folder and select Hello Input profile. Click Ok.

15. The Hello Input profile gets loaded in the source profile of the Map. Click on Choose to select the destination profile of the Map.
16. Select Profile Type – JSON and Profiles – Hello Output. Click Ok.
17. The Hello Output profile gets loaded in the destination profile of the map. Click on the ![]() to add a Map function.
to add a Map function.
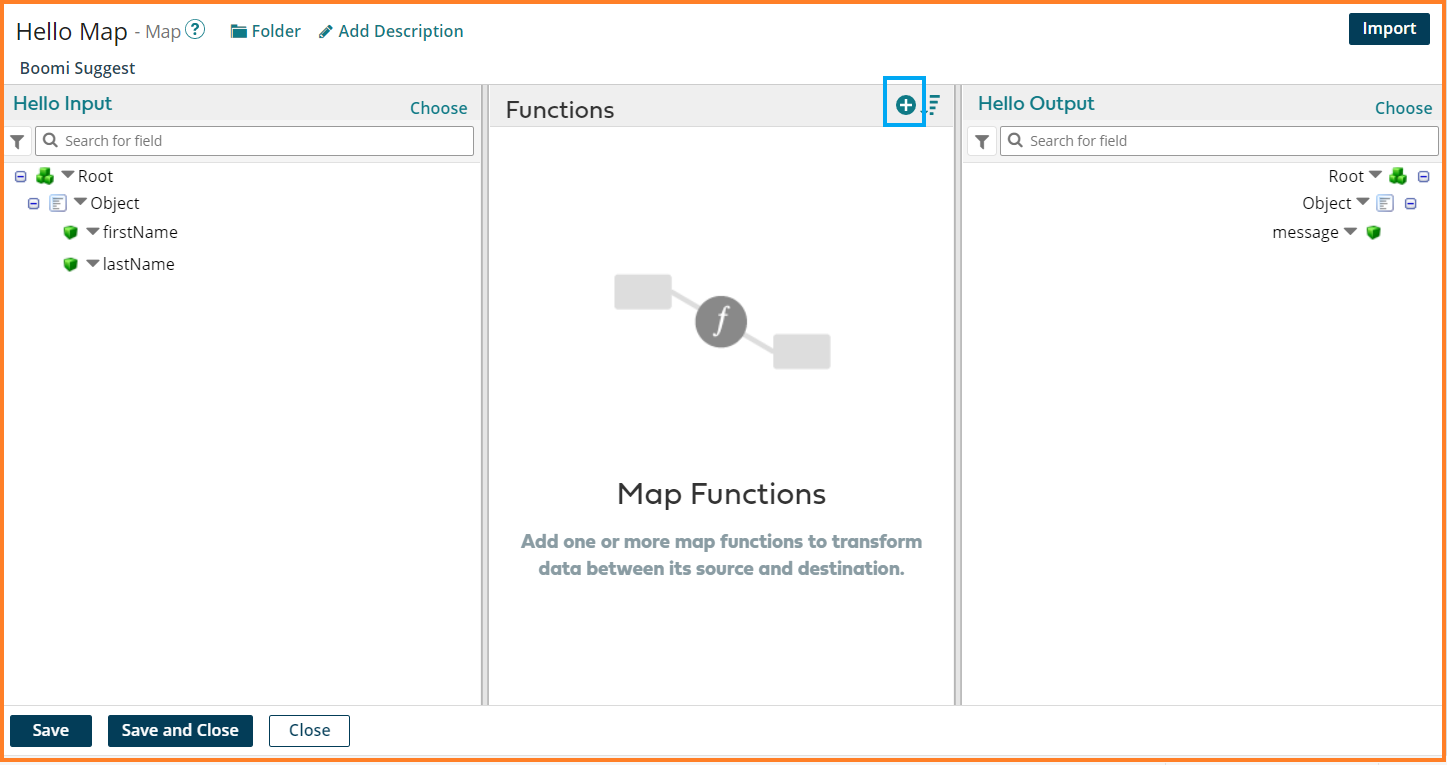
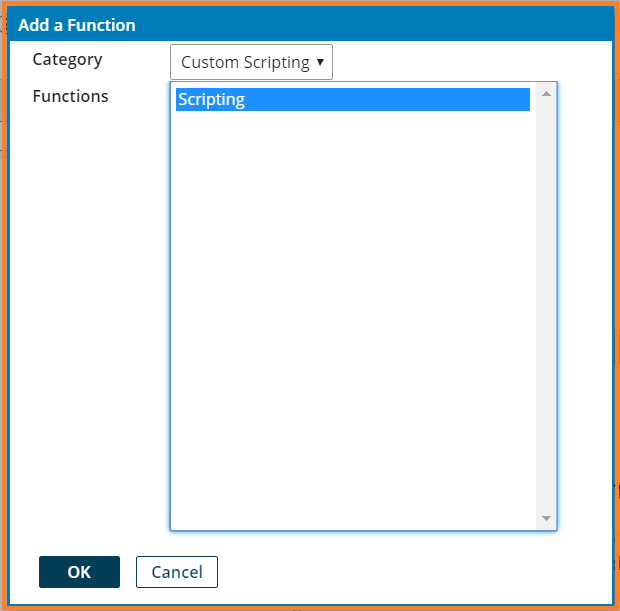
18. Add a function dialog window appears. Click on the Category dropdown and select Custom Scripting. Select Functions – Scripting. Click Ok.
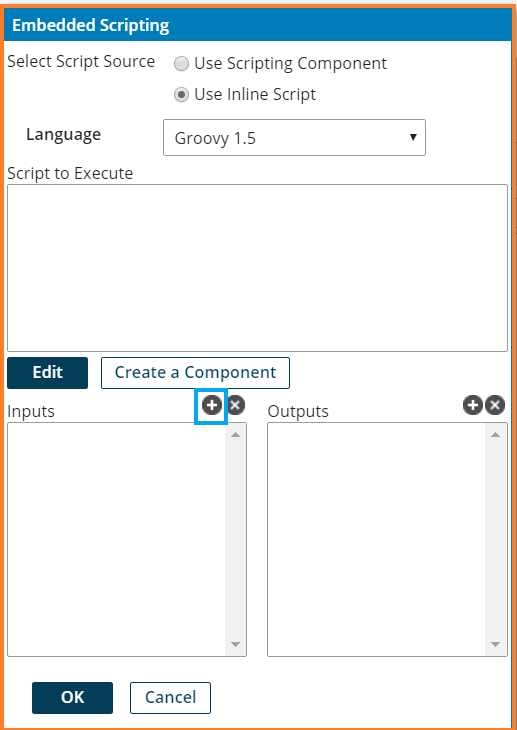
19. Embedded Scripting dialog window appears. Click on ![]() next to the Inputs to add input fields for the mapping function.
next to the Inputs to add input fields for the mapping function.
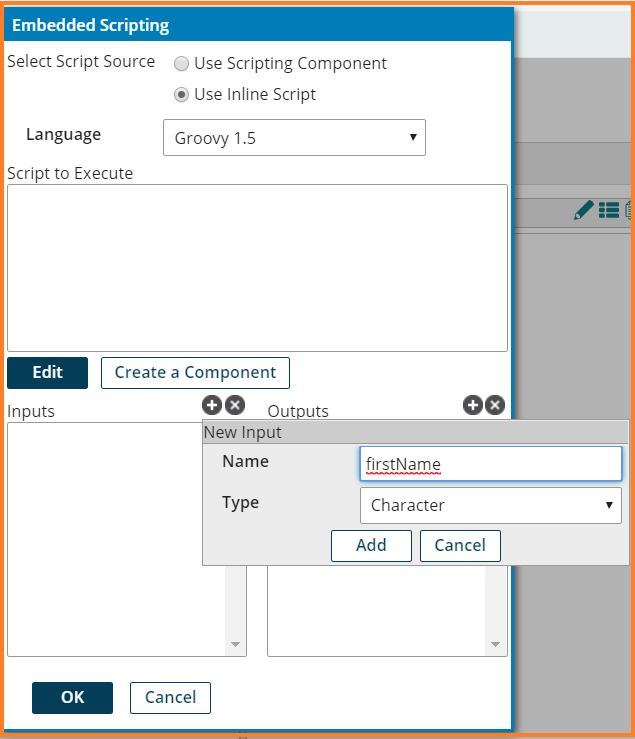
20. A New Input dialog appears. Enter Name – firstName and Type – Character. Click Add. Repeat the same to add lastName. Click Ok.
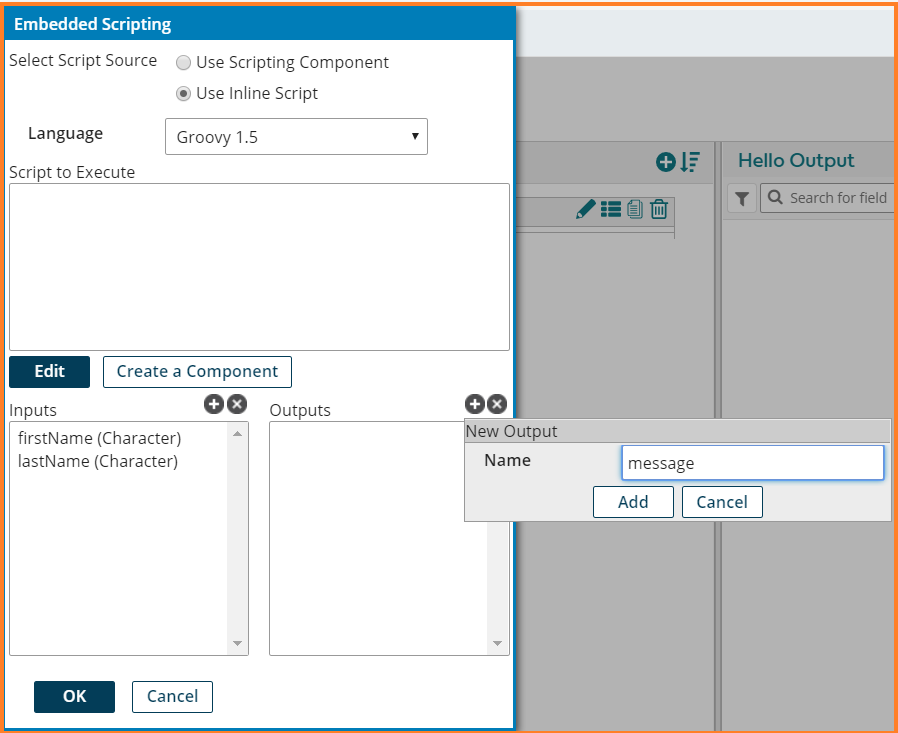
21. The inputs gets populated. Click on ![]() next to Outputs. A New Output dialog appears. Enter Name – message and Click Add.
next to Outputs. A New Output dialog appears. Enter Name – message and Click Add.
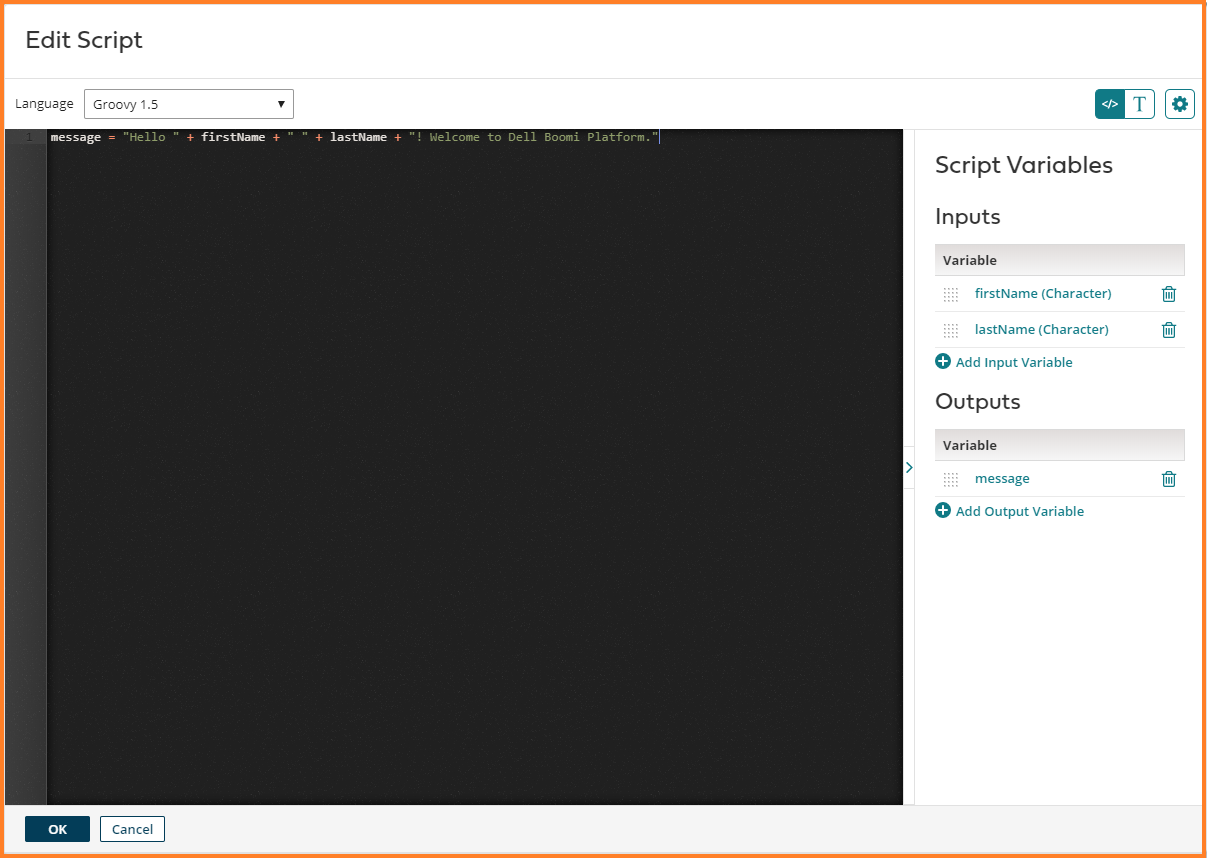
22. The output gets populated. Click on the Edit button. Edit Script Window appears. Enter the following Groovy script and Click Ok.
message = “Hello ” + firstName + ” ” + lastName + “! Welcome to Dell Boomi Platform.”
23. The script gets populated in the Script to Execute text area. Click Ok.

24. Configure Defaults dialog appears. Click Cancel.

25. Click Save and Close.
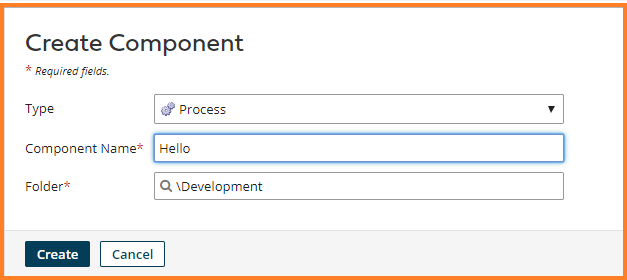
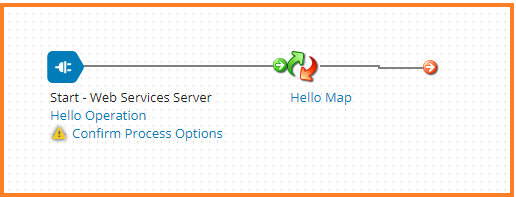
26. Click on ![]() to create a Hello process component. A Create Component dialog appears. Select Type – Process. Component Name – Hello. Click Create.
to create a Hello process component. A Create Component dialog appears. Select Type – Process. Component Name – Hello. Click Create.
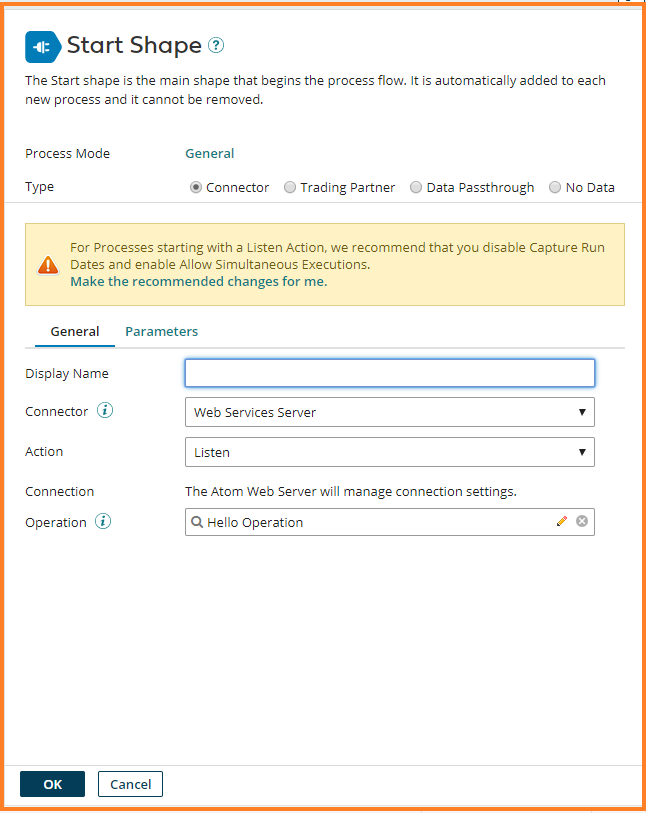
27. A Start Shape window appears. Select Connector – Web Services Server. Click on ![]() in the Operation text field.
in the Operation text field.
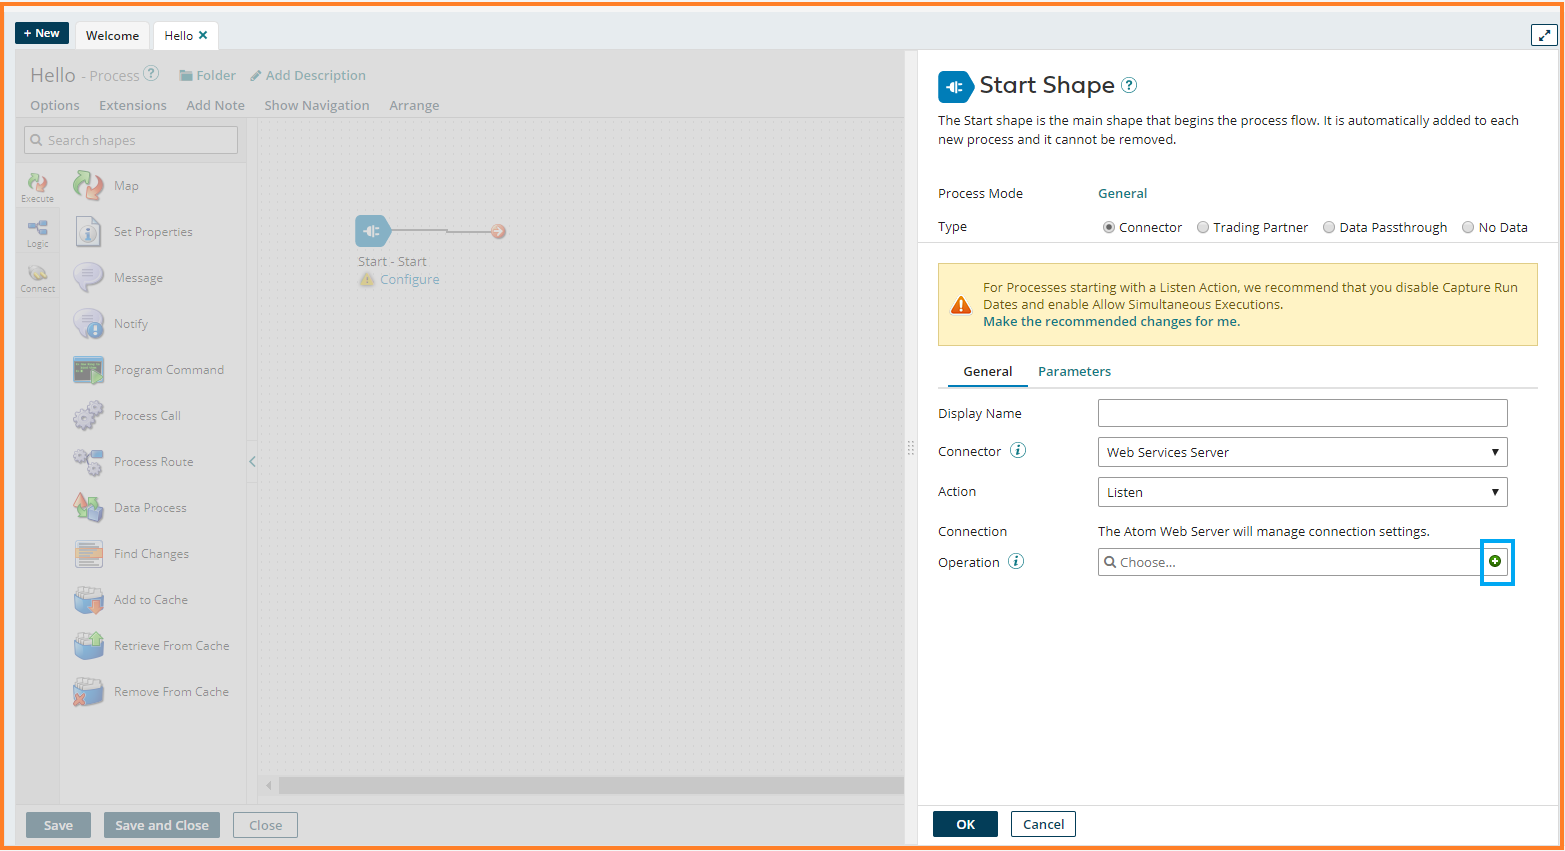
28. Enter the following and Click Save and Close.
OperationName – Hello Operation
Operation Type – UPSERT
Object – hello
Expected Input Type – Single JSON Object
Request Profile – Hello Input
Response Output Type – Single JSON Object
Response Profile – Hello Output
Result Content Type – application/json
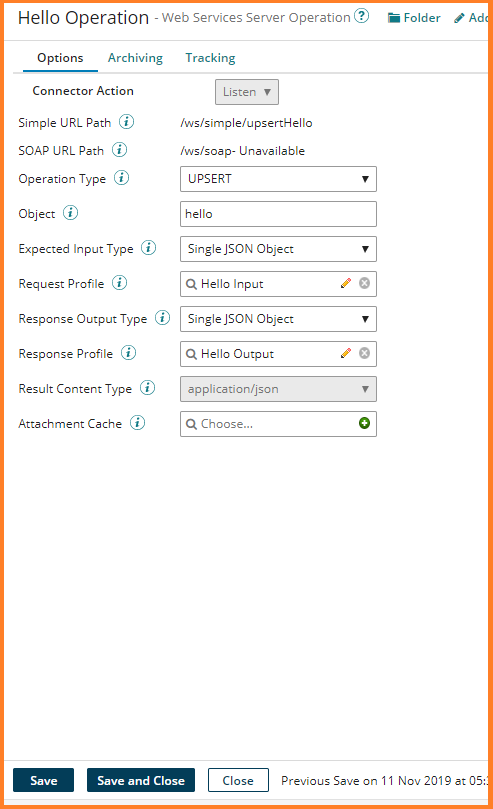
29. The operation name – Hello Operation gets filled in the Operation field in the Start Shape. Click Ok.
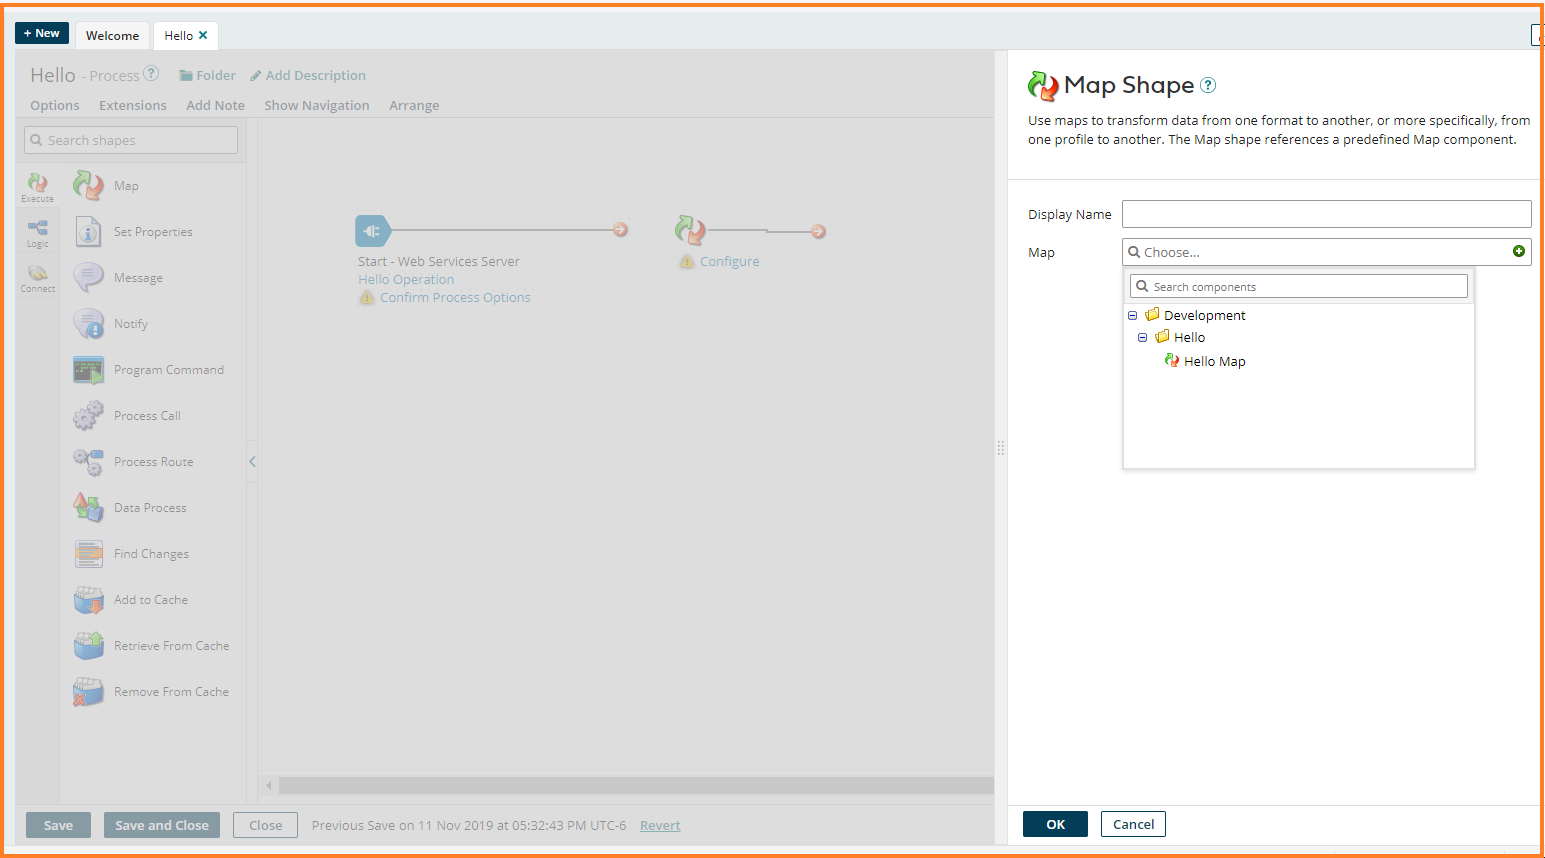
30. Click on Execute to drag the Map shape on to the canvas.
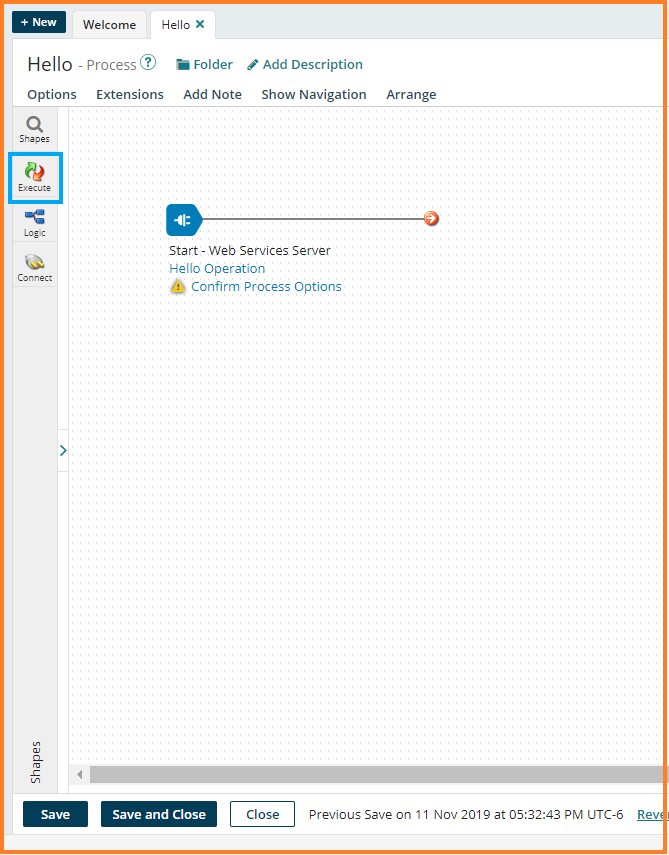
31. Drag Map shape onto the canvas next to Start Shape. Choose the Hello Map that was created in Step 12 – 25. Click Ok.
32. Connect Start shape to the Map shape by dragging ![]() from Start shape onto the Hello Map shape.
from Start shape onto the Hello Map shape.
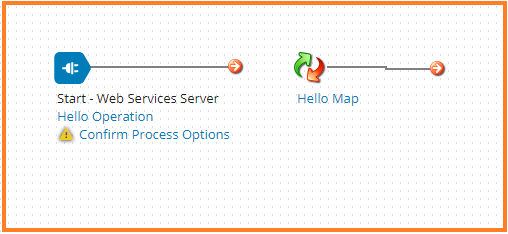
33. The red arrow turns into green arrow confirming that Start shape is connected to the Map shape. Click Save.
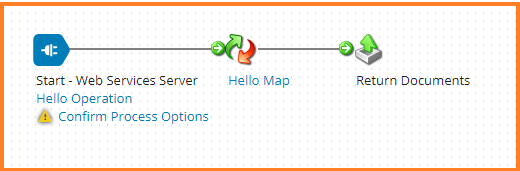
34. Click on ![]() to view the Logic shapes. Drag the Return Documents shape onto the canvas next to the Map shape. Click Ok. Connect Hello Map Shape to the Return Documents Shape. Click Save and Close.
to view the Logic shapes. Drag the Return Documents shape onto the canvas next to the Map shape. Click Ok. Connect Hello Map Shape to the Return Documents Shape. Click Save and Close.

35. Drag the Return Documents shape onto the canvas next to the Map shape. Click Ok. Connect Hello Map Shape to the Return Documents Shape. Click Save and Close.
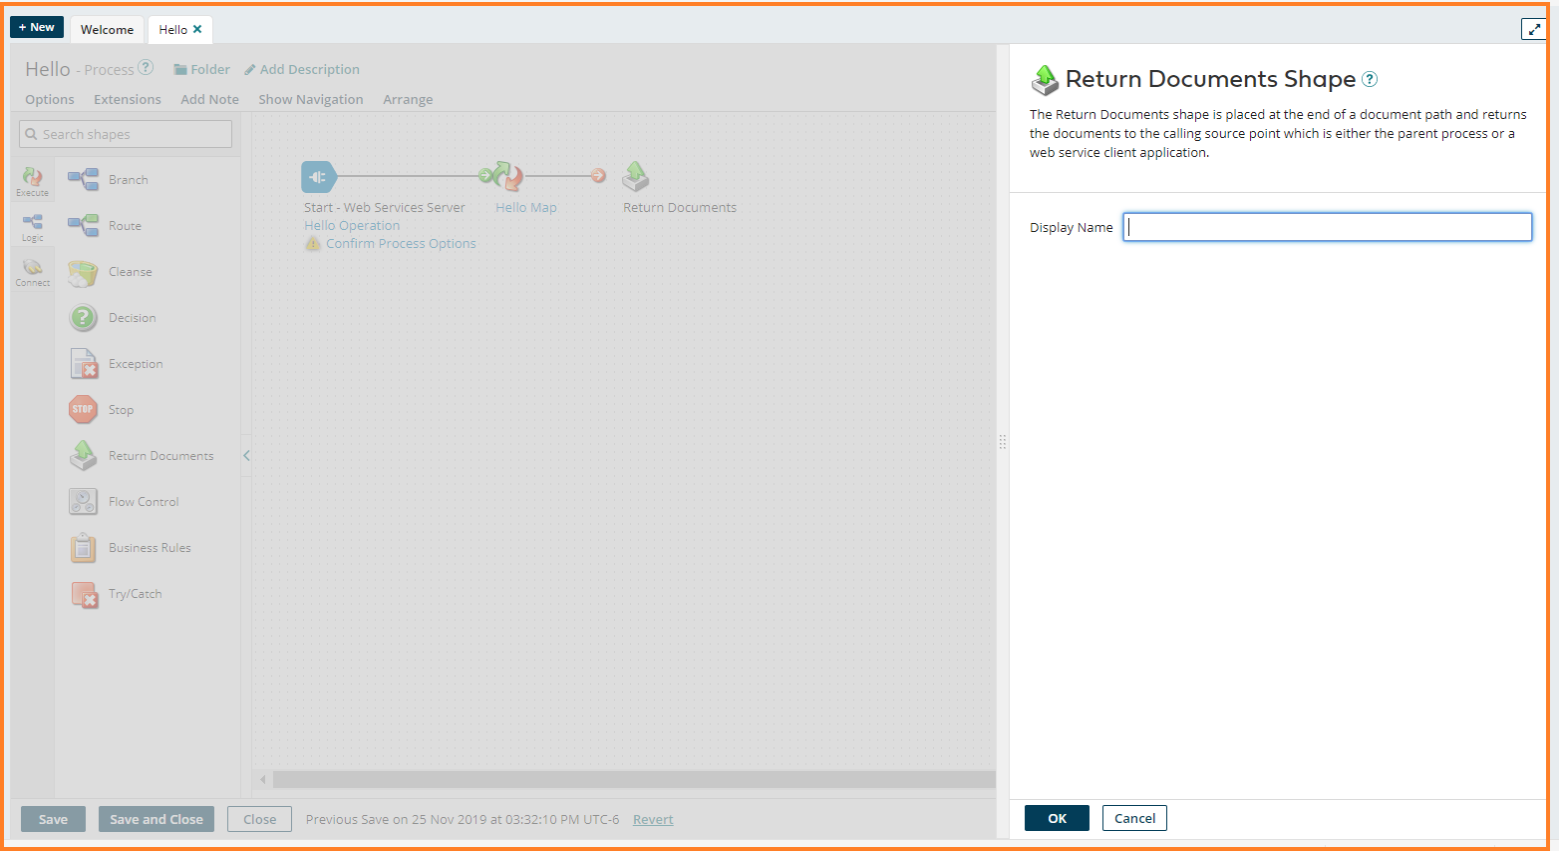
36. Connect Hello Map Shape to the Return Documents Shape. Click Save and Close.
Deploying the Hello web service to a Local Atom in TEST Environment for testing.
1.Please setup a Local Atom in a TEST Environment and verify that it’s is up and running. Please refer to my post on Installing Boomi Local Atom on Windows. on how to setup local atom in TEST Environment.
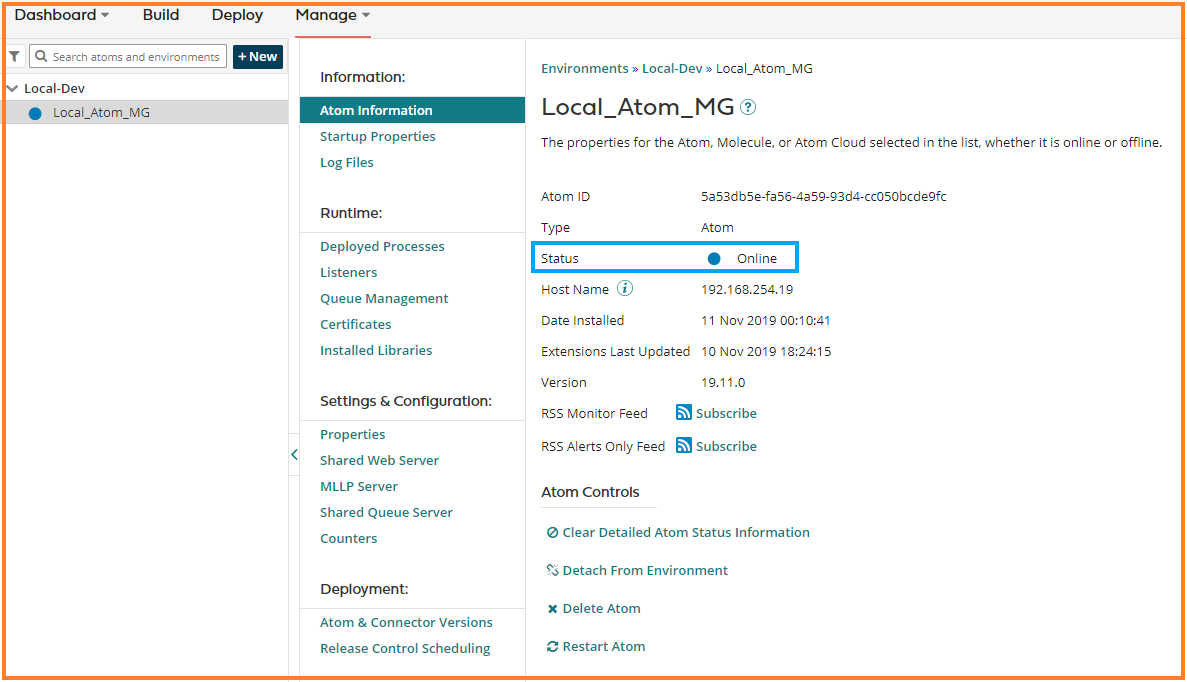
Navigate to Manage -> Atom Management
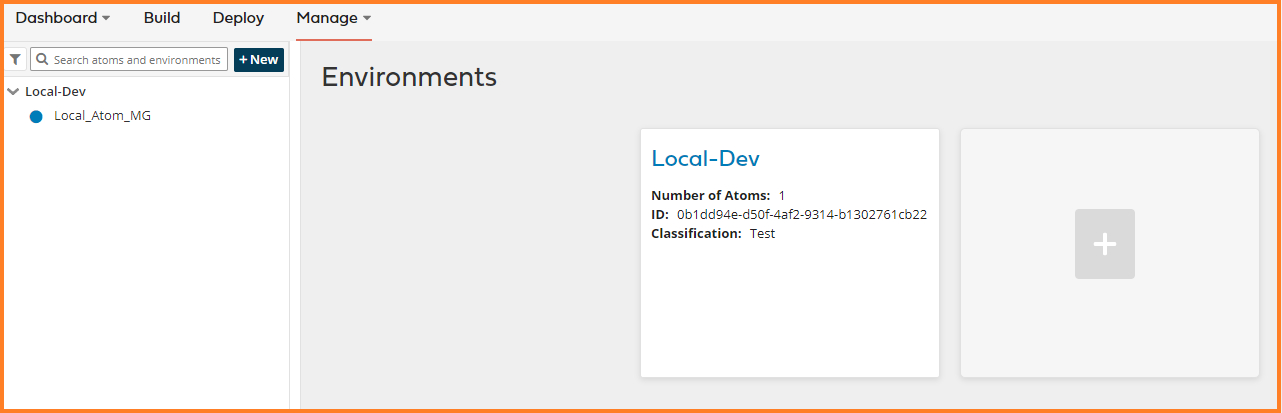
Click on local atom that you have created ( Local_Atom_MG is the local atom that I have created for my testing ) and verify that the status of the local atom is online.
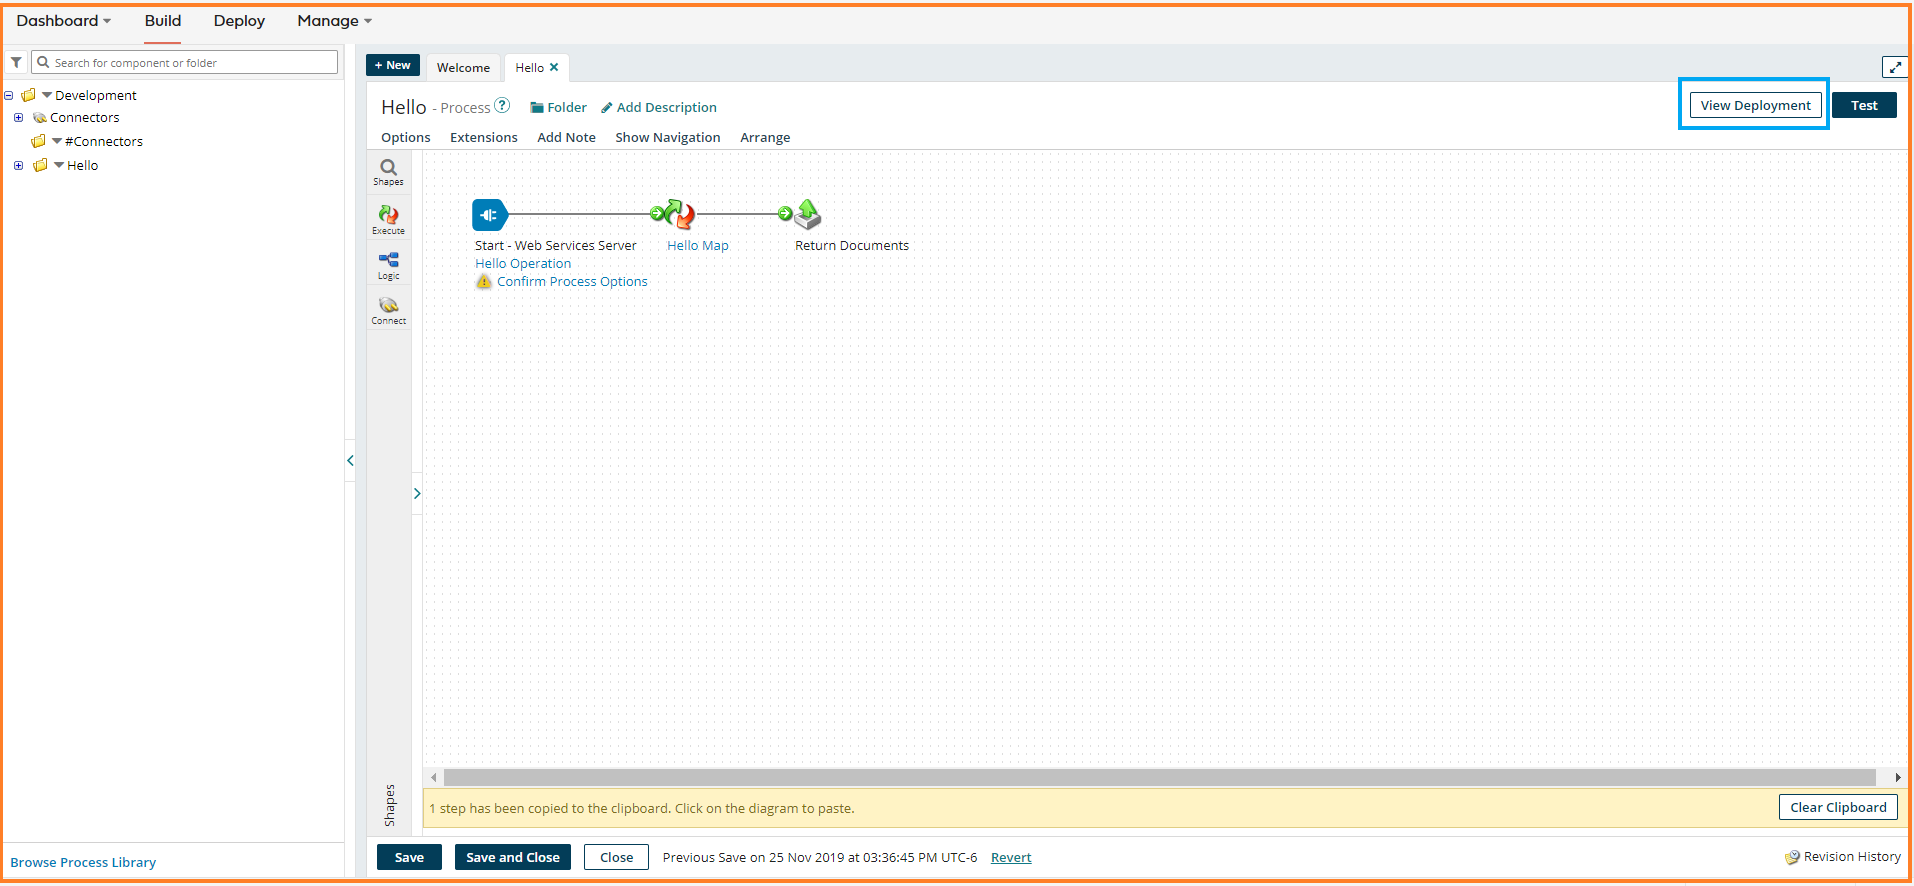
2. Open the Hello Process in the process editor and click on View Deployment.
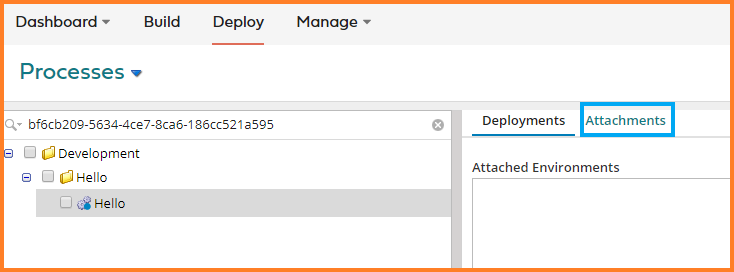
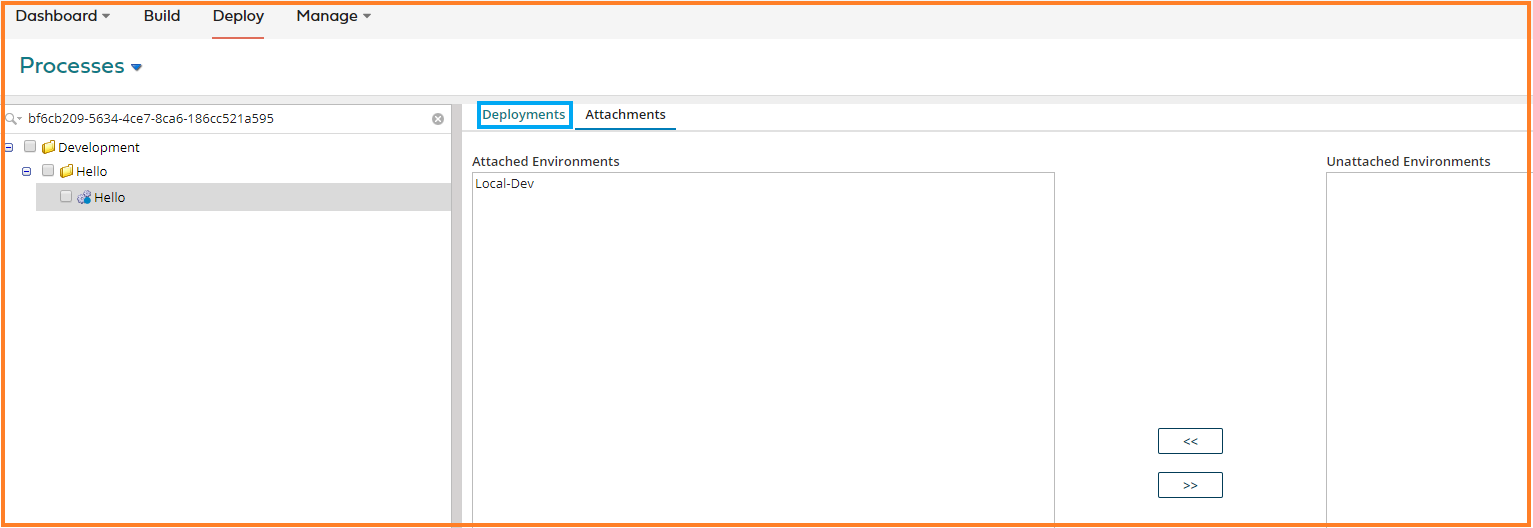
3. Click on Attachments.
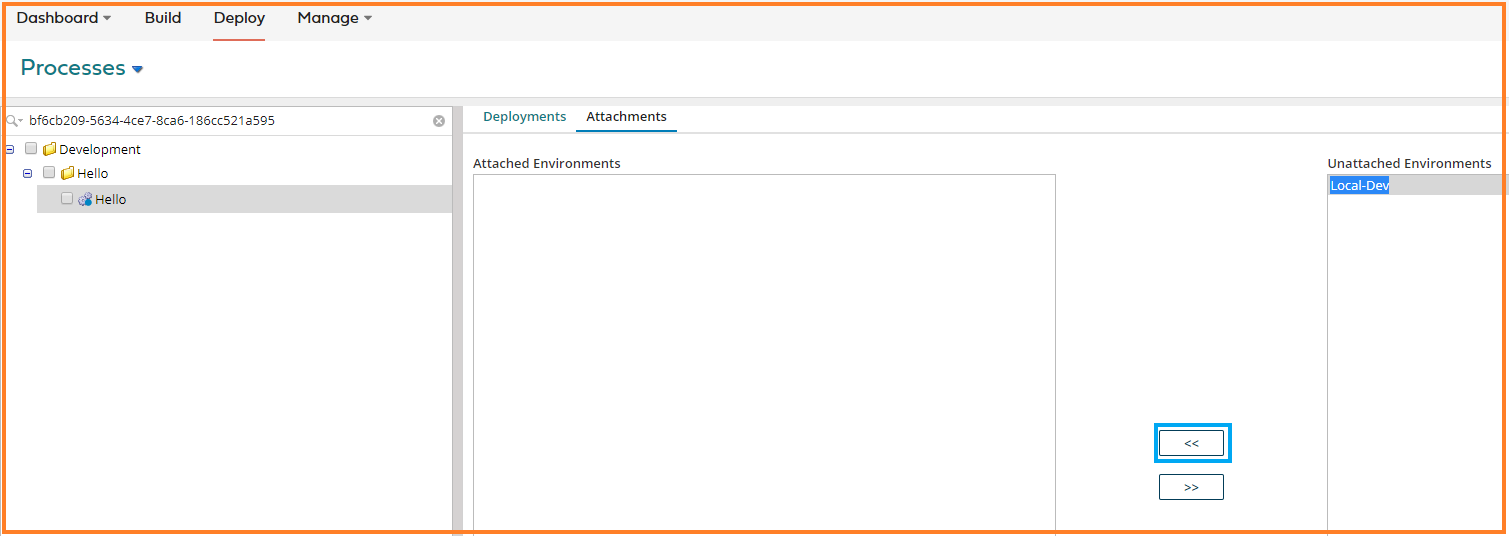
4. Select Local-Dev under Unattached Environments and click on ![]() to move it under Attached Environments.
to move it under Attached Environments.
5. Click on Deployments.
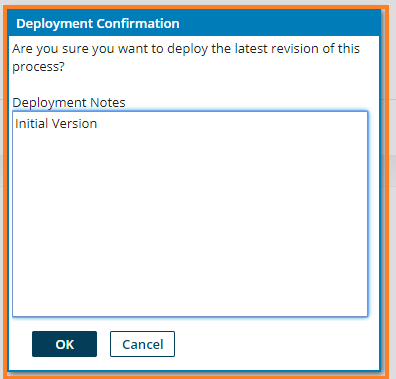
6. Click on Deploy Latest Revision of Process.

7. A Deployment Confirmation dialog box appears. Enter Initial Version in the Deployment Notes text area and click OK. The service gets deployed to the Local Atom.
Enabling Basic Authentication.
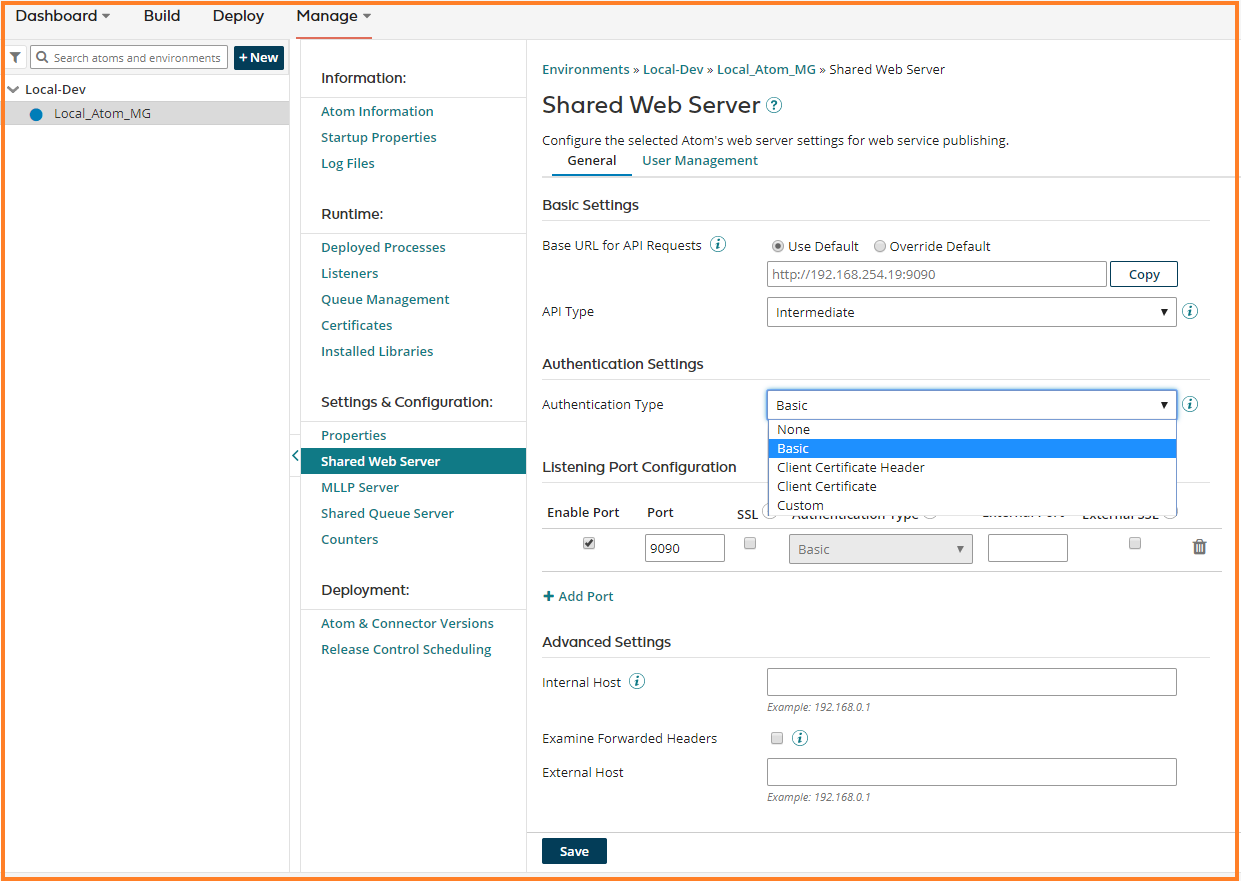
The available authentication type options that are available in Boomi are None, Basic, Client Certificate Header, Client Certificate, Custom, and External Provider. We will be using Basic authentication type in our example. Please visit the Authentication types section in the link Shared Web Server panel for more information on Authentication type.
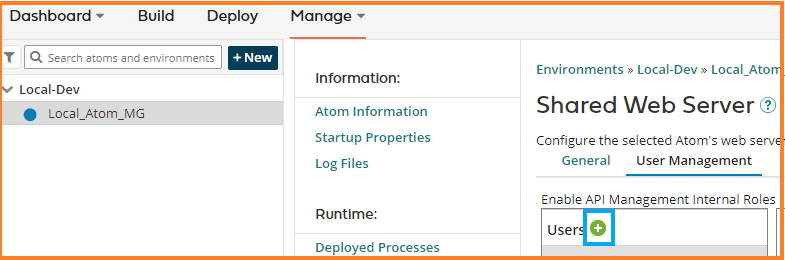
1. Navigate to Manage -> Atom Management -> Local_Atom_MG. Click on Shared Web Server under Settings and Configuration. Select Basic for Authentication Type under Authentication settings. Copy the Base URL to a text editor to be used later in the Http Client connector call.
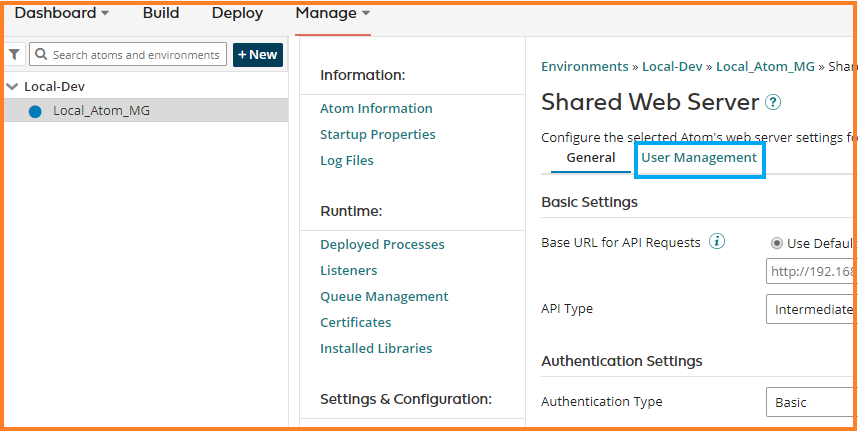
2. Click on User Management.
3. Click on ![]() next to Users to add a new test user account to test Hello service.
next to Users to add a new test user account to test Hello service.
4. Enter Username – testuser1. Copy testuser1@xxxxxxxxxxx-XXXX to a text editor to be used later in the Http Client connector call.
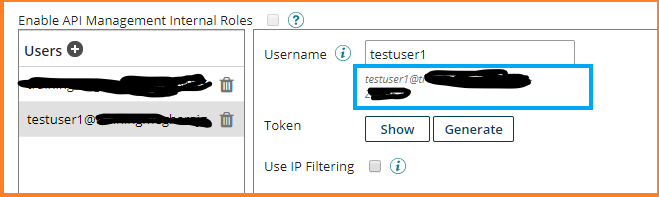
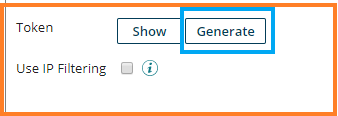
5. Generate a token by clicking Generate. Copy the generated token and save it in a text editor to be used later. Click Save.
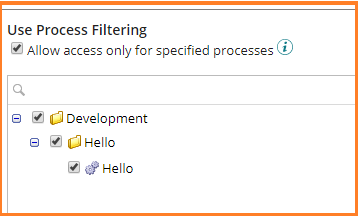
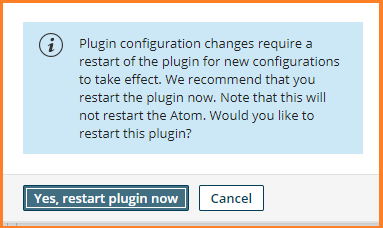
6. Check the checkbox for Allow access only for specified processes and Check the Hello process.
7. Click Save. A plugin restart window appears. Click Yes, restart plugin now.
Build a HelloClient to test Hello service.
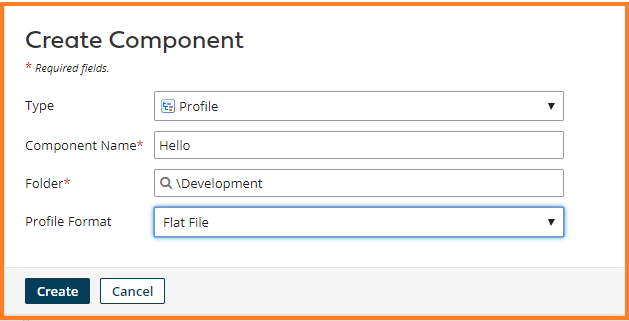
1.Create a Flat File profile – Hello.
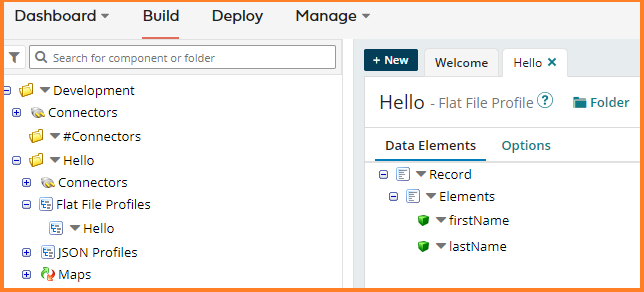
2. Add two Data Elements – firstName , lastName. Click Save and Close.
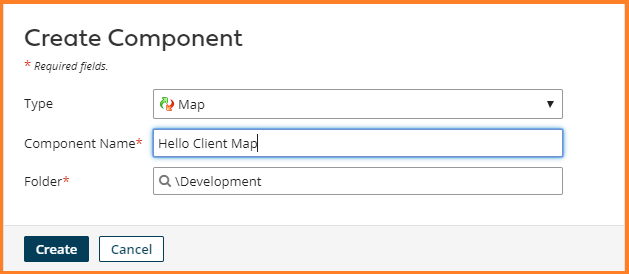
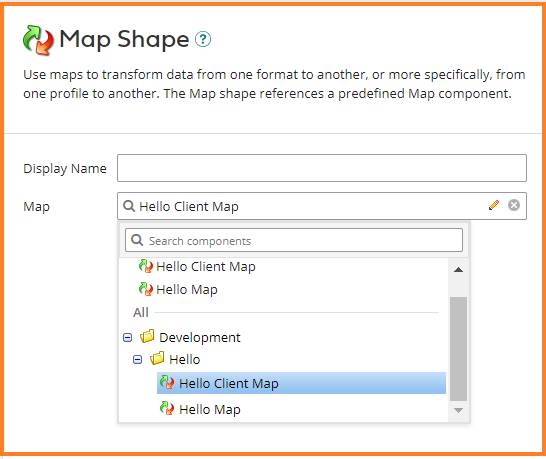
3. Create a Map – Hello Client Map. Click Create.
4. Choose Hello Flat File profile as source profile for the map. Click OK.

5. Choose Hello Input JSON profile as destination profile for the map. Click OK.

6. Map the fields firstName and lastName of Hello Flat File source profile to the firstName and lastName of the Hello Input JSON destination profile. Click Save and Close.

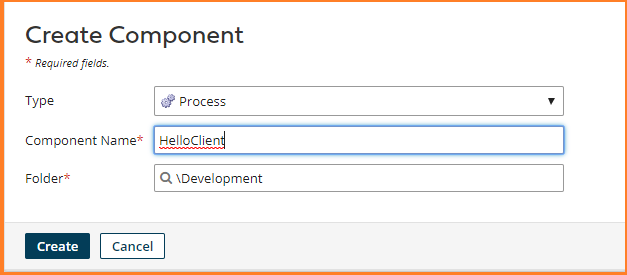
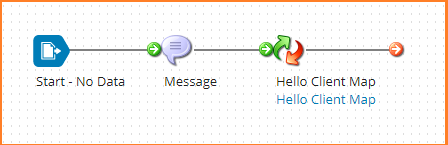
7. Create a new component of Process type and name it HelloClient.
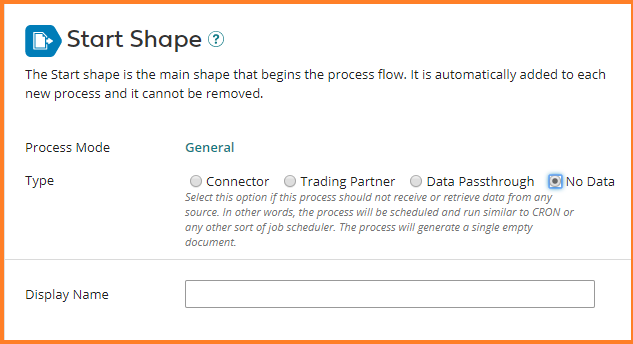
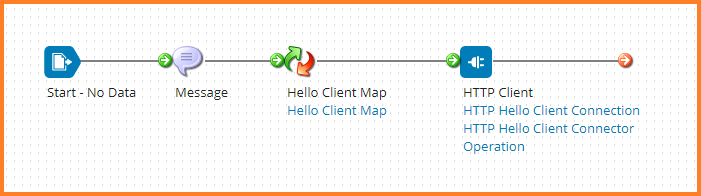
8. Choose No data type for the Start shape. Click OK.
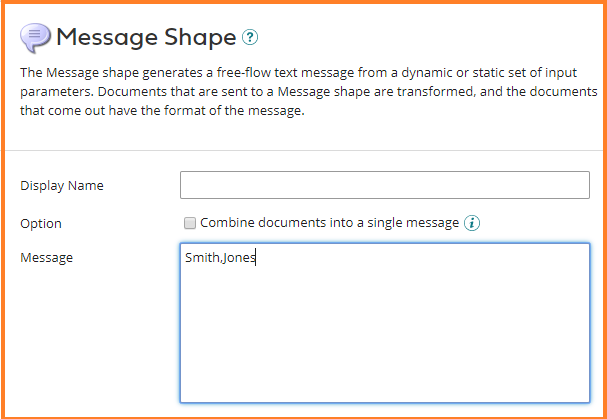
9. Drag Message shape onto the canvas. Enter Smith,Jones in the Message text area. Click OK.
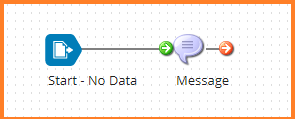
10. Connect Start shape to the Message shape.
11. Drag the Map shape onto the canvas and select Hello Client Map. Click OK.
12. Connect Message shape to the Map shape.
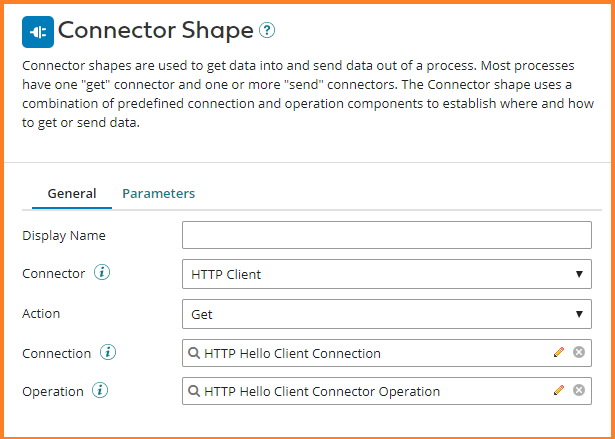
13. Drag the Http Client shape onto the canvas. Click ![]() on the Connection field to create a new Http Client connection.
on the Connection field to create a new Http Client connection.
Enter the following –
- Connection Name – HTTP Hello Client Connection.
- URL – http://199.212.254.19:9090 that was saved in a text editor in Enabling Basic Authentication section
- Authentication Type – Basic
- User Name – testuser1@xxxxxxxxxxx-XXXX that was saved in a text editor in the Enabling Basic Authentication section.
14. Click Encrypted to enter the token that was saved in the Enabling Basic Authentication section. Click Apply.

15. Click Save and Close.
16. Click ![]() on the Operation field to create a new Http Client Operation.
on the Operation field to create a new Http Client Operation.
Enter the following –
- Name – HTTP Hello Client Connector Operation
- Connector Action – GET.
- NOTE – Selecting SEND will not get back a response from the Hello service.
- Select Request Profile Type – JSON.
- Request Profile – Hello Input JSON Profile
- Select Response Profile Type – JSON.
- Response Profile – Hello Output JSON Profile.
- Content Type – application/json
- HTTP Method – POST
- Return HTTP Errors – Checked.
- Resource Path – Click on
 in the Resource Path and enter ws/simple/upsertHello. This value can be found in the Simple URL path from the Hello Operation. Refer step 28 of Build Hello Service.
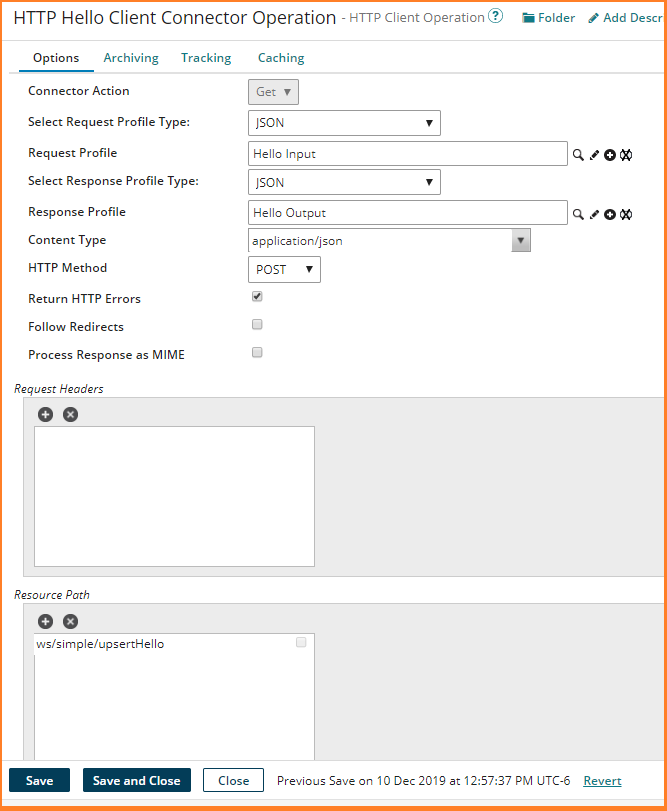
17. Click Save and Close.
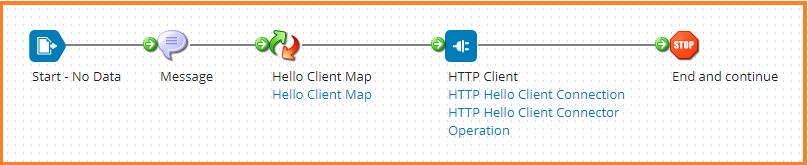
18. Click OK. Connect Map shape with the HTTP Client shape.
19. Drag Stop shape onto the canvas. Click OK. Connect HTTP Client shape to the Stop Shape.
Testing.
1. Click on Test.
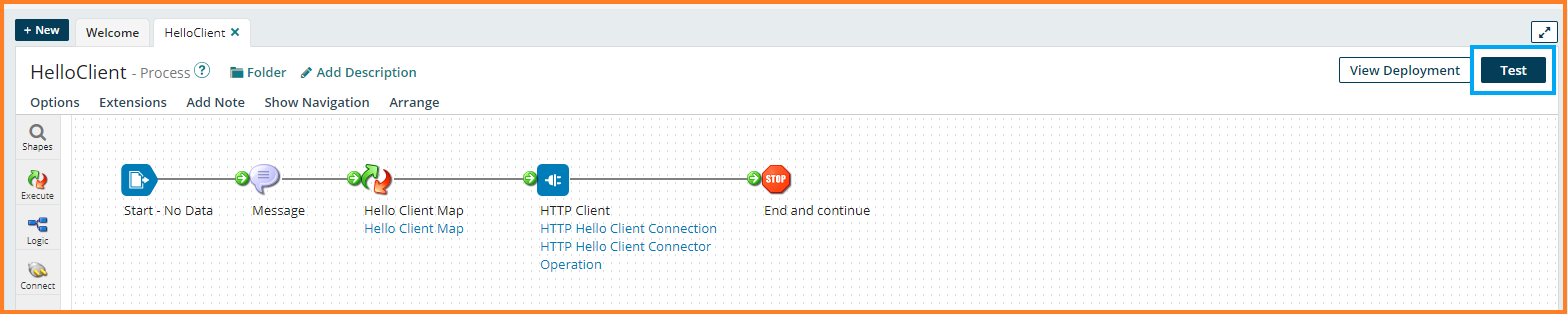
2. Select a local atom (Local_Atom_MG) that was used to deploy the Hello service. Click Run Test.

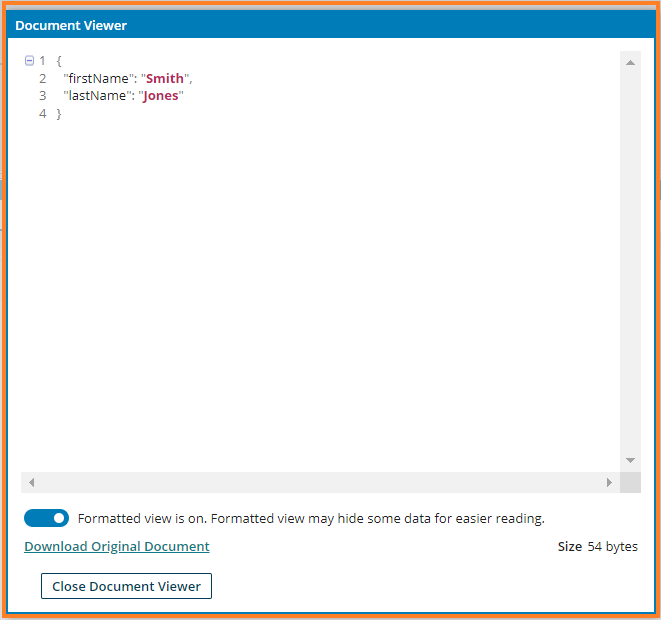
3. Click on the Http Client Shape once the test is completed. Click on the View Source under Shape Source Data.

4. A document viewer opens up showing the JSON request that was sent to the Hello Service. Verify the test data and click Close Document Viewer.
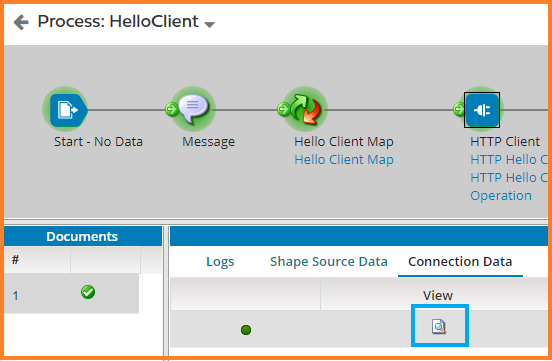
5. Click on View under the Connection Data.
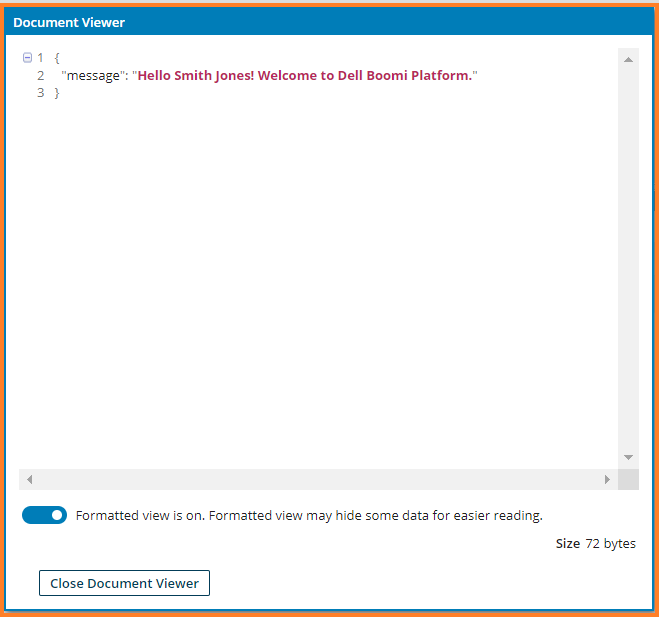
6. A Document Viewer opens up showing the JSON response that was received from the Hello Service. Verify the test data and click Close Document Viewer.
7. Click ![]() next to Process: HelloClient and select View Logs.
next to Process: HelloClient and select View Logs.
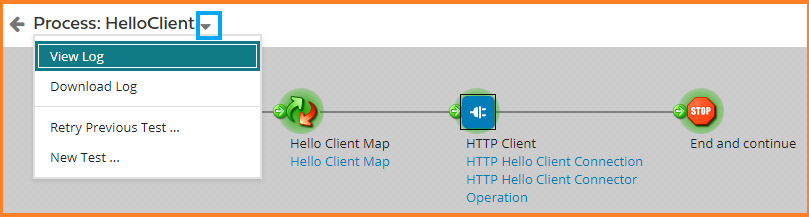
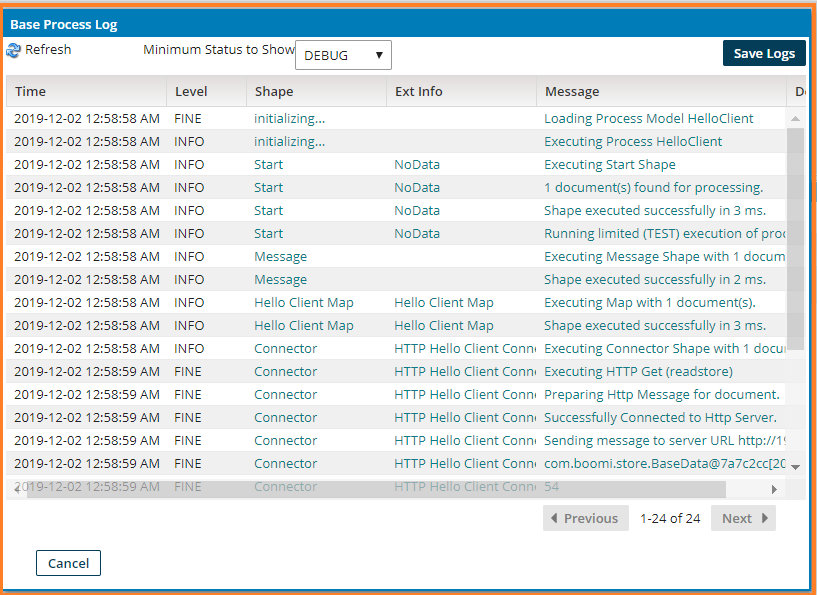
8. Base Process Log window opens up showing all the logs. Select individual messages to view the logs.
Summary
I hope you found this detailed step-by-step tutorial on creating a synchronous REST web service on the Boomi platform useful. Please share any feedback that you have via comments on this article.

Reference link: https://train.boomi.com